
Checklist for Meta Conversion Data Sync
Step-by-step checklist to set up and validate Meta Pixel and Conversions API, boost Event Match Quality, prevent double-counting, and monitor sync health.
Meta ad campaigns only work as well as the data you provide. If your conversion data sync breaks, you risk overspending on ads that underperform while missing chances to scale your best campaigns. This guide outlines how to ensure reliable data flow using Meta's Conversions API (CAPI) and Pixel.
Key Takeaways:
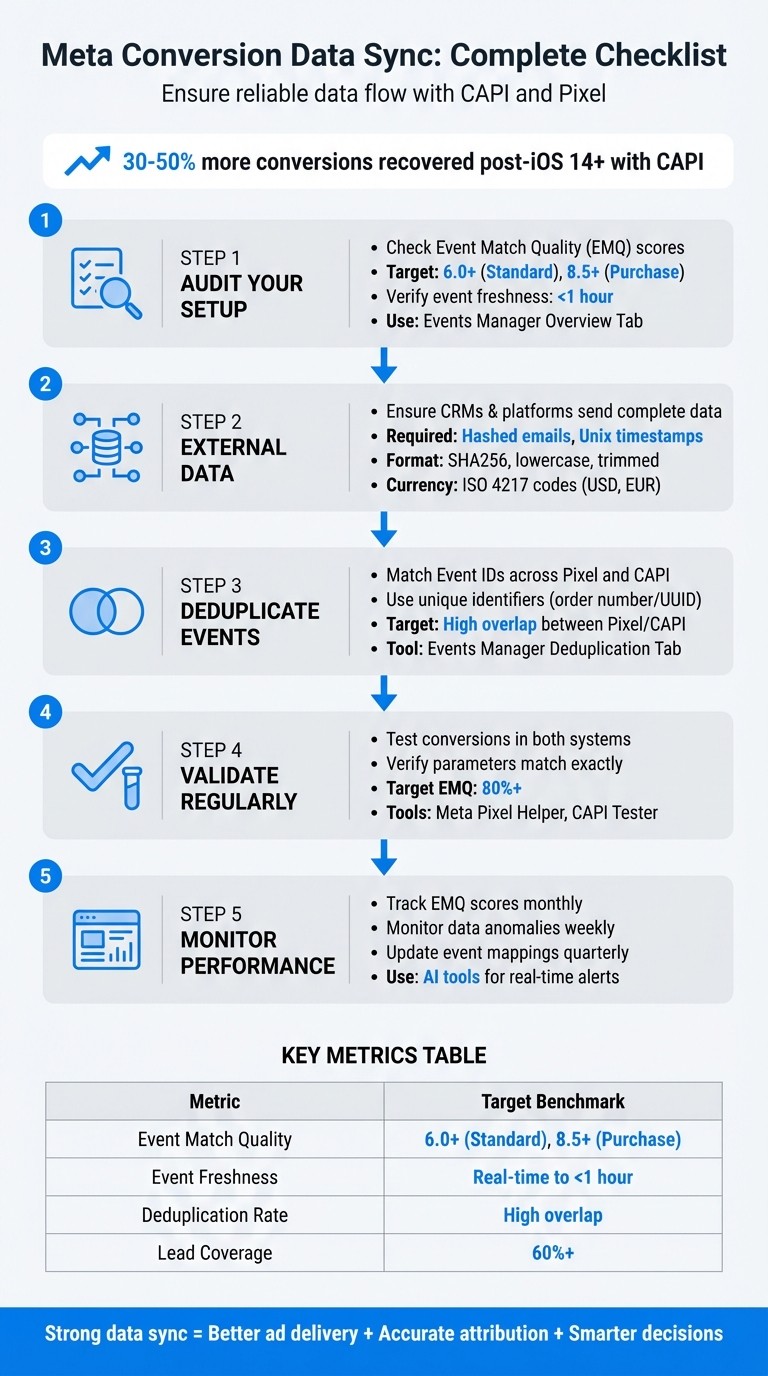
Why it matters: Advertisers using CAPI recover 30–50% more conversions post-iOS 14+, improving targeting and Return on Ad Spend (ROAS).
What’s at stake: A broken sync skews decisions across marketing, finance, and strategy. If Meta reports 120 purchases but your CRM shows 200, you're working with incomplete data.
How to fix it: Follow best practices for Meta Pixel data sync and a clear checklist for audits, event mapping, technical setup, validation, and monitoring.
Quick Overview:
Audit Your Setup: Check Meta Events Manager for Event Match Quality (EMQ) scores, missing parameters, and real-time data updates.
Align External Data: Ensure CRMs and platforms like Shopify or Stripe send complete, properly formatted data (hashed emails, Unix timestamps, etc.).
Deduplicate Events: Avoid inflated counts by matching Event IDs across Pixel and CAPI.
Validate Regularly: Use Meta's tools to test and confirm data accuracy.
Monitor Performance: Track EMQ scores and sync health monthly; adjust event mappings quarterly.
A strong data sync ensures better ad delivery, accurate attribution reporting, and smarter decisions. Let’s dive into the full checklist.
5-Step Meta Conversion Data Sync Checklist for CAPI and Pixel Setup
How to Set Up Meta CAPI with PixelYourSite + Tips to Boost EMQ Score

Pre-Sync Audit Checklist
Before syncing conversion data, it's crucial to address any misconfigurations or gaps in your data. A thorough pre-sync audit can help avoid issues that could negatively affect ad performance. Start by reviewing your Events Manager setup and auditing external data sources to identify potential gaps.
Verify Meta Events Manager Setup
Open Events Manager and assess your Event Match Quality (EMQ) scores. Standard events should score at least 6.0, while purchase events need to hit 8.5 or higher. Low scores often indicate missing user identifiers like hashed emails or phone numbers. If your EMQ falls short of these benchmarks, investigate common Meta Pixel errors to identify which customer data parameters are missing and update your pixel implementation to capture them.
Use the Meta Pixel Helper browser extension to confirm that the pixel is firing correctly on key pages - such as the homepage, product pages, checkout, and thank-you pages. Check that events update in real time (within an hour) using the Events Manager Overview Tab. If data is older than seven days, it won't sync properly with Meta's systems and could lead to attribution gaps.
Once your Meta Events setup is verified, ensure external data sources align with these standards.
Audit External Data Sources
Review your external systems, including CRM platforms (e.g., HubSpot, Salesforce), e-commerce platforms (e.g., Shopify), and payment processors like Stripe. Confirm these systems capture the following required fields: event name, value, timestamp, and hashed user data (email, phone). Timestamps should be formatted as Unix timestamps in seconds, and currency values should use ISO 4217 three-letter codes (e.g., USD).
Ensure personally identifiable information is standardized - lowercase, trimmed, and hashed using SHA256 before transmission. Technical parameters like IP addresses and user agents should remain in their raw form.
Identify Data Discrepancies
Create a simple spreadsheet with columns for Platform, Event Name, Platform Count, Actual Count, Gap %, and Priority. Compare conversion counts from Meta to your internal business metrics, such as CRM lead counts, Shopify orders, or Stripe transactions. For example, if Meta shows 120 purchases but your payment processor records 200, you’re experiencing a 40% data loss. Common causes include ad blockers, missing event parameters, or events firing on incorrect pages.
Run a test conversion and confirm it appears in both your attribution platform and Events Manager with matching timestamps and parameters.
Confirm Deduplication Readiness
If you're using both browser pixel and server-side CAPI (Conversions API), ensure proper deduplication to avoid inflated conversion counts. Each event should include a unique event_id, such as an order number or UUID, that matches across both browser and server-side events. Use the Events Manager Deduplication Tab to check for high overlap between Pixel and CAPI events. Without this setup, your conversion data may be inaccurate, leading to common attribution issues and misleading cost-per-acquisition metrics.
Metric | Target Benchmark | Tool for Validation |
|---|---|---|
Event Match Quality (EMQ) | 6.0+ (Standard), 8.5+ (Purchase) | Events Manager Overview Tab |
Event Freshness | Real-time to < 1 hour | Events Manager Freshness Tab |
Deduplication Rate | High overlap between Pixel/CAPI | Events Manager Deduplication Tab |
Lead Coverage | 60% or higher | Events Manager (CRM Dataset) |
Event Mapping and Standardization Checklist
To ensure Meta accurately interprets your conversion signals to improve retargeting performance, it's crucial to map events to conversion goals using Meta's standard names. This consistency is essential when working with both Pixel and CAPI.
Start by aligning your source system events with Meta's predefined event names like Purchase, Lead, CompleteRegistration, AddToCart, or ViewContent. For example, map a "Lead Qualified" event from your CRM to Lead, or an "Order Confirmed" event from your e-commerce platform to Purchase.
Each event should include key parameters:
event_name: The standard name of the event.
event_time: A Unix timestamp in seconds.
event_id: A unique identifier for deduplication.
action_source: Indicates the event's origin (e.g., "website", "app", or "system_generated").
For commerce-related events, also include:
value: A numeric representation of the transaction amount (e.g., 142.52).
currency: Use ISO 4217 three-letter codes like USD or EUR.
Always use Unix epoch timestamps in seconds (UTC) and ensure the action_source matches across Pixel and CAPI to prevent duplication issues [5–7].
Handling Personally Identifiable Information (PII)
When processing PII, follow these guidelines:
Hash sensitive data: Use SHA256 to hash emails (convert to lowercase and trim whitespace), phone numbers (remove non-numeric characters except the country code), and first and last names.
Leave technical identifiers raw: Data such as IP addresses, user agent strings, and Meta cookies (fbc, fbp) should remain unhashed.
Maintain a centralized mapping document to align your source fields (e.g., contact_email) with Meta's standard parameters (e.g., em). This document will serve as a reference for your team during audits or updates.
Validating Your Mappings
Before deploying your setup, use Meta's Test Events tool in Events Manager. Send test conversions and verify that they appear with the correct event name, timestamp, hashed user data, and value. If your match quality scores fall below 60%, try adding more customer data parameters, like hashed first and last names, to improve scores. Aim for match quality scores above 80%.
Source System Field | Meta Standard Parameter | Hash? | Category |
|---|---|---|---|
|
| Yes (SHA256) | Customer Information |
|
| No | Custom Data |
|
| No | Custom Data |
|
| No | Customer Information |
|
| No | Custom Data |
|
| No | Customer Information |
Once your events are standardized, you're ready to move on to setting up the technical aspects for seamless data synchronization. This includes following a Meta Ads API key setup guide to ensure secure and reliable connectivity. This foundation is essential for scaling Meta ads with real-time API updates to drive better campaign results.
Technical Setup Checklist
Once your events are mapped and standardized, it’s time to configure the technical infrastructure that drives server-side conversion tracking. This step ensures your data sources connect seamlessly to Meta's Conversions API, creating a reliable flow of conversion data. This setup is essential for accurate attribution and optimizing ad delivery.
Authorize Meta's Conversions API
Start by generating an access token in Meta Events Manager through Business Manager. Make sure you have permissions for Ads Management and Ads Read. You’ll need two key pieces of information: your pixel ID (available in Events Manager) and the access token. These credentials are required to authenticate your server-side integration tool or attribution platform, enabling server-side event delivery that bypasses browser blockers.
For production environments, it’s best to use a System User Token. This token is renewable and supports automated server connections, making it a reliable choice for ongoing operations.
Connect Data Sources to Server-Side Delivery
In your platform’s sync settings, activate Meta Conversions. From there, select your ad account and dataset, then map your events using hashed identifiers. This configuration allows you to import historical data within 15-30 minutes and ensures that events are sent server-side.
For detailed instructions on testing and validating your setup, check out the Meta Ads conversion optimization checklist.
Choose Sync Frequency
Decide between real-time and batched sync options based on your campaign needs and server resources.
Real-time sync sends immediate signals to Meta’s ad optimization algorithms, allowing for quick adjustments based on performance data. However, it requires more server resources.
Batched sync processes events every few minutes or hours, which is better for handling large event volumes efficiently but introduces a slight delay in attribution signals.
Sync Frequency | Best Use Case | Impact on Attribution |
|---|---|---|
Real-time | Low-to-medium volume, fast optimization | Immediate signal for ad delivery |
Batched (minutes/hours) | High volume, resource efficiency | Slight delay in attribution data |
Choosing the right sync frequency ensures your campaigns balance speed and efficiency.
Use Automation Tools Like AdAmigo.ai

After completing the technical setup, consider automating ongoing improvements with tools like AdAmigo.ai. This platform continuously audits your Meta ad account, identifies areas for improvement based on conversion data, and implements changes - either with your approval or autonomously. Its AI Actions feature provides a daily, prioritized to-do list, suggesting adjustments to creatives, audiences, budgets, and bids. By automating these tasks, you can focus on strategy while ensuring compliance with sync protocols and optimizing your system as a connected workflow.
Testing and Validation Checklist
Once you've completed the setup, give Meta up to 24 hours to process events. Afterward, it's time to verify that your entire conversion pipeline - from the trigger event to the Meta Events Manager - is functioning as intended. This step ensures the technical setup to standardize conversion data is working correctly.
Start by triggering a test conversion. For example, complete a purchase or lead form using a designated test email. Track this event through your data pipeline and confirm it appears in your attribution platform with the correct campaign assignment. Then, head over to Meta Events Manager, filter by the test email, event name, and timestamp, and double-check that all parameters (such as value, currency, and customer data) match exactly as expected.
Log any discrepancies in a spreadsheet. Include columns like Platform, Event Name, Reported Count, Actual Count, Gap %, and Priority. This comparison helps pinpoint issues like data loss or duplication using a Meta conversion data sync debugging guide. Your Event Match Quality (EMQ) score should be above 80% for reliable attribution. If it's under 60%, you’ll need to pass additional hashed customer identifiers like email addresses or phone numbers.
To test deduplication, send the same event through both the Pixel (browser) and CAPI (server). Each event should carry the same Event ID, as previously configured. If you see two separate entries in the Events Manager instead of one deduplicated record, there’s likely an issue with your ID logic. Use tools like the Meta Pixel Helper to find duplicate IDs and the CAPI Tester to check JSON structure and identifier consistency.
Be on the lookout for common validation errors. Missing purchase values often result from misconfigured Google Tag Manager variables, while invalid currency codes (e.g., "usd" instead of "USD") can cause events to be rejected. If Events Manager flags any errors, review the details - issues often stem from problems like incorrect ISO 8601 timestamp formatting or missing required match fields. Once one test event is successfully validated, repeat the process for other event types like Purchase, Lead, and AddToCart to ensure full coverage.
Finally, navigate to Events Manager > Data Sources, and select "Review" for any flagged custom events. Acknowledge these to finalize the setup. This step clears any pending warnings and confirms that Meta recognizes your new data stream. Once validation is complete, you can move on to monitoring your data quality over time.
Ongoing Monitoring and Optimization
Once you've set up and validated your data processes, the work doesn’t stop there. Keeping your data accurate over time requires regular monitoring and fine-tuning.
Review Monthly Match Quality Scores
Your Event Match Quality (EMQ) score is a key metric that needs consistent attention. To check it, head to the Events Manager and look under the Overview tab for each event. Meta suggests maintaining an EMQ of at least 6.0 for reliable outcomes, with Purchase events ideally scoring 8.5 or higher.
Look at the customer information parameters being sent - hashed email, phone number, IP address, and zip code all play a role in boosting your score. If your EMQ dips below 6.0, inspect the Diagnostics tab for any missing or rejected data. Also, make sure your fbp and fbc cookies are refreshed regularly, as outdated cookies can lower match rates over time.
Monitor for Data Anomalies
Be on the lookout for unexpected drops in conversion numbers or inconsistencies between Events Manager and your internal metrics, such as GA4 data. Conduct weekly checks to catch problems early before they impact your ad spend. Compare your key metrics to industry benchmarks: keep EMQ above 6.0, ensure event freshness is within one hour, and aim for high overlap in deduplication rates between Pixel and CAPI.
If something seems off, double-check that the event_name and event_id match exactly across both browser and server events. Use tools like Test Events and Payload Helper to confirm that all required parameters are reaching Meta from server-side events. Don’t forget to verify that currency codes are in uppercase (e.g., USD). These checks, while routine, are critical to maintaining accurate data synchronization.
Update Event Mappings Quarterly
As your business evolves, your event mappings should, too. Plan to review and update these mappings every quarter to reflect new products, services, or shifts in your customer journey.
Make sure key event data - like event_name, event_time, event_id, and action_source - is formatted correctly. User identifiers such as em, ph, fn, ln, ct, st, zp, and country must be hashed with SHA256, converted to lowercase, trimmed, and free of symbols. For commerce data, fields like value, currency, content_ids, and order_id should follow numeric standards and ISO 4217 currency codes.
Use AI Tools for Insights
AI tools like AdAmigo.ai can simplify these processes even further. For instance, the AI Chat Agent can answer questions like, "Why did my conversion count drop yesterday?" with quick, data-backed responses. AdAmigo Protect offers continuous monitoring, flagging unusual activity or delivery issues before they escalate into costly problems. With real-time alerts and performance insights, these tools let you stay focused on strategy while ensuring your data sync and account health remain on track.
Conclusion
Meta conversion data sync plays a key role in boosting ad performance. By combining server-side tracking through the Conversions API with your Meta Pixel, you can recover a substantial amount of data that might otherwise be lost due to ad blockers and privacy measures. This additional data helps Meta's algorithm optimize your campaigns more effectively, allowing you to connect with higher-value customers and minimize wasted ad spend.
The checklist provided earlier - covering steps like testing Meta conversion events and auditing Events Manager and maintaining an Event Match Quality score above 80% - ensures precise attribution across devices, avoids double-counting, and identifies potential pixel issues early on. A strong Event Match Quality score (over 80%) equips Meta's algorithm with reliable data, which translates into better campaign results.
Managing these processes manually can be a daunting task. That’s where automation tools like AdAmigo.ai come in. Features such as AdAmigo Protect for real-time anomaly detection and the Chat Agent for AI-driven insights simplify the process. The platform also automates deduplication and monitors sync health, ensuring your data remains accurate and actionable while you focus on broader strategy.
As privacy regulations tighten and third-party cookies become a thing of the past, server-side tracking has become indispensable. By sticking to the checklist outlined in this guide and leveraging the right tools, you can create a conversion tracking system that doesn’t just maintain performance but enhances it over time - without constant manual intervention. Consistency in applying these practices will keep your ad strategy running smoothly and effectively.
FAQs
Why don’t my Meta purchases match Shopify or Stripe?
Meta purchases might not align with Shopify or Stripe data due to challenges like delayed events, missing parameters, or deduplication errors, all of which can impact attribution accuracy. To address this, review your Pixel and Conversions API setup, ensuring everything is configured correctly. Check the freshness of your events and monitor your Event Match Quality (EMQ) scores for any inconsistencies. Tools like Events Manager and Test Events can help you identify and resolve issues, improving the consistency of your data. Proper synchronization is key to ensuring your platforms align more effectively.
What EMQ score should I aim for on Purchase events?
To improve your campaign results, aim for an EMQ (Event Match Quality) score of 6.0 or higher on Purchase events. A higher EMQ score ensures more accurate event matching, which plays a key role in optimizing ad performance.
How do I stop Pixel and CAPI from double-counting?
To avoid double-counting between Pixel and Conversions API (CAPI), focus on proper deduplication. Use parameters like event_name, event_time, and user_data to align events. Standardize your event IDs and hashed user data, ensuring event IDs and timestamps match precisely. Keep an eye on Event Match Quality (EMQ) scores and leverage Meta's debugging tools, such as Payload Helper and Event Manager, to confirm your setup and address any duplication problems.