
How to Test Meta Conversion Events
Step-by-step guide to testing Meta conversion events: verify Pixel and Conversions API, check parameters and deduplication, and maintain accurate tracking.
Meta conversion events are essential for tracking actions like purchases or sign-ups, helping Meta's ad algorithm optimize campaigns effectively. If your events are misconfigured or inaccurate, you risk wasting ad spend and distorting performance data. Here's how to ensure your events are set up and tested properly:
Key Steps to Testing Meta Conversion Events:
Understand Standard vs Custom Conversions:
Standard Events: Predefined actions like "Purchase" or "AddToCart."
Custom Events: Unique actions you define, requiring manual setup.
Custom Conversions: Rules applied to existing events for specific goals.
Use the Right Tools:
Meta Events Manager, Meta Pixel, Conversions API, and Meta Pixel Helper.
Google Tag Manager (GTM) for advanced setups.
Set Up a Testing Environment:
Start in a staging environment with a test pixel to avoid affecting live data.
Use Meta Events Manager’s Test Events tool to test Meta Pixel events and simulate user actions.
Verify Event Accuracy:
Check parameters like value, currency, and event deduplication between Pixel and API.
Ensure Event Match Quality (EMQ) scores are above 6.0 for better ad performance.
Troubleshoot Issues:
Missing events? Check Meta Pixel configuration and placement or API configuration and sync issues.
Duplicate events? Verify deduplication logic.
Incorrect parameters? Fix formatting or mapping errors in GTM or server code.
Maintain Accuracy:
Re-test events after site updates or tracking changes.
Conduct monthly audits to ensure data integrity.
Why It Matters: Accurate event tracking ensures Meta’s algorithm optimizes for the right actions, improving ad performance and Return on Ad Spend (ROAS). Testing and monitoring your setup regularly is crucial to avoid permanent data errors.
How to Test Your Meta Pixel Browser Side Events in Meta (Facebook) Events Manager!
Setting Up Your Testing Environment
Getting your testing environment right is essential to safeguard live data and catch errors before launching campaigns. The first step? Choose the right data source for testing your events.
Selecting Your Pixel or Data Source
Head over to Meta Events Manager to locate your pixel. If you're using both the Meta Pixel and the Conversions API, keep in mind that the Pixel captures immediate user actions, while the Conversions API focuses on high-value server-side events.
Check the Event Match Quality (EMQ) score in Events Manager. This score, ranging from 1 to 10, measures how well server events are matched to Meta accounts. A higher score means better optimization for ad delivery. If you're testing server-side events, make sure you have your Pixel ID and a secure access token ready for use with the Conversions API Tester. Reviewing the EMQ score ensures your data is accurate before moving forward.
Staging vs. Production Testing
Start your testing in a staging environment, which mirrors your live site. Use GTM Preview mode and a separate "test" pixel in Meta Events Manager to confirm that triggers work correctly without affecting live data. This step is critical for catching issues early, protecting your live reporting.
As Felix Eve from Stack Overflow advises:
"We recommend setting up separate source for each environment. That way you can either point events to test conversion pixels in Facebook Conversion Tracking or turn off Facebook Conversion Tracking completely in non-production environments."
– Felix Eve, Stack Overflow
Once the staging tests are complete, move to production testing with Meta Events Manager's Test Events tool. Use this tool to filter out personal activity and ensure your setup is accurate. Remember, Meta event data can't be retroactively corrected, so catching errors in staging is key to maintaining clean reporting.
Identifying Key Events in Your Funnel
With your environment ready, focus on identifying the events that are crucial to your funnel's success. For e-commerce, these typically include ViewContent, AddToCart, InitiateCheckout, and Purchase. For lead generation, focus on Lead and CompleteRegistration. Be sure to document the key parameters for each event (like value in USD) to measure your ROAS effectively. If you're tracking high-value conversions - such as purchases above a specific threshold - create a custom conversion with defined rules to isolate and optimize those transactions.
Testing Events in Meta Events Manager
Once your setup is ready, it’s time to ensure your conversion events are firing correctly. Meta Events Manager’s Test Events tool gives you a live view of each event as it occurs, allowing you to identify and fix issues before they impact your campaigns.
Using the Test Events Feature
To get started, head to Meta Events Manager, choose your Data Source (such as your Pixel or Dataset), and click on the Test Events tab. For website events, input the URL of the page you want to test and click Open Website. Open that URL, perform the desired actions - like clicking "Add to Cart" or submitting a form - and watch as the events appear in real time on the left-hand side.
For server events via the Conversions API, the process is slightly different. You’ll need to use the unique test_event_code provided by the tool. Add this code to your server payload; without it, those server events won’t show up in the Test Events window. Once the code is added, trigger the conversion on your site and monitor the events as they stream in. Be sure to remove the test_event_code before launching your campaigns to avoid skewing your data.
Checking Event Parameters and Accuracy
After confirming that events are being received, it’s crucial to check the accuracy of the event details. Expand any event to review key parameters like event_id, value, currency, content_ids, and any custom data. The Connection Method column will indicate whether the event was triggered by the browser (Pixel) or your server (Conversions API). Pay special attention to high-priority parameters, such as the value in USD, which is essential for tracking ROAS.
To ensure deduplication, confirm that events sent via both Pixel and CAPI share the same event_name and event_id. Also, check that the EMQ (Event Match Quality) score is at least 6.0 for accurate attribution.
Filtering and Retesting Events
Once you’ve verified the parameters, you can filter specific events to simplify your view. Use the dropdown menu on the right side of the Test Events window to sort events by type - standard, custom conversions, or automatic. This helps you focus on specific stages of the funnel without unnecessary distractions. Before testing a new sequence, click Clear Activity to reset the feed, ensuring that only current session events are displayed rather than any cached data.
If an event doesn’t appear or its parameters seem incorrect, retest immediately. Trigger the action again, review the event details, and double-check the payload. Meta advises that events should be received within 20 minutes of being sent to maintain data freshness. Addressing these issues during testing ensures your campaigns launch with accurate tracking, avoiding problems that can’t be fixed after the fact. These steps are essential for resolving any tracking challenges covered in the next section.
Fixing Common Event Tracking Problems
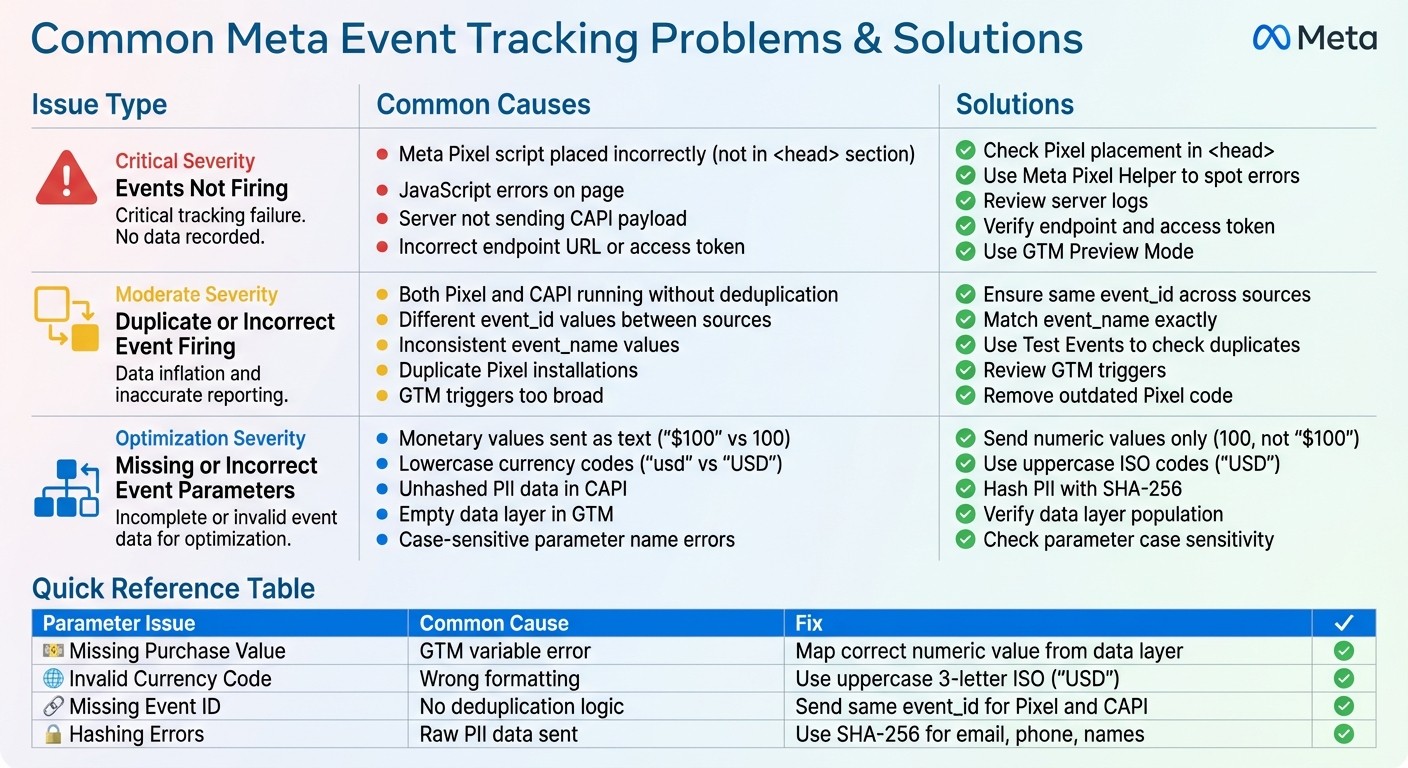
Common Meta Event Tracking Issues and Solutions
When testing your events, you might encounter certain tracking hiccups. Here’s a look at some frequent issues and how to address them effectively.
Events Not Firing
If an event isn’t showing up in Test Events, the first step is to check if you have found and installed the Meta Pixel script correctly in the <head> section of your site. Avoid placing it in the footer. Use the Meta Pixel Helper to spot any errors, and open your browser’s Developer Console to identify potential JavaScript problems.
For issues with Conversions API events, ensure your server is actually sending the event payload. Check your server logs and confirm the endpoint URL and access token are correct. According to Meta’s documentation, "The Conversions API allows you to share website events that the Pixel may lose due to network connectivity issues or page loading errors". However, this only works if the server integration is properly configured. Use GTM Preview Mode to confirm that your tags are triggering as intended.
Duplicate or Incorrect Event Firing
Duplicate events often occur when both the Meta Pixel and Conversions API are running without proper deduplication. ensure both sources standardize conversion data by sending the same event_id and matching the event_name exactly. Use Test Events to check if a single action triggers the same event twice. The Meta Pixel Helper can also flag duplicate Pixel installations directly in your browser.
It’s also crucial that event_name values are consistent. For example, both sources should use "Purchase" instead of one using "Purchase" and the other "Transaction." If you’re using Google Tag Manager, review your triggers to make sure they aren’t too broad or firing on unintended pages. Remove any outdated or duplicate Pixel code from your site’s header or footer to avoid inflated event counts.
Missing or Incorrect Event Parameters
Even when events are firing, missing or incorrectly formatted parameters can disrupt optimization efforts. Use Test Events to review key parameters like event_id, value, currency, and content_ids. Common mistakes include sending monetary values as text (e.g., "$100" instead of 100), using lowercase currency codes ("usd" instead of "USD"), or failing to hash customer data like email or phone numbers before sending them through CAPI.
Parameter Issue | Common Cause | Fix/Solution |
|---|---|---|
Missing Purchase Value | Incomplete event code or GTM variable error | Map the correct numeric value from the data layer. |
Invalid Currency Code | Incorrect formatting (e.g., "usd" or "$") | Use uppercase three-letter ISO codes (e.g., "USD"). |
Missing Event ID | Deduplication logic not implemented | Ensure both Pixel and CAPI send the same |
Hashing Errors | Sending raw PII data via CAPI | Use SHA-256 hashing for sensitive data like email, phone, and names. |
If you’re using Google Tag Manager, double-check that your data layer is properly populated before the tag fires. For CAPI, make sure required parameters like action_source, event_source_url, and client_user_agent are included for every website event. Keep in mind that parameter names are case-sensitive - for instance, "videoID" and "videoid" are treated as entirely different fields. Address these issues quickly to ensure your conversion data remains accurate and actionable.
Maintaining Accurate Event Tracking
Testing isn’t a one-and-done task - it's an ongoing process. Consistent monitoring is essential to catch and debug Meta Ads conversion tracking issues as they arise. Over time, conversion tracking can falter as your website evolves, integrations shift, or new campaigns roll out. And unfortunately, any historical discrepancies in your data can’t be undone. Regular upkeep ensures these issues don’t creep into decision-making.
When to Re-Test Your Events
You should re-test your events anytime there’s a site update that alters user flow. This includes things like redesigns, CMS migrations, plugin updates, or the addition of new tracking tools. If you’re introducing new conversion events or modifying existing ones - such as breaking down a single "Purchase" event into product-specific conversions - make sure to conduct a full round of testing before launching. Similarly, if you update your Conversions API setup (e.g., adjusting server endpoints, access tokens, or parameters), it’s critical to retest. Even small changes to your data layer or tag manager can disrupt event firing or parameter mapping. Regular audits, such as mapping GA4 events to Meta conversions, further help maintain data accuracy over time.
Running Regular Event Audits
Aside from immediate checks after changes, it's smart to schedule monthly audits to keep everything running smoothly. Tools like Test Events and the Meta Pixel Helper can help you evaluate your setup. In Events Manager, pay attention to your Event Match Quality (EMQ) score - aim for at least 6.0, but ideally hit 10/10 for the best attribution accuracy and ad performance. Make sure your Pixel and Conversions API events share the same event_name and event_id values, and work toward a 75% event coverage ratio between Conversions API and Pixel events to maximize performance. Also, check the "Overlap" metric to spot any problems with deduplication keys. Lastly, verify that events are being sent to Meta in real-time or close to it, as delays can interfere with algorithm optimization.
Using AdAmigo.ai for Campaign Optimization
Once your event tracking is validated, you can take things a step further with AdAmigo.ai. This autonomous AI tool helps optimize your campaigns by refining creatives, targeting, and budgets based on your conversion data. One standout feature is AI Actions, which provides a daily, prioritized to-do list of impactful tweaks - like testing new ad variations or refining audience segments. By combining optimized event tracking with AdAmigo.ai’s automation, you can turn accurate conversion data into measurable performance improvements. This is especially helpful for agencies juggling multiple clients or in-house teams looking to boost efficiency without expanding their workforce.
Conclusion
Getting Meta conversion events right is essential for running campaigns that actually perform. If your tracking is off, you're making decisions based on bad data, which wastes money and limits your results. And since Meta doesn’t allow you to fix event data retroactively, any errors - like overcounted or mislabeled events - can permanently throw off your reporting and future strategy.
Key Steps for Testing Events
Start by setting up the right Pixel or data source and identifying and optimizing event rules for key events in your funnel. Then, use the Test Events feature in Events Manager to simulate user actions and confirm that events are firing correctly with the proper parameters. Troubleshooting common problems like events not firing, duplicates, or missing parameters is critical. Make sure the event_id is consistent across all sources. Aiming for an Event Match Quality (EMQ) score of 6.0 or higher can significantly improve ad attribution. When your tracking is clear and accurate, your campaigns benefit directly.
Why Accurate Event Tracking Matters
When your event tracking is accurate, Meta’s algorithm can zero in on high-value users, helping you optimize budgets and improve ROI. This precision also enables value-based optimization, so the system focuses on finding customers who bring the most value - not just driving up conversion numbers. For teams juggling multiple clients or scaling operations, tools like AdAmigo.ai can take things further. By leveraging clean event data, it uses AI to suggest daily, prioritized actions - like testing new ad creatives or fine-tuning audience segments. Combining reliable tracking with smart automation helps you grow faster without adding more team members or wasting money on trial and error.
FAQs
How can I test Meta conversion events in a staging environment?
To test Meta conversion events in a controlled staging environment, start by setting up a dedicated staging pixel in Events Manager. Install this pixel on your staging site, and use the Meta Pixel Helper to verify that it’s firing properly. Once installed, head to the Test Events tool in Events Manager to observe live event activity as you simulate actions like add-to-cart or purchase on your staging site.
If you’re using the Conversions API, check server-side events with the Conversions API Tester to confirm they align with browser-pixel events. Pay close attention to event parameters like value and currency to ensure they’re accurate, and double-check that deduplication IDs are consistent. Tools such as AdAmigo.ai can simplify this process by automating debugging and sending alerts if discrepancies arise during testing.
These steps will help you confirm that your Meta conversion events are working as intended before rolling out updates to your live campaigns.
What are common issues with Meta conversion events, and how can I fix them?
Meta conversion events often run into a few recurring problems. These include the event not firing at all, triggering on the wrong page (like a Purchase event activating on the "Add to Cart" button instead of the thank-you page), firing multiple times due to duplicate pixel placements or improper deduplication between the browser pixel and Conversions API, or sending incomplete or incorrect parameters such as the value or currency.
To address these issues, start by using Meta’s Test Events tool in Events Manager to ensure the event fires correctly on the intended URL. The Meta Pixel Helper browser extension is another handy tool to confirm that the pixel loads without errors and transmits the necessary parameters. If you're using the Conversions API, make sure to enable deduplication by assigning a unique event_id to each conversion event. Additionally, check the Event Details view for any missing or incorrect parameters, correct them, and retest until everything functions properly. For an easier workflow, tools like AdAmigo.ai can help by monitoring pixel health, detecting misfires or duplicates, and providing automatic suggestions for fixes.
Why is maintaining a high Event Match Quality (EMQ) score important?
Maintaining a strong Event Match Quality (EMQ) score is essential because it directly affects Meta's ability to connect your website or app events with the right users. A higher EMQ score means better data accuracy, which translates to improved ad targeting, sharper audience insights, and, ultimately, better campaign results.
When your event data is precise and properly matched, you can fine-tune your ad delivery, cut down on wasted ad spend, and boost your return on ad spend (ROAS). Focusing on achieving a high EMQ score ensures you get the most out of your Meta ad campaigns while staying competitive in a data-driven advertising landscape.