
Meta Pixel Debugging: Common Errors Explained
Fix Meta Pixel issues fast: installation, domain verification, event parameters, ad blockers, Conversions API and testing tools.
Fixing Meta Pixel issues is critical if you want accurate data for your ad campaigns. Common problems like incorrect installation, missing event parameters, or browser restrictions can disrupt tracking and hurt performance. Here's a quick breakdown of the key issues and how to resolve them:
Installation Errors: Pixel code must go in the
<head>section. Avoid duplicate installations (e.g., via Shopify and Google Tag Manager).Domain Verification: Unverified domains can lead to data mismatches. Verify your domain in Meta Business Manager.
Missing Parameters: Events like
Purchaseneedvalue,currency, andcontent_idsfor proper optimization.Browser Restrictions: Privacy settings and ad blockers can block pixel tracking. Use the Conversions API to send data server-side.
Debugging Tools: Use Meta Pixel Helper, Test Events, and your browser console to identify and fix errors.
How to Fix Meta Facebook Pixel Errors and Test Your Events
Why Your Meta Pixel Isn't Firing
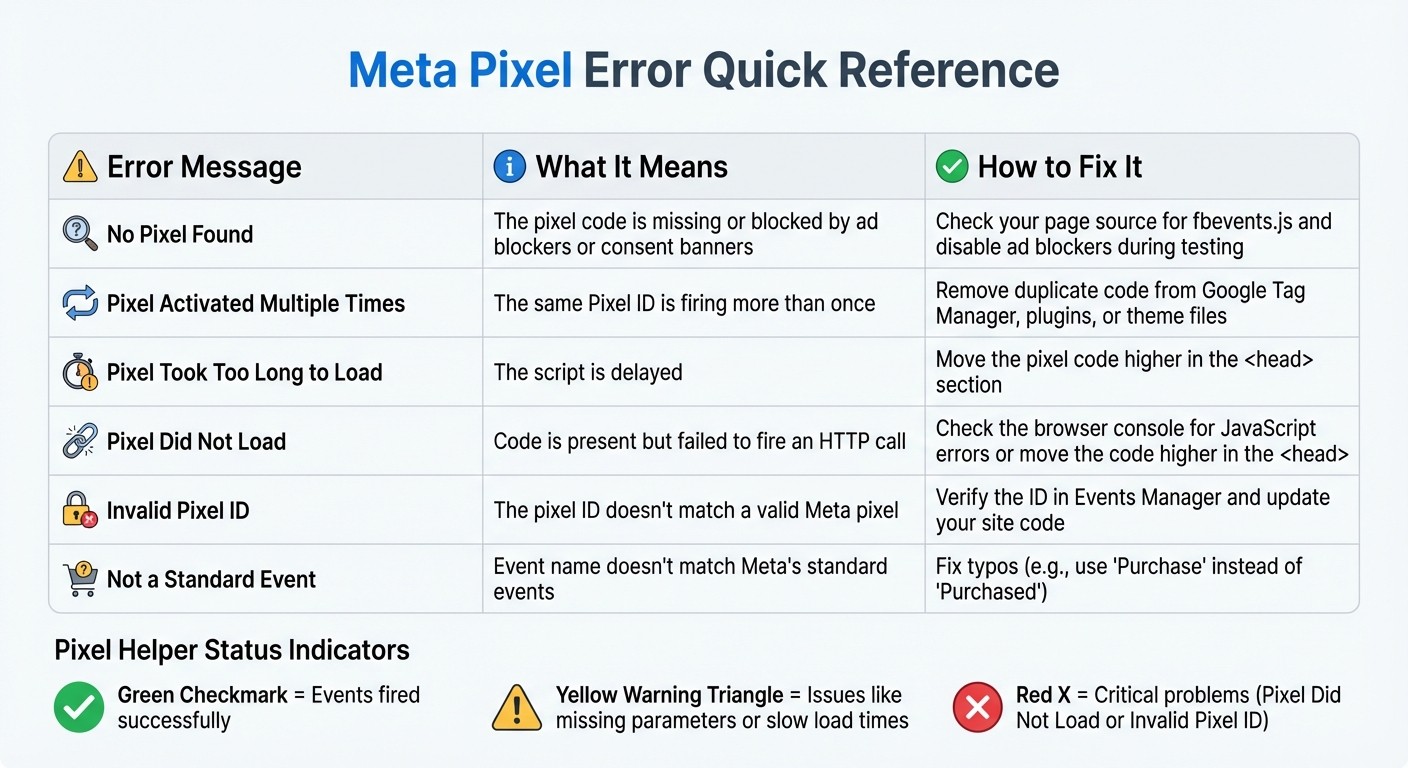
Meta Pixel Common Errors Quick Reference Guide
If the Pixel Helper icon is gray or Events Manager shows no activity, your Meta Pixel might not be firing. The most common reasons? Installation mistakes, domain verification gaps, and setup errors. Let’s break down these issues and how they can disrupt your pixel's performance.
Wrong Installation or Placement
Your pixel's base code needs to be placed inside the <head> section of your HTML, as close to the top as possible. If you place it in the <body> or footer, it delays execution, which can trigger a "Pixel Took Too Long to Load" warning and result in lost conversion data.
Another common issue is duplicate installations. This happens when the same Pixel ID is installed multiple times - like through a Shopify app, Google Tag Manager, and hardcoded theme files. If the Pixel Helper flags "Pixel Activated Multiple Times", it means duplicate code is inflating your event counts and skewing your reports. To fix this, check your page source for fbevents.js. If it appears more than once, remove the duplicates.
Here’s a quick guide to common errors and fixes:
Error Message | What It Means | How to Fix It |
|---|---|---|
No Pixel Found | The pixel code is missing or blocked by ad blockers or consent banners. | Check your page source for |
Pixel Activated Multiple Times | The same Pixel ID is firing more than once. | Remove duplicate code from Google Tag Manager, plugins, or theme files. |
Pixel Took Too Long to Load | The script is delayed. | Move the pixel code higher in the |
Once your installation is sorted, it’s time to verify your domain.
Domain Not Verified
If your domain isn’t verified in Meta Business Manager, your pixel might fire, but the events won’t be attributed properly. This can hurt your retargeting efforts and skew your return on ad spend (ROAS). An unverified domain often leads to "dataset ownership mismatches", where events fire in the browser but aren’t linked to your ad account.
To verify your domain, go to Business Manager → Brand Safety → Domains and look for a green "Verified" badge next to your primary domain. If it’s marked as "Pending" or missing, follow Meta’s instructions to verify it using a DNS TXT record or an HTML file upload. Also, double-check that the Pixel ID in your site’s code matches the one listed under the verified domain in Events Manager.
Next, let’s tackle common setup errors.
Common Setup Errors
Using an incorrect or inactive Pixel ID can trigger an "Invalid Pixel ID" error in the Pixel Helper. This often happens when the wrong ID is entered during setup.
CMS integration issues are another frequent culprit. Platforms like WordPress, Shopify, or Wix sometimes inject the pixel code incorrectly or conflict with manual installations. If you suspect this is the problem, disable the plugin temporarily and add the code manually to see if the issue resolves.
Permissions can also trip you up. If the user who installed the pixel doesn’t have "Manage Pixel" permissions in Business Manager, the pixel won’t function correctly - even if the code is installed. If a team member leaves or permissions are revoked, you’ll need to reassign or update access to get things working again.
Lastly, cookie consent banners can block the pixel from firing. If your site uses one of these tools, the Pixel Helper might show "Awaiting Consent", and the pixel won’t fire until the visitor clicks "Accept." To troubleshoot, test in Incognito mode and grant consent immediately to see if the pixel fires.
Fixing these pixel issues is essential for accurate tracking and better campaign performance.
Fixing Conversion Tracking Problems
Just because your pixel is firing correctly doesn’t mean your conversion tracking is working as it should. As Meta’s debugging guide points out: “firing isn’t the same as receiving.” Those green checkmarks in Pixel Helper? They don’t always mean your data is complete. The usual suspects behind incomplete conversion data include missing parameters, incorrect event sequencing, and browser-side interference. Now that installation issues are resolved, it’s time to ensure your conversion events are being tracked properly.
Missing or Incorrect Event Parameters: Double-check your event data for accuracy
If a "Purchase" event fires but doesn’t include key parameters like value, currency, or content_ids, it might appear in Pixel Helper, but Meta won’t use it for optimization or accurate ROI reporting.
To catch these issues, head to the "Test Events" tab in Events Manager. Here, you can confirm whether parameters are being passed as dynamic variables (e.g., {{subtotal_price}}) rather than static text. If you spot placeholders like {{email}} or {{value}} instead of actual data, your CMS or tag manager isn’t resolving those variables correctly.
Also, remember that event names are case-sensitive. A small typo, such as using "addtocart" instead of "AddToCart", can trigger a "Not a Standard Event" error. This error stops Meta from using its optimization models. Always ensure you match Meta’s predefined standards for event names exactly.
Event Code Firing in the Wrong Order: Prioritize proper pixel initialization
The Meta base pixel code must load and initialize before any specific event codes (like Purchase or Lead) are triggered. If the pixel initializes too late or event codes fire too early, you risk losing conversion data.
This issue is especially common with fast-loading single-page applications. If your pixel is placed too low in your HTML (outside the <head> section), it may load too slowly. Meta’s Pixel Helper documentation warns: “If the pixel activates too late and the visitor navigates away before activation, actions may not be tracked.”
Make sure your pixel is firing on the correct pages and in the proper sequence to avoid these pitfalls.
Browser Restrictions and Ad Blockers: Overcome privacy controls that block pixel tracking
Privacy-focused browsers like Safari or Brave, along with ad blockers, can prevent the Meta Pixel from loading or sending data to Meta’s servers. In some cases, tracking requests are blocked entirely, and delays of up to 72 hours can occur.
To address this, consider implementing the Conversions API (CAPI). Unlike browser-based tracking, CAPI sends data server-side, bypassing browser restrictions altogether. Studies suggest that combining CAPI with the browser pixel can recover 15–25% of conversions that would otherwise be lost to ad blockers and iOS privacy restrictions. Just make sure to include a matching event_id for both browser and server events to avoid double-counting.
Next, focus on validating your pixel setup to ensure your tracking is reliable and complete. This step is critical for optimizing your campaigns and accurately measuring performance.
Tools for Testing Meta Pixel
After addressing installation and sequencing issues, it's time to confirm why use Meta Pixel and that it is working properly. Several tools can help you do just that. The Meta Pixel Helper shows what’s happening in your browser, Test Events reveals what Meta receives on its servers, and the browser console uncovers JavaScript errors that might quietly disrupt tracking. Together, these tools give you a complete view of your pixel’s data flow. Let’s break down how to use each one effectively.
Meta Pixel Helper
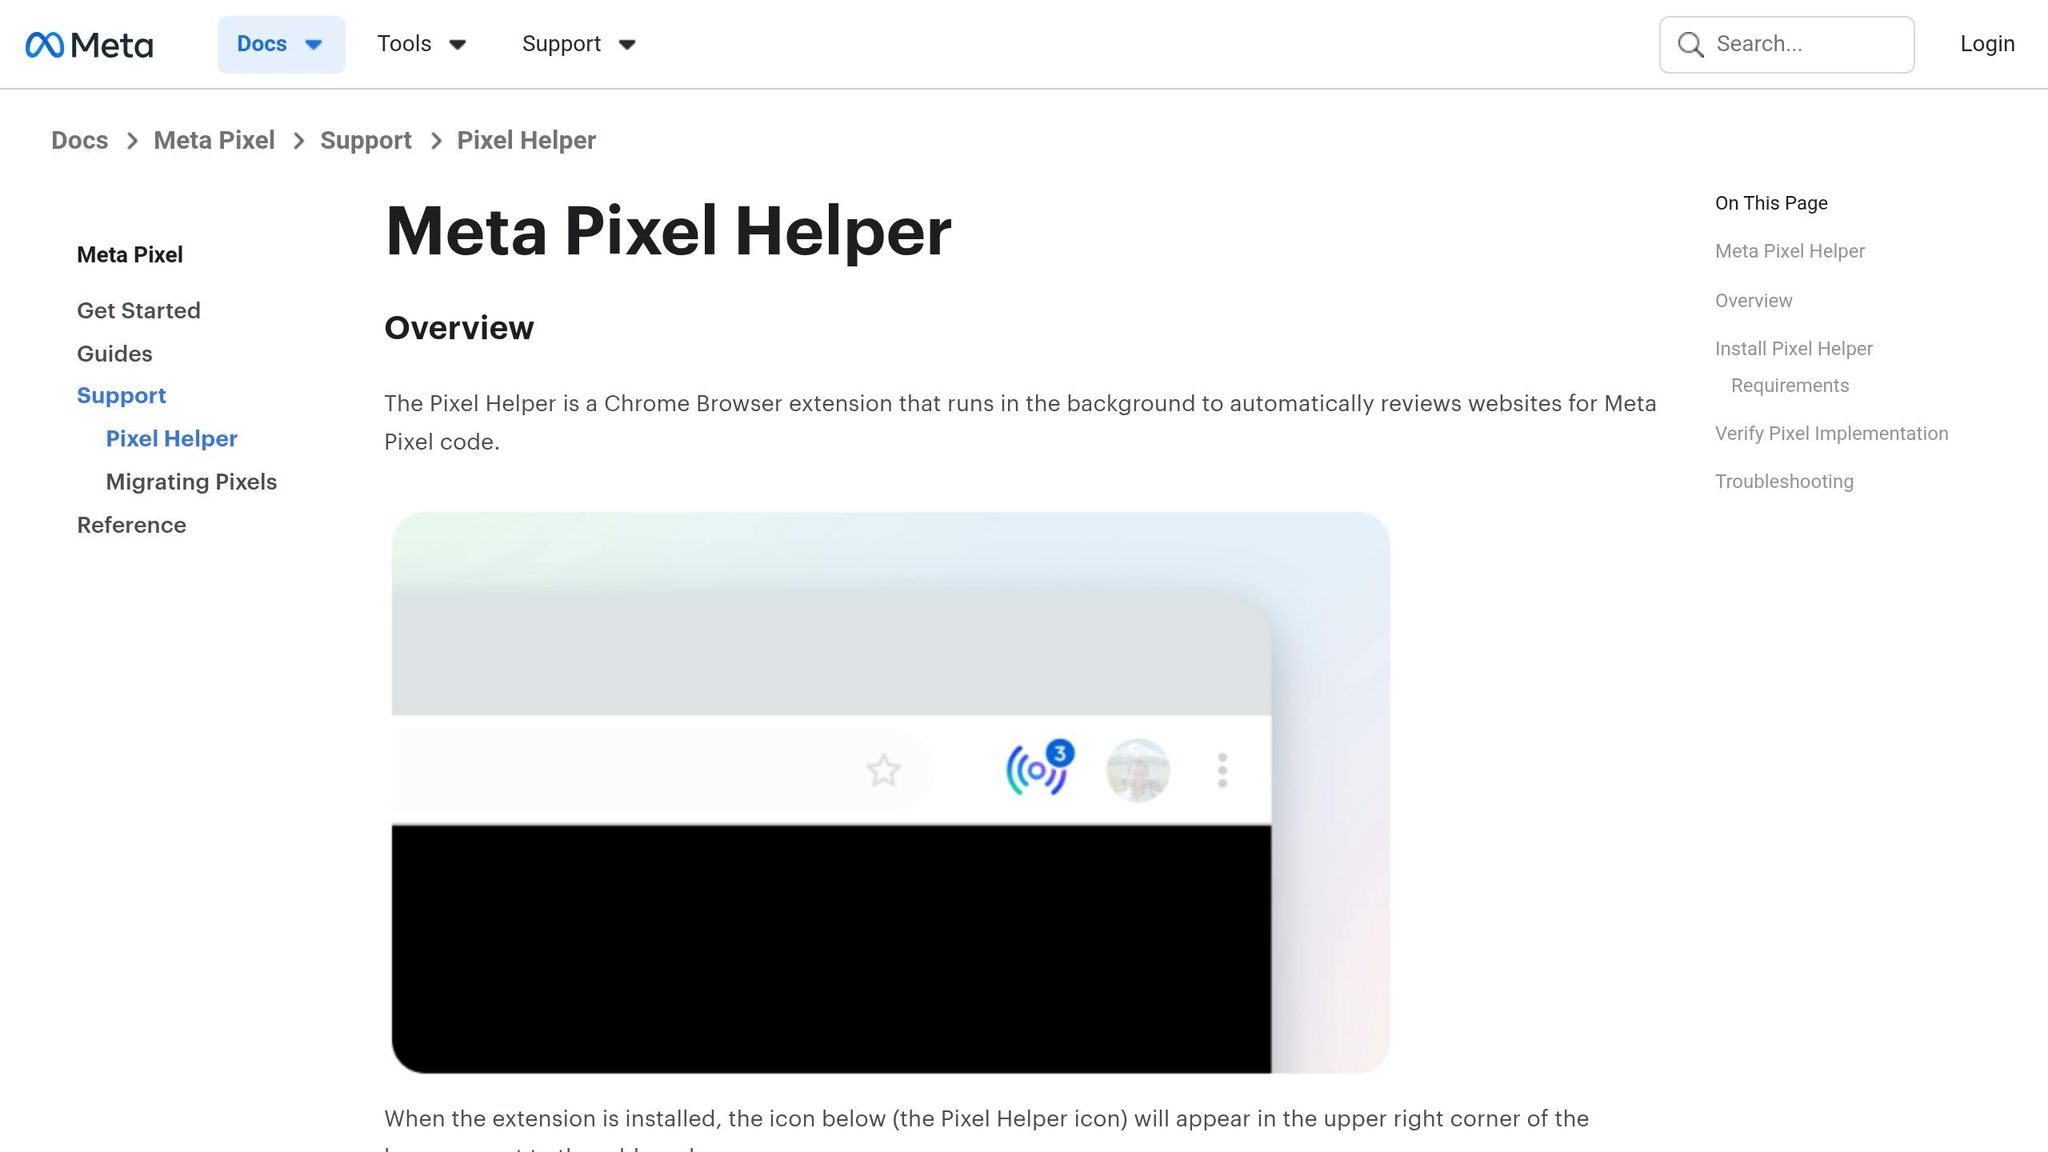
The Meta Pixel Helper is a free Chrome extension and your go-to tool for spotting pixel issues. It identifies the Meta Pixel library (fbevents.js) and provides real-time feedback on events and errors. When the extension detects a pixel, its icon turns blue, displaying a badge with the number of events fired on the page. Clicking the icon reveals important details like Pixel IDs, events (e.g., PageView, Purchase), and parameters.
Here’s what the tool’s indicators mean:
Green checkmarks: Events fired successfully.
Yellow warnings: Issues like missing parameters or slow load times.
Red errors: Critical problems, such as "Pixel Did Not Load" or "Invalid Pixel ID."
To get started, download the official Meta version of the extension to avoid fake copies. Then, test your pixel across key pages like the Homepage, Product, Cart, and Purchase pages. Don’t just rely on green checkmarks - dig deeper to ensure Advanced Matching data (like hashed emails) and commerce parameters are accurate.
Here’s a quick reference for common error messages and fixes:
Error Message | Meaning | Recommended Fix |
|---|---|---|
No Pixel Found | No pixel code detected on the page. | Check if the code is missing or blocked by a consent banner or ad blocker. |
Pixel Did Not Load | Code is present but failed to fire an HTTP call. | Check the browser console for JavaScript errors or move the code higher in the |
Pixel Activated Multiple Times | The same ID and event fired more than once. | Remove duplicate installations, such as both GTM and hardcoded theme code. |
Invalid Pixel ID | The pixel ID doesn’t match a valid Meta pixel. | Verify the ID in Events Manager and update your site code. |
Not a Standard Event | Event name doesn’t match Meta’s standard events. | Fix typos (e.g., use |
Keep in mind, this tool only validates browser-side events. It doesn’t check server-side events sent via the Conversions API (CAPI). Following Meta API integration best practices ensures these server-side signals are tracked accurately. For that, you’ll need the Test Events tool.
Test Events in Events Manager
The Test Events tool in Events Manager shows what Meta actually receives from your pixel. Start by navigating to Meta Events Manager, selecting your Pixel or dataset, and opening the Test Events tab. Enter your website URL, open your site in a new browser window, and perform actions like adding items to the cart or completing a purchase. Then, return to Events Manager to monitor the real-time feed.
Key things to check:
Source label: Confirms whether the data came from the browser or server.
Green status icon: Indicates successful event receipt.
This tool is especially useful if you're using both Pixel and CAPI. It helps confirm that Meta is correctly deduplicating signals when both systems send the same event_id.
Browser Console Debugging
When the Meta Pixel Helper displays a "Pixel Did Not Load" error, your browser’s console can help identify the root cause. Open your browser’s developer tools (usually with F12) and go to the Console tab. Look for red error messages indicating failed scripts that might block the Meta Pixel. Errors from other third-party scripts or site themes can also interfere with the pixel if they load before the pixel code.
For additional insights, check the Network tab and filter for "tr" to view data packets sent to Meta’s servers. If you see "Failed to load resource" errors, it’s likely due to an ad blocker or strict tracking protection. Testing in Incognito mode with ad blockers disabled can help confirm this.
Fixing Parameter and Configuration Errors
After debugging conversion tracking issues, it's equally important to tackle parameter and configuration errors to maintain accurate data. Even if your Meta Pixel is firing correctly, parameter errors can disrupt conversion tracking. Meta might receive the event, but without the right data, it can't optimize campaigns or calculate ROAS accurately. The tricky part is that these errors often go unnoticed because the pixel appears functional, even though conversions fail to show up in Ads Manager. Below, we'll explore common parameter issues and how to resolve them using a Meta Ads conversion optimization checklist.
Missing Required Parameters
For commerce events like Purchase, Subscribe, or StartTrial, the value and currency parameters are crucial. Without them, Meta can't calculate ROAS or optimize for value-based conversions. Similarly, the content_ids parameter must match the product IDs in your Meta Catalog to ensure that Dynamic Product Ads work as intended.
For instance, if you're using Shopify, rely on dynamic variables like {{subtotal_price}} or {{product.id}} instead of static values. To verify everything is set up correctly, head to the Test Events tab in Events Manager, simulate a purchase, and check that value, currency, and content_ids populate in the real-time feed. If you see empty fields or placeholder text (like {{email}}), it means your dynamic variables aren't resolving properly.
Incorrect Parameter Values
The currency parameter must use a three-letter ISO code, such as USD or EUR, rather than symbols or full words. Additionally, event names must strictly follow Meta's standards. For example, Purchase is valid, but using variations like Purchased will trigger a "Not a Standard Event" warning, which can hinder optimization.
Be cautious of double-encoding issues, such as & being rendered as &amp;, as this can corrupt parameter data. For advanced matching parameters like email or phone, ensure they are sent in lowercase, with no spaces, and hashed using SHA-256. Improperly formatted or raw personal data can reduce your Event Match Quality and weaken attribution.
Parameter Error | Impact | Recommended Fix |
|---|---|---|
Missing | Unable to calculate ROAS or optimize for value. | Map dynamic checkout totals to the event. |
Missing | Breaks Dynamic Product Ads and catalog tracking. | Ensure product IDs match those in your Meta Catalog. |
Invalid Pixel ID | Data isn't recorded in the correct account. | Verify the ID in Events Manager. |
Encoded Characters | Parameters become unreadable to Meta. | Fix string encoding in your CMS or tag manager. |
Non-Standard Event Name | Event is treated as "Custom" and ignored for optimization. | Use one of Meta's 17 standard event names. |
Reducing Data Loss from Ad Blockers and Privacy Settings
Even with everything set up perfectly, ad blockers and privacy settings can still interfere with tracking requests. To address this, consider implementing server-side tracking to recover missing data. Let’s look at how server-side solutions like the Conversions API (CAPI) can help reduce these losses.
Setting Up Conversions API
The Conversions API (CAPI) works by sending event data directly from your website's server to Meta. Unlike the Meta Pixel, which uses JavaScript and operates through a browser (making it vulnerable to being blocked), CAPI establishes a server-to-server connection that bypasses ad blockers entirely. This makes it especially useful for dealing with data losses caused by iOS restrictions and privacy-focused browsers.
When you use both the Meta Pixel and CAPI together, you create a safety net. The Pixel handles browser-based tracking, while CAPI acts as a backup for any events that the browser fails to send. To avoid duplicate data, ensure you include the same event_id, event_name, and timestamp in both browser and server events. Give it 24 hours to confirm that deduplication is working properly.
Tracking Method | Data Source | Blocked by Ad Blockers | Blocked by Privacy Settings | Validation Tool |
|---|---|---|---|---|
Meta Pixel | User's Browser | Yes | Yes | Meta Pixel Helper |
Conversions API | Website's Server | No | No | Events Manager Test Events |
Testing with Ad Blockers Disabled
To check if ad blockers are causing data loss, temporarily disable them and test your pixel. Open your site in Incognito mode to minimize interference from browser extensions. Pause your ad blocker specifically for your site, then refresh the page to ensure the pixel loads correctly.
Next, go through your conversion funnel just as a customer would: visit the homepage, view a product, add it to your cart, and complete the checkout process. Keep an eye on the Meta Pixel Helper icon - it should turn blue and display a badge showing the number of detected events. If the pixel works when ad blockers are off but fails when they’re on, you’ve identified the problem. At that point, implementing CAPI should become a priority to recover those lost conversions.
Using Automation Tools for Pixel Debugging
Meta's native tools are great for basic insights, but automation steps in when you need to go beyond browser-side checks. Manual debugging might be fine for smaller accounts, but when you're managing large-scale campaigns, automation tools help you spot issues faster. These platforms offer a "control tower" view, confirming whether events actually reach Meta's servers - not just if they fired in your browser. This is a crucial distinction because the Meta Pixel Helper only tracks browser-side activity, whereas automation tools ensure server-side delivery is happening as well.
How AdAmigo.ai Monitors Pixel Activity

AdAmigo.ai keeps a constant eye on your tracking setup, ensuring everything runs smoothly. It enforces naming conventions and structured UTM management, catching errors like incorrect destination URLs or inconsistent tracking parameters before they cause bigger problems. This automated approach works alongside manual checks to provide thorough validation for both server-side and browser-side activity.
The platform simplifies tasks like deduplication by syncing event_id between Pixel and CAPI to standardize conversion data, while also mapping parameters for value, currency, and content_ids. Instead of manually combing through each parameter, AdAmigo.ai does the heavy lifting for you, automatically flagging mismatches so you can fix them before any data is lost or compromised.
Adding AdAmigo.ai to Your Workflow
Getting started with AdAmigo.ai is quick and straightforward. After connecting your Meta ad account, you simply set your KPIs and define your goals (like "Scale spend 30% at ≥3× ROAS") - all in under five minutes. From there, the platform generates a daily feed of AI-driven recommendations for campaigns, audiences, budgets, and creatives. You can review and approve these changes manually, tweak them, or enable auto-publish mode to let the system take over.
Conclusion
Debugging Meta Pixel issues becomes manageable with a clear, three-step process: use the Meta Pixel Helper for browser-side checks, confirm data reception with the Events Manager's Test Events tool, and verify server-side events through the Conversions API. Each step addresses specific challenges, from installation errors to missing parameters like value and currency. This structured approach ensures smoother audits and easier maintenance down the line.
Common problems - like duplicate pixel installations, incorrect event names, or slow load times - can often be avoided with regular audits, especially when tracking across multiple domains. Make pixel debugging part of your routine: perform a full quality check after any theme update, plugin installation, or GTM adjustment. Always test in Incognito mode with ad blockers off for accurate results. Regular maintenance strengthens the foundation of your tracking setup.
For complex campaigns, automation tools such as AdAmigo.ai can simplify pixel management by standardizing naming conventions, ensuring consistent event_id deduplication, and catching parameter mismatches before they become a problem. This allows you to focus on strategic goals while keeping your tracking system reliable - even when managing hundreds of ad variations.
When your pixel functions properly and data flows seamlessly, Meta’s algorithms can better optimize your campaigns, leading to improved ROAS, lower CPA, and scalable results.
FAQs
Why do events appear in Pixel Helper but not in Ads Manager?
Events might show up in Pixel Helper but not in Ads Manager for a few reasons, such as incorrect event setup, delays in data processing, or mismatched attribution settings. To fix this, double-check that the pixel is installed properly and that events are triggering as they should. Also, review your event configurations and tracking settings in your Meta ad account for any inconsistencies.
How can I check if my Pixel and Conversions API are deduplicating correctly?
To avoid counting the same event twice, confirm deduplication by checking that the event_id is identical for both server-side and client-side events. This step ensures proper coordination between the Pixel and Conversions API, preventing duplicate tracking.
What’s the fastest way to identify which plugin or tag is causing duplicate Pixel fires?
The fastest way to identify the plugin or tag responsible for duplicate Pixel fires is by using the Meta Pixel Helper Chrome extension. This handy tool allows you to check your Pixel installation, monitor which events are firing, and spot problems like duplicate events. By reviewing your website's Pixel activity, you can determine if multiple tags or plugins are causing the same event to fire repeatedly.