
How To Test Meta Pixel Events
Learn how to effectively test Meta Pixel events to ensure accurate tracking and optimize your advertising campaigns.
To ensure your Meta Pixel events are working as intended, you need to test them thoroughly. Meta Pixel tracks user actions on your site, like purchases or form submissions, and sends this data to Meta for ad targeting and performance measurement. If these events aren't mapped to conversion goals or tested properly, your campaigns could suffer from inaccurate data, wasted ad spend, and poor targeting.
Key Steps for Testing Meta Pixel Events:
Verify Pixel installation on your site and match the Pixel ID with Meta Events Manager.
Use tools like the Meta Events Manager Test Events tab, Meta Pixel Helper Chrome extension, and Google Tag Manager for real-time validation and troubleshooting Meta Ads conversion tracking.
Perform actions like page views, adding items to the cart, or completing purchases, and check if the events appear in the Test Events tab.
Address issues like missing events, duplicate data, or invalid parameters (e.g., incorrect currency codes or text values instead of numbers).
Test custom events (e.g., video plays or form submissions) using GTM's debug mode and confirm the data in Meta Events Manager.
Recommended Practices:
Use Incognito Mode to avoid session conflicts.
Disable ad blockers and unnecessary browser extensions during testing.
Maintain a checklist of events and parameters to test systematically.
Troubleshooting Tools:
Meta Events Manager: Tracks real-time event logs and parameters.
Meta Pixel Helper: Diagnoses browser-based issues like missing or duplicate events.
GTM Preview/Debug Mode: For advanced setups, checks tag triggers and data layers.
Automation for Monitoring: Platforms like AdAmigo.ai can monitor events continuously, flagging issues like missing Purchase events or parameter errors. This ensures campaigns remain optimized and reduces manual troubleshooting.
Testing and maintaining accurate Meta Pixel events are essential for better use of audience data, conversion tracking, and campaign performance. Use the tools and steps above to validate your events and prevent data issues from derailing your advertising strategy.
Preparing to Test Meta Pixel Events
Getting everything ready before testing Meta Pixel events is crucial. It ensures your results are accurate and actionable while saving you the headache of troubleshooting later.
Key Prerequisites
Access to Meta Events Manager: You need admin-level permissions to view event data, adjust pixel settings, and use the Test Events tab. Without these permissions, you won’t be able to access the main testing interface.
Correct Pixel ID: Double-check that the Pixel ID in your website code matches the one in the Events Manager. You can find it under Data Sources in the Overview section or by using the Pixel Helper extension on your website. A mismatch can lead to data being sent to the wrong place.
Website Admin Privileges: Make sure you can install, modify, or troubleshoot the Meta Pixel code or resolve common pixel issues. This typically means having access to your website’s header section, content management system, or tag management platform.
Proper Pixel Installation: Verify that the Meta Pixel is installed on all relevant pages and linked to your Meta ad account. The base code should be placed before the closing
</head>tag on each page. Incorrect placement can cause events to fail or delay tracking.
Tools for Testing
Once you’ve completed the setup, gather the tools you’ll need to test and validate your events effectively.
Meta Events Manager’s Test Events Tab: This is your go-to dashboard for real-time event validation. Enter your website’s URL, perform actions, and see which events are triggered along with their parameters.
Meta Pixel Helper Extension: This free Chrome extension provides quick diagnostics. It identifies issues like missing parameters, duplicate events, or interference from ad blockers and privacy settings.
Google Tag Manager: This tool simplifies pixel deployment. Instead of editing your website’s code directly, you can use Tag Manager to add and manage your Meta Pixel, making it easier to test changes and troubleshoot problems.
Tool | Primary Function | Key Benefits |
|---|---|---|
Meta Events Manager Test Events | Real-time event validation | Direct integration with detailed feedback |
Meta Pixel Helper Extension | Browser-based event detection | Instant diagnostics with error alerts |
Google Tag Manager | Pixel deployment and management | Code-free adjustments and flexible setup |
Setting Up a Clean Testing Environment
To ensure accurate tracking, optimize your testing environment by following these steps:
Use Incognito Mode: This prevents session conflicts and avoids cached data interfering with your tests. Clear your browser cache and cookies before every session for the best results.
Avoid Account Conflicts: Don’t stay logged into multiple Meta accounts simultaneously, as it can cause tracking issues.
Disable Unnecessary Extensions: Temporarily turn off ad blockers or other privacy-focused browser extensions that might interfere with the Meta Pixel. Keep the Meta Pixel Helper active for diagnostics.
Create a Checklist: Document the events, parameters, and expected outcomes you’re testing. This keeps your process organized and ensures you don’t miss any critical steps. If something goes wrong, the checklist can also help pinpoint the issue.
Step-by-Step Guide to Testing Meta Pixel Events
To make sure your Meta Pixel is tracking correctly, you’ll need to test both standard and custom events. This guide walks you through the process step by step.
Testing Standard Events
Standard events like PageView, AddToCart, and Purchase are essential for most Meta advertising campaigns. Proper testing ensures your conversion tracking is accurate and optimized.
Start by opening Meta Events Manager and selecting your Pixel under Data Sources. From there, go to the Test Events tab, which acts as your real-time validation dashboard. Enter your website URL into the field provided and click "Open Website" to open your site in a new browser window.
Now, perform the action you want to test:
For a PageView event, simply load a page.
For AddToCart, click the "Add to Cart" button on a product page.
For Purchase, complete the checkout process using a dummy transaction.
Head back to the Test Events tab to see if the event appears. Click on the event to review its parameters. For Purchase events, confirm that the value is displayed as a number and the currency is shown as "USD" or your chosen currency code.
If the events don’t show up, troubleshoot by following these steps:
Use Google Chrome for testing, as some tools work best with this browser.
Refresh the page and try again.
Check for browser extensions that might block the Pixel from firing.
For further diagnostics, use the Meta Pixel Helper extension.
Checking Event Data with Meta Pixel Helper
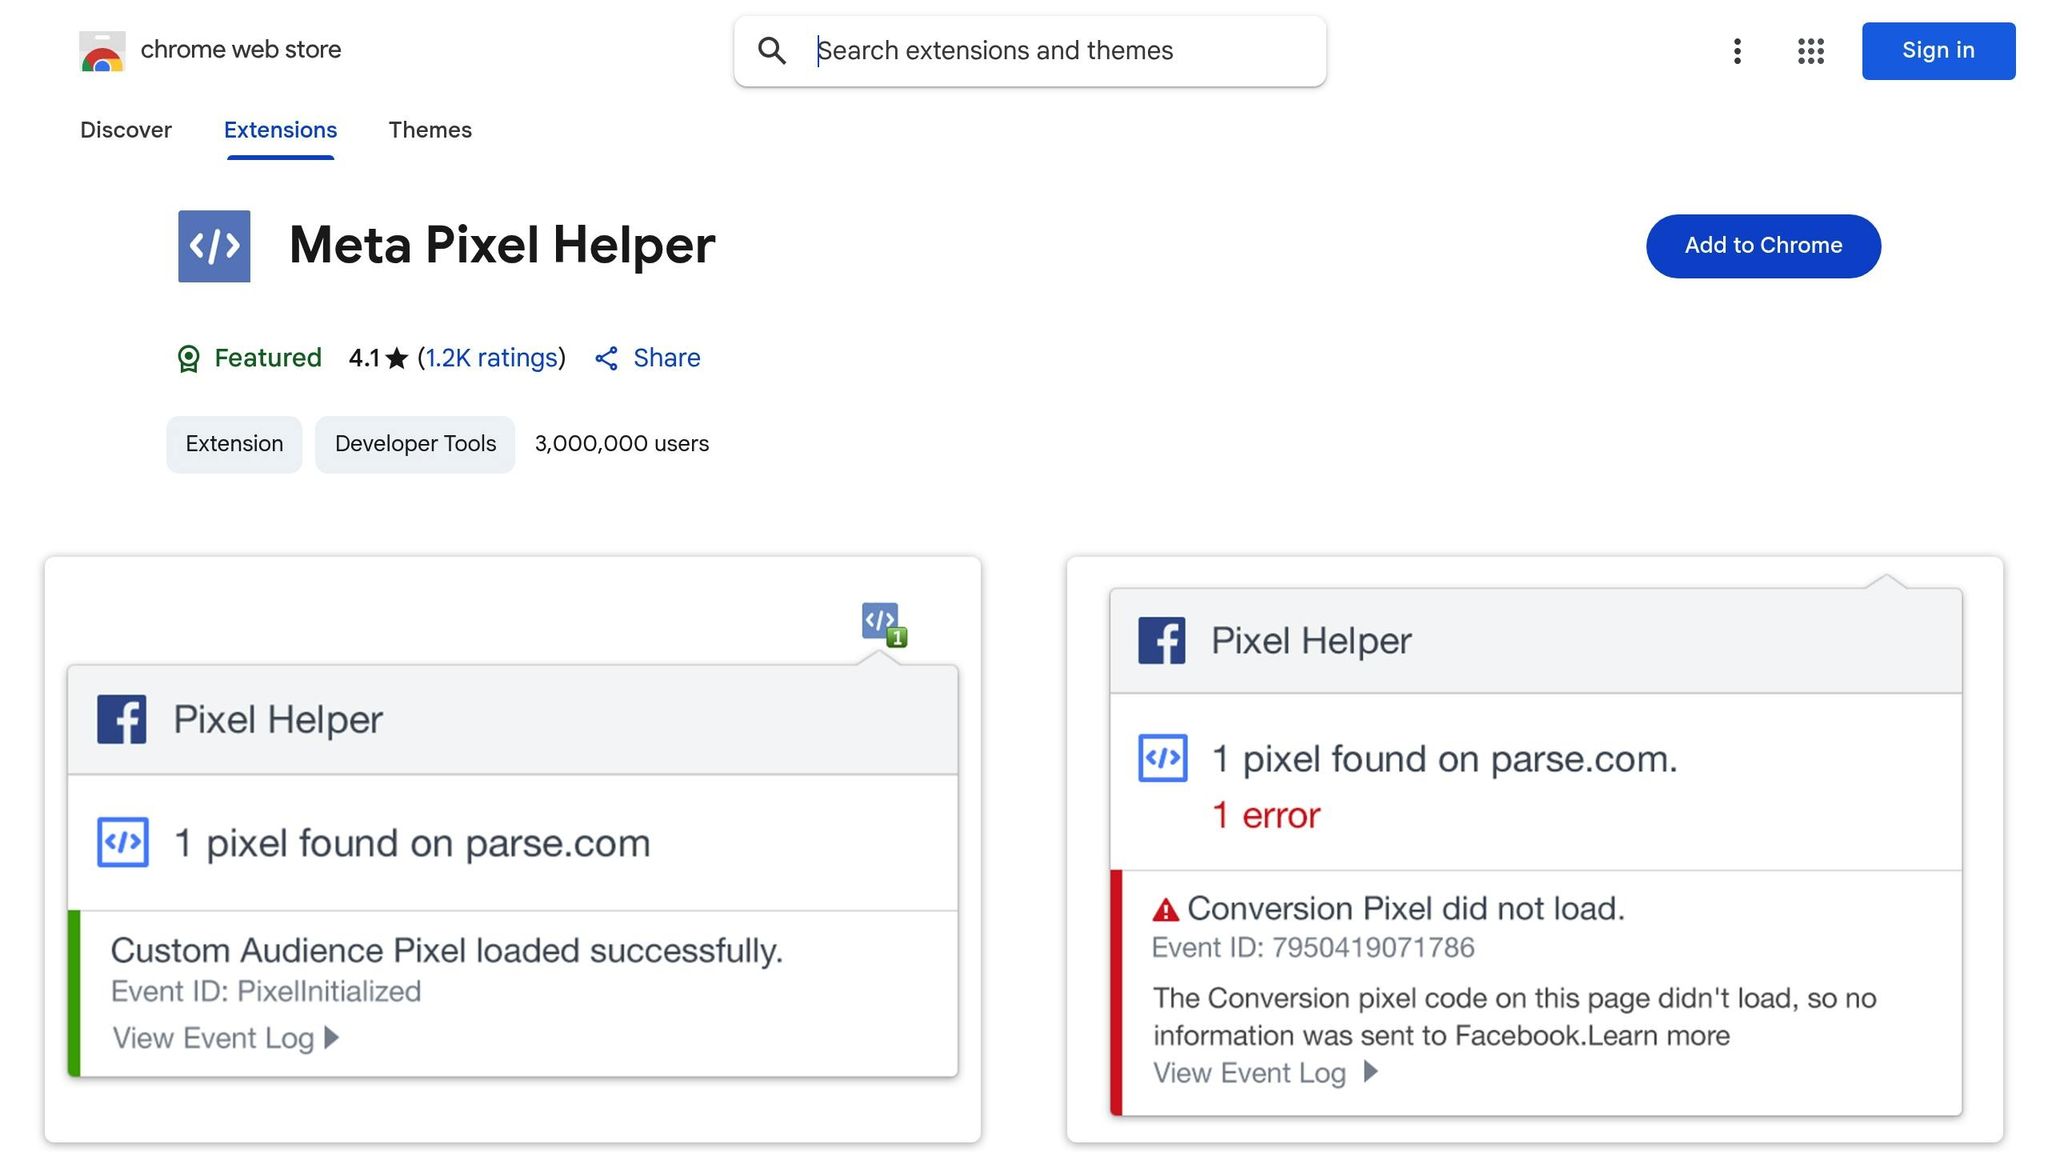
The Meta Pixel Helper Chrome extension is a quick way to troubleshoot Pixel events. Once installed, visit your website and click the extension icon in your browser toolbar.
The tool will display a list of detected Pixel events, their firing status, and the associated Pixel ID. Look for green checkmarks, which indicate successful event firing. If you see yellow warnings or red errors, those signal issues that need fixing. For example, the "New Domain Sending Data" warning can often be resolved by adding your domain to the allow list in Events Manager.
Double-check that the Pixel ID shown in the extension matches the one in Events Manager. If they don’t match, your events might be sent to the wrong account, leading to inaccurate data and attribution issues.
The Pixel Helper also provides detailed parameter data for each event. For eCommerce sites, confirm that currency codes are correct (e.g., "USD" instead of "usd") and that value parameters are numbers, not text. These details are crucial for accurate tracking and campaign performance.
Once standard events are verified, move on to testing custom events and parameters (including GA4 mapping).
Testing Custom Events and Parameters
Custom events allow you to track specific user actions, like video plays or form submissions. Testing these events requires a combination of tools.
If you’re using Google Tag Manager (GTM), start by enabling Preview and Debug mode. This mode shows when tags fire and what data they send. Perform the action you want to track (e.g., play a video or submit a form), and check the GTM debug console to confirm the Meta Pixel tag fires. Look for the custom event name and verify that all parameters are passed correctly. Keep in mind that parameter names are case-sensitive - "videoID" and "videoid" will be treated as different parameters.
Next, use the Meta Pixel Helper to check the event details. For example, if you’re testing a "VideoWatched" event, the parameters might include video ID, duration, or completion percentage. Compare this data with your tag setup to ensure everything matches.
Finally, verify the custom event in the Test Events tab of Events Manager. The event name and all associated parameters should appear exactly as you configured them. This three-step process - using GTM debug mode, Pixel Helper, and Test Events - ensures your custom events are properly set up and functioning across Meta's platform.
For clarity during testing, use unique data to easily identify and analyze custom events.
Troubleshooting and Validating Event Data
Once you've tested your Meta Pixel events, the next step is to interpret the feedback from your testing tools and address common Meta Pixel errors that come up. Properly understanding the feedback ensures your tracking is accurate and that you’re not missing out on critical conversion data.
Reading Feedback from Testing Tools
The Test Events tool in Meta Events Manager provides a real-time log of events triggered on your website. It shows event names, parameters, and their status: success, warning, or error. When an event appears in the log, click on it to review the details and examine each parameter carefully.
Both Meta Events Manager and the Meta Pixel Helper use colors to indicate status:
Green: Success
Yellow: Warnings (e.g., events from new domains or deprecated event types)
Red: Errors (e.g., events that failed to fire, missing parameters, or incorrect data formatting)
Warnings won’t break your tracking but should be addressed to ensure everything runs smoothly. Errors, on the other hand, need immediate attention. For example, a common error might involve missing currency codes for Purchase events or sending value parameters as text instead of numbers.
Pay close attention to parameter details. For eCommerce events, ensure the currency is listed as "USD" (not "usd" or "$") and that monetary values are numbers with periods as decimal separators. Keep in mind that parameter names are case-sensitive - "videoID" and "videoid" will be treated as completely different data points.
Common Issues and Solutions
Missing Events
If an event doesn’t appear in the Test Events tool or Meta Pixel Helper, start by checking that the correct Pixel ID is installed on your website and matches the one in Events Manager. Clear your browser cache, use Google Chrome if you’re not already, and test again. Tools like GTM’s debug mode can help confirm whether tags are firing as expected. Additionally, check your website’s source code for JavaScript errors that might block the Pixel from loading.
Duplicate Events
Duplicate events can inflate conversion numbers and distort your campaign data. This often happens when multiple Pixel codes are installed on the same page or when tag triggers are misconfigured. Double-check that no duplicate Pixel codes exist in your website’s source code. Also, review trigger conditions in your tag manager. For instance, a Purchase event should only fire on the order confirmation page - not on every page load.
Pixel ID Mismatch
A mismatch in Pixel IDs can send conversion data to the wrong account. Use the Meta Pixel Helper to verify the active Pixel ID on your page and compare it to the ID in your Events Manager. If there’s a mismatch, update your website code or tag manager configuration with the correct ID, then retest to confirm the fix.
Invalid Parameters
Incorrect parameters can disrupt your tracking entirely. For example, Meta requires the currency to be a three-letter code like "USD" and values to be numbers - not text strings with symbols like "$100". Double-check these details to avoid errors.
Accurate event data is essential for better ad targeting and campaign performance, especially when you track custom conversions to measure specific user actions. Once these issues are resolved, you can move forward with documenting and validating your test results.
Recording and Confirming Results
After fixing any issues, confirm your solutions by systematically recording your test data. Document key details like browser, device, operating system, and the steps you followed during testing. Take screenshots of results from both the Test Events tool and Meta Pixel Helper - this documentation will be invaluable for future troubleshooting or collaboration with your team.
Test your events across major browsers (Chrome, Firefox, Safari, Edge) and on both iOS and Android devices. Record any inconsistencies between platforms, as these might reveal browser- or device-specific problems.
Once you’ve resolved the issues, retest all events to ensure everything is functioning as expected. Fixing one problem can sometimes create new ones, so it’s important to review your entire testing checklist again, especially for events that were previously problematic.
Monitor your Events Manager data for several days after making changes. Watch for unusual drops in event volume or unexpected spikes, as these could signal new issues. Establishing a regular monitoring routine - especially after website updates or changes to your tag management setup - helps catch problems early.
Finally, maintain a detailed testing log. Include dates, the issues you encountered, the solutions you applied, and confirmation that the fixes were successful. This log not only serves as a reference for your team but also helps identify recurring patterns. When event tracking remains consistent across all browsers and devices for several days, you can feel confident that your troubleshooting efforts have paid off.
Comparing Tools for Meta Pixel Event Testing
After testing events using the methods outlined earlier, you can take your setup a step further by leveraging specific tools designed for diagnosing and refining Meta Pixel events. Each tool has its own strengths and weaknesses, so understanding what each one offers will help you choose the best fit for your needs.
Tool Comparison Table
Here’s a side-by-side look at three primary tools for Meta Pixel event testing. This quick comparison highlights their strengths, best use cases, and limitations:
Tool | Ease of Use | Real-Time Feedback | Diagnostic Capabilities | Best For | Limitations |
|---|---|---|---|---|---|
Meta Events Manager | Good | Yes | detailed event logs and parameter inspection, including server events | Comprehensive event validation | Requires Meta account access |
Meta Pixel Helper | Excellent | Yes (browser only) | On-page diagnostics with clear error and warning feedback | Quick checks and troubleshooting | Limited to Chrome and browser-based events |
GTM Preview/Debug | Medium | Yes | Advanced insights on tag firing and data layer details | Complex setups and multi-tag implementations | Requires working knowledge of GTM |
Meta Events Manager is perfect for users seeking detailed logs of both client-side and server-side events. It’s a versatile tool that works well for everything from basic event validation to advanced Conversion API vs. tracking pixels for server-side tracking.
Meta Pixel Helper offers immediate, browser-based diagnostics, making it ideal for identifying common issues like incorrect Pixel IDs or missing events. However, it’s limited to client-side validations and requires the Chrome browser.
Google Tag Manager Preview/Debug is the go-to option for advanced setups, providing a deep dive into tag firing, trigger conditions, and data layer variables. It’s best suited for users managing multiple tags or tracking Meta ads with Google Analytics.
Choosing the Right Tool for Your Needs
Selecting the right tool depends on your technical expertise and the complexity of your tracking setup. Here’s a breakdown of how to use these tools effectively:
For basic event validation, start with the Test Events feature in Meta Events Manager. It confirms whether events are reaching Meta’s servers and displays the parameters being sent. This is especially useful for standard eCommerce events like PageView, AddToCart, and Purchase.
For quick troubleshooting, Meta Pixel Helper is your best bet. It provides instant feedback and helps pinpoint issues like misconfigured Pixel IDs or missing events, saving you time and helping you avoid common mistakes in Meta ad testing.
For complex tracking setups involving custom events, multiple pixels, or intricate trigger logic, GTM Preview/Debug is invaluable. It gives you a detailed look at tag activity, trigger conditions, and data layer variables, making it essential for advanced implementations.
Experienced marketers often use a layered approach - starting with Meta Pixel Helper for quick checks, verifying events in Meta Events Manager, and diving into GTM Preview/Debug for more detailed troubleshooting. This combination ensures thorough testing across all levels.
If you’re working on server-side event testing, Meta Events Manager is the only tool capable of validating events sent directly from your server. For those using the Conversions API alongside the browser pixel, this tool is a must-have.
Tailoring Your Tool Selection
Your choice of tools also depends on the size and complexity of your operation. Small businesses with straightforward tracking needs often find Meta Pixel Helper sufficient for routine checks. On the other hand, agencies and enterprises typically rely on Meta Events Manager for its detailed reporting capabilities. For more intricate setups, combining all three tools provides the most comprehensive testing framework.
Lastly, consider your team’s technical expertise. Meta Pixel Helper is beginner-friendly - just install the Chrome extension and start testing. Meta Events Manager requires only basic familiarity with Meta’s interface, while GTM Preview/Debug demands a deeper understanding of tag management concepts. Matching the tool to your team’s skill level ensures smoother testing and troubleshooting.
Using Automation Tools for Event Monitoring
While manual testing is essential for validating pixel events, automation tools elevate Meta Pixel event monitoring by providing continuous oversight and automated adjustments. These platforms don't just confirm that events are firing - they actively use that data to enhance campaign performance and address issues before they escalate. This constant monitoring seamlessly integrates with the broader testing strategies discussed earlier.
How AdAmigo.ai Ensures Accurate Event Data

AdAmigo.ai relies on precise event data to optimize campaigns in real time. Acting as a learning agent, it depends entirely on accurate Meta Pixel event tracking to make critical optimization decisions. Unlike systems driven by static rules, AdAmigo.ai dynamically analyzes event data to adjust targeting, creative elements, and bidding strategies automatically. This makes it essential to thoroughly test and validate your Pixel events to unlock the platform's full potential.
One standout feature is AI Actions, which provides daily optimization recommendations based on real-time event analysis. For instance, if AdAmigo.ai detects that a "Purchase" event stops firing after a website update, it can notify you immediately, suggest troubleshooting steps, or even pause campaigns that rely on that event. Once the issue is resolved and the event data flows correctly again, the platform resumes those campaigns, minimizing wasted ad spend and preventing data gaps.
Additionally, AdAmigo.ai conducts a comprehensive audit of your Meta ad account, website, and social media pages. This audit evaluates your existing Meta Pixel setup and event data quality, identifying issues like duplicate events, missing parameters, or event drops before they impact performance.
As AdAmigo.ai processes new data, it continuously refines its monitoring and campaign adjustments to align with current performance trends and business objectives. This adaptable system ensures that the platform grows smarter over time, avoiding outdated, static rules and instead responding to real-time changes.
The platform also features an AI Chat Agent that provides instant insights into event performance. You can ask questions like "Why did my conversions drop yesterday?" or "How can I fix missing Purchase events?" This instant access to diagnostics allows you to address issues quickly without toggling between multiple tools.
Benefits of Automation in Event Management
Automation takes the insights gained from manual testing and builds on them by delivering round-the-clock event monitoring. For agencies and brands managing multiple campaigns, automation tools provide a significant edge over manual methods. Businesses using automated event monitoring tools report up to 30% higher campaign efficiency and cut manual troubleshooting time by more than 50%.
One major advantage of automation is real-time event tracking. While manual checks happen sporadically, automation platforms like AdAmigo.ai monitor event integrity continuously. This means issues such as missing conversion events or parameter errors are flagged within hours, not days or weeks.
Agencies using AdAmigo.ai report managing 4-8× more clients per media buyer, thanks to the platform's ability to monitor multiple accounts simultaneously. By automatically identifying Meta Ads anomalies and implementing optimizations, AdAmigo.ai frees up media buyers to focus on strategy rather than tedious manual checks.
For brands and in-house teams, automation serves as a cost-effective alternative to hiring additional staff. Acting as an "always-on" AI media buyer, the platform’s expertise grows over time, adapting campaigns to changes in user behavior or tracking setups. This results in better targeting, improved conversion rates, and a stronger return on ad spend.
According to Meta's documentation, accurate event tracking can boost ad delivery optimization by up to 20%. Since Meta relies on event data for targeting and retargeting, maintaining precise tracking is vital. Automation ensures that event data remains accurate, addressing disruptions immediately to keep campaigns performing at their best.
Platforms like AdAmigo.ai also offer autopilot functionality, giving users the option to review recommended actions or enable fully autonomous operation. In autopilot mode, the AI implements optimizations based on its monitoring and analysis of event-driven performance. This ensures that decisions are always grounded in accurate, up-to-date data, providing consistent and reliable campaign optimization without the inconsistencies of manual checks.
Conclusion and Key Takeaways
Review of the Testing Process
Testing Meta Pixel events is a multi-step process that starts with installing the Pixel, configuring events, and testing Meta conversion events using the Test Events tool for real-time validation. To make troubleshooting easier, the Meta Pixel Helper browser extension offers instant feedback on event firing, errors, and parameter accuracy.
It's important to address common configuration issues like mismatched Pixel IDs or missing parameters. Double-check that Pixel IDs match across your website code and Events Manager to prevent data fragmentation or loss. Regular testing is crucial, especially after website updates or campaign changes, to ensure all events are tracked correctly.
Documenting your configurations and fixes is another essential step. This not only aids in future troubleshooting but also lays the groundwork for more advanced monitoring and optimization efforts.
Final Thoughts on Automation and Optimization
Once you've nailed the manual validation process, automation tools can take event tracking and campaign performance to the next level. In fact, over 60% of US advertisers now rely on automation tools for monitoring and optimizing Meta Pixel events, citing improved efficiency and fewer errors.
Platforms like AdAmigo.ai show how continuous automation can elevate event tracking and campaign results. As discussed earlier, automation becomes increasingly important as tracking grows more complex. Rochelle D., in her G2 review, shared this glowing feedback:
"We are getting INSANE RESULTS! Our budgets are controlled, our spend is being smartly allocated and our ROAS is up massively. Agencies charging 7 times the cost of AdAmigo have been put to shame quite frankly!"
Automation not only builds on the insights from manual testing but ensures those insights are applied consistently to improve campaign performance over time.
For agencies juggling multiple clients, automation can allow media buyers to manage 4–8× more accounts without compromising data quality. For in-house teams, these tools act as cost-effective solutions, essentially functioning as "always-on" AI media buyers that adapt and improve with use.
Accurate tracking can lead to up to a 20% improvement in ad optimization. By combining thorough manual testing with automated monitoring, businesses can create a system that ensures data accuracy while scaling campaign performance efficiently.
In the fast-changing world of Meta advertising, mastering both manual validation and automation is key to staying ahead. This approach strengthens targeting, enhances conversion tracking, and boosts ROAS, giving businesses the tools they need to thrive in a competitive landscape.
FAQs
How can I test if my Meta Pixel events are tracking user actions correctly?
To make sure your Meta Pixel is tracking user actions correctly, take advantage of the Test Events tool provided by Meta. This handy tool lets you simulate user interactions on your website and confirm that the appropriate events are being triggered. All you need to do is head to the Test Events section in your Events Manager, input your website URL, and carry out the actions you want to test while watching the events in real time.
Regularly testing your Pixel is key to spotting any tracking issues, helping you maintain accurate data for ad optimization. If you're looking for advanced options, tools like AdAmigo.ai can take your Meta ad campaigns to the next level by fine-tuning your creatives, targeting, and budgets - leaving you free to focus on strategy and growth.
What are common challenges when testing Meta Pixel events, and how can they be fixed?
Testing Meta Pixel events can sometimes be tricky, but most issues can be sorted out with a little troubleshooting. The most common problems you might encounter include events not firing as they should, duplicate events being triggered, or data being reported inaccurately.
To get things back on track, take advantage of the Test Events tool in Meta Events Manager. This handy tool lets you see in real time if your Pixel events are firing correctly. If you notice events aren’t firing, it’s worth revisiting your Pixel setup to ensure the event code is properly placed on your website. For duplicate events, check your implementation to make sure the same action isn’t triggering the event multiple times.
If you’re looking to go beyond basic troubleshooting or want to fine-tune your ad performance, consider using tools like AdAmigo.ai. This platform automates creative testing and campaign adjustments, helping you make the most of your Pixel data to achieve better results.
How can automation tools like AdAmigo.ai help optimize and track Meta Pixel events effectively?
Automation tools like AdAmigo.ai take the hassle out of managing and optimizing Meta Pixel events. By using AI, it handles critical aspects of your Meta ad campaigns, such as analyzing performance, spotting areas for improvement, and automating tasks like campaign creation, audience targeting, and budget adjustments to help you get the best results.
With features like AI-powered recommendations and automatic adjustments, AdAmigo.ai keeps your campaigns running at their peak, saving you time and effort while driving better outcomes. Its ability to learn and adapt based on real-world data makes it an invaluable ally in the ever-competitive world of Meta advertising.