
5 Steps to Sync Meta Ads with Google Analytics
Step-by-step 5-step guide to connect Meta Ads with GA4, import cost data, fix UTMs, map events, and verify ROAS.
Syncing Meta Ads with Google Analytics (GA4) helps you track ad performance and user behavior in one place, improving the efficiency of your campaigns. By connecting these platforms, you can:
Track conversions more accurately: Use GA4 events like purchases or leads to refine targeting and bidding in Meta Ads.
See the full customer journey: Understand how users interact across devices and sessions, beyond just ad clicks.
Optimize ad spend: Import Meta Ads cost data into GA4 to calculate ROAS and identify high-performing campaigns.
Quick Steps:
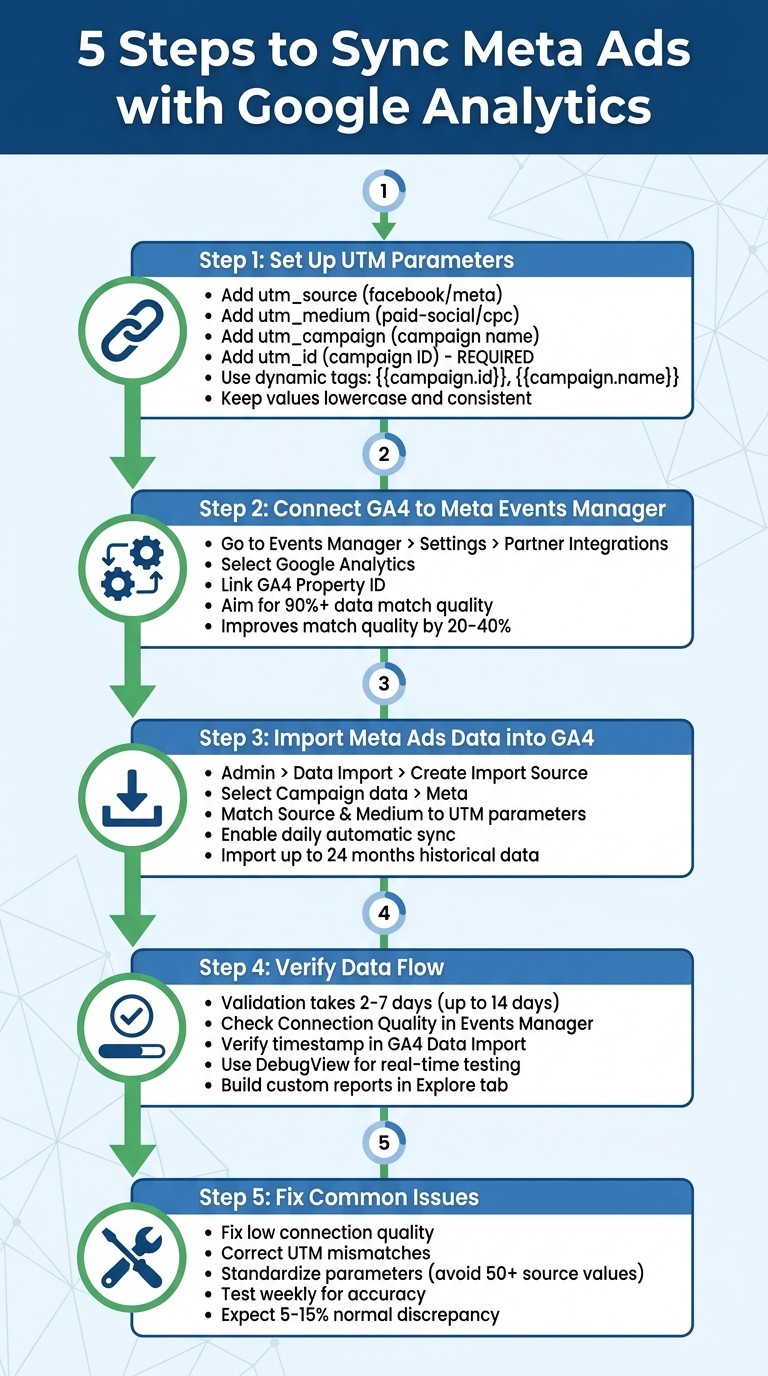
Set Up UTM Parameters: Add UTM tracking codes to Meta ad URLs for better attribution in GA4.
Connect GA4 to Meta Events Manager: Link your accounts for server-side event syncing and improved tracking.
Import Meta Ads Data into GA4: Sync cost, clicks, and impressions for unified reporting.
Verify Data Flow: Check connection quality and validate event mapping.
Fix Common Issues: Resolve UTM mismatches, low connection quality, and tracking errors.
This integration simplifies campaign analysis, helping you make better decisions and improve ad performance.
5 Steps to Sync Meta Ads with Google Analytics GA4
NEW GA4 Feature: Meta Ads Cost Data Import

Step 1: Set Up UTM Parameters in Meta Ads
UTM parameters are essential for ensuring GA4 accurately tracks and attributes traffic from your Meta Ads campaigns. These parameters - added to your ad URLs - help identify the platform, channel type, campaign name, and more. Without them, GA4 won't be able to correctly link traffic to specific Meta campaigns, ad sets, or creatives. The key parameters to include are:
utm_source: Identifies the platform (e.g.,facebookormeta).utm_medium: Defines the channel type (e.g.,paid-socialorcpc).utm_campaign: Specifies the campaign name.
Additionally, for GA4's Meta Ads cost data import feature to work seamlessly, you need to include utm_id, which accurately captures your campaign ID.
Important: UTM values are case-sensitive. For example, utm_source=Meta and utm_source=meta will be treated as separate sources in GA4, potentially fragmenting your data. To avoid this, always stick to lowercase values across your campaigns.
Add Dynamic UTM Parameters
To reduce manual errors and maintain consistency, use the dynamic parameter tool in Meta Ads Manager. This tool, available at the ad level, simplifies the process by allowing you to use dynamic tags like {{campaign.name}} or {{campaign.id}}. These tags automatically pull the correct values from your ad setup, ensuring alignment between GA4 and Meta Ads Manager.
Here’s a breakdown of recommended dynamic tags and their purposes:
UTM Parameter | Recommended Meta Dynamic Tag | Purpose |
|---|---|---|
|
| Required for GA4 Cost Data Import |
| Static (e.g., | Identifies the platform |
| Static (e.g., | Defines the channel |
|
| Names the campaign |
|
| Differentiates ad versions or placements |
For utm_source and utm_medium, stick to static values that align with GA4's default channel groupings. For instance, using utm_medium=paid-social consistently ensures that all Meta Ads traffic is categorized under "Paid Social" in GA4. Also, avoid spaces in your UTM values - replace them with dashes or underscores to prevent URL inconsistencies caused by auto-conversion to "+" or "%20".
If you’re managing multiple ads, you can save time by applying UTM parameters in bulk. Use the "URL Parameters" field in Ads Manager and edit multiple ads simultaneously.
Test Your UTM Setup
Once your UTMs are configured, test them to ensure everything works as expected. Preview your ad in Meta Ads Manager, click through, and check the URL in your browser. Confirm that the parameters are formatted correctly, including proper placement of ? and & symbols.
When your ads go live, monitor traffic in GA4. Go to Acquisition > Traffic acquisition and check the "Session source/medium" dimension to verify that traffic is being attributed correctly and resolve any reporting differences between the platforms. Note that imported Meta data may take up to 24 hours to appear in GA4 reports.
With your UTM parameters properly set up and tested, you're ready to move forward with connecting GA4 in Meta Events Manager. This step ensures your Meta Ads tracking is accurate and reliable, setting the stage for effective campaign analysis. For a complete setup, follow our Meta Ads conversion optimization checklist.
Step 2: Connect Google Analytics in Meta Events Manager
Integrating GA4 with Meta Events Manager enables server-side event syncing, which helps bypass iOS 14+ tracking restrictions and improves match quality by 20–40%, based on Meta's benchmarks.
This connection also lets you compare attribution data across platforms, resolve discrepancies, and allocate budgets more effectively. While Meta focuses on interactions within its ecosystem, GA4 provides insights into user behavior on your website after they click an ad. Together, they offer a full picture of the customer journey.
Link Your GA4 Property to Meta Events Manager
Start by logging into Meta Business Manager and heading to Events Manager. Choose your pixel or data source, then navigate to Settings > Partner Integrations and select Google Analytics.
From your GA4 account, locate the property ID in Property Settings. Sign in to your Google account, select the relevant GA4 property, and ensure you have admin access to both Meta Business Manager and the GA4 property. Without these permissions, the connection won't authenticate. Additionally, you'll need a verified domain in Meta and an active GA4 property with event tracking enabled.
Once you submit the link, Meta will test the connection by sending test events. A successful connection will display a "Connected" status with a green checkmark and a data match percentage - aim for 90% or higher. If errors occur, such as a "Low Quality" status (indicating fewer than 10 matching events), it could be due to mismatched event names or permission issues. Use GA4 DebugView to verify events and troubleshoot the connection if needed.
Map GA4 Events to Meta Custom Conversions
After linking the platforms, map GA4 events to Meta custom conversions for seamless reporting. In Events Manager, go to Data Sources > your pixel > Settings > Custom Conversions. From there, create or edit a conversion, select "Event" as the source, and match it to the detected GA4 events.
For example:
Map GA4's "purchase" event to Meta's "Purchase"
Map "add_to_cart" to "AddToCart"
Map "lead" to "Lead"
You can also map custom events, like "signup_complete", to track registrations. When setting up conversions, add any necessary rules (e.g., value parameters), name the conversion to align with your GA4 event, and save your settings. Test the setup by triggering the event and confirming it appears in both platforms.
Keep an eye on the Connection Quality indicator in Events Manager to quickly identify and fix any data flow or mapping issues. Proper event mapping ensures you're ready to import Meta Ads data into GA4 in the next step.
Step 3: Import Meta Ads Data into GA4
Once you've mapped GA4 events to Meta conversions, you can bring in detailed campaign metrics like cost, clicks, and impressions directly into GA4. This integration simplifies your workflow, combining campaign performance data with website analytics - all without manual uploads. The setup process is quick, taking about five minutes, and even allows you to import up to 24 months of historical data.
Set Up Data Import in GA4
To get started, log into your GA4 account and navigate to Admin > Data Collection and Modification > Data Import. From there, click Create Import Source, select Campaign data as the data type, and choose Meta as the source. You'll then need to log in using your Meta Business Portfolio credentials. Keep in mind that you must have at least Viewer access in GA4 and Admin access in Meta Business Suite to proceed.
Next, select your Business Center and the Ad Account you want to link. It’s critical that the Source and Medium fields in GA4 match the UTM parameters used in your Meta ad URLs exactly. For instance, if your Meta ads use utm_source=facebook and utm_medium=paid, ensure "facebook" and "paid" are entered in their respective fields. Even small differences, like capitalization, can block data from syncing.
Also, confirm that the currencies in Meta Ads and your GA4 property align. You can check your GA4 currency settings under Admin > Property Settings > Reporting time zone and currency.
Once set up, data imports usually take about 30 minutes to process, although it may take up to 24 hours for the metrics to show up in your GA4 reports. Note that the Ad Account, Source, and Medium settings are locked after setup. If you need to change them later, you’ll have to delete the existing connector and create a new one.
Turn On Automatic Data Sync
To keep things running smoothly, enable daily syncing for your data import. This ensures that new campaign metrics like costs, clicks, and impressions automatically flow into GA4 without requiring manual updates. Once the sync is active, your imported Meta data will appear in the Non-Google cost report under the Acquisition section in GA4. Be sure to monitor the Connection Quality indicator regularly.
The initial connection validation process usually takes between 2 and 7 days, though in rare cases, it might take up to 14 days. If the integration disconnects later, it’s often because the person who set it up lost Viewer access in GA4 or Partial control in Meta Business Suite.
To avoid interruptions, use a shared company email (like marketing@company.com) rather than a personal account for the integration. Additionally, ensure Two-Factor Authentication is active on both your Facebook and Instagram accounts. These steps help prevent sync issues if team members leave or change roles within your organization.
Step 4: Verify Data Flow and Build Reports in GA4
To ensure your Meta Ads data syncs correctly with GA4 and to start building performance reports, you'll need to validate the data connection. This process usually takes between 2 to 7 days, though in some cases, it might extend up to 14 days. During this time, Meta reviews your setup and event mapping to ensure everything is functioning smoothly before data begins to flow consistently.
Verify Your Data Connection
Start by checking the Connection Quality in Meta Events Manager. Head to Partner Integrations > Google Analytics and locate the status marker. A "High" status indicates everything is working as it should. If you see "Low", click on the indicator for troubleshooting guidance.
Next, confirm the latest upload timestamp in GA4. Navigate to Admin > Data Collection and Modification > Data Import and locate your Meta import source in the table. The "Last upload" timestamp will show when the most recent data was successfully imported.
For real-time checks, use GA4 DebugView. Click through a tagged Meta ad link and watch incoming events in DebugView to verify that your mapped Meta events are being received with the correct UTM parameters. Keep in mind that you'll need at least Viewer access in GA4 and Partial control in Meta Business Suite to manage these integrations.
Once you're confident the data connection is stable, you can move on to building custom reports in GA4.
Build Custom Reports for Meta Ads Data
A reliable data connection is the foundation for meaningful analytics, helping you make smarter decisions about ad performance. Start by reviewing the Acquisition > Traffic Acquisition report in GA4, focusing on Session source/medium. Then, dive deeper using the Explore tab.
To create a custom report, open a new Blank exploration and import dimensions like "Session source/medium" and "Campaign." Add metrics such as Sessions, Active users, Engagement rate, Key events, and Total revenue. Organize these dimensions and metrics to calculate ROI and ROAS effectively.
Attribution can be tricky, but combining Meta's cost data with GA4's conversion tracking gives you a more complete view of Meta Ads vs. Google Ads multi-channel attribution than relying on either platform alone. During the first week after setup, monitor your reports closely to catch any issues like UTM mismatches or currency discrepancies that might distort your results. Regular adjustments will help ensure your data remains accurate and actionable.
Step 5: Fix Common Issues and Improve Data Accuracy
Once you've set up the integration, it's time to tackle some common challenges to ensure your tracking remains consistent and accurate. Even with a successful setup, issues like connection quality problems, UTM parameter mismatches, and inconsistent tracking configurations can affect how Meta Ads data appears in GA4. Addressing these early helps you avoid fragmented data and keeps your reports reliable.
Fix Low Connection Quality
If the Connection Quality indicator in Meta Events Manager shows "Low", start by reviewing your event mapping. Go to Partner Integrations > Google Analytics and check the status indicator to identify which events are causing trouble. The root cause often lies in mismatched event names or missing parameters like currency or value. Make sure event names and parameter structures (e.g., value, currency, product_id) match exactly between Meta and GA4.
Next, confirm your Meta Pixel is firing on all relevant conversion pages. Use the Meta Pixel Helper Chrome extension to check if events trigger when users complete specific actions. If events aren't firing, double-check your pixel code or consider implementing the Conversions API (CAPI). CAPI sends conversion data directly from your server to Meta, bypassing browser limitations and iOS privacy updates that can lead to underreporting.
After fixing connection issues, focus on standardizing your UTM parameters to maintain accurate attribution.
Correct UTM Mismatches
Inconsistent or missing UTM parameters can scatter your Meta traffic across various sources in GA4, making attribution messy. This often happens when UTM tags are skipped or when URL redirects strip parameters before users land on your page.
To resolve this, ensure all Meta ads link directly to their final destination without redirects that remove UTM parameters. Use Meta's dynamic UTM parameters (like {{ad.id}} and {{campaign.name}}) to automate tagging and minimize manual errors. If you're using more than 50 different utm_source values for Meta ads, standardize your UTMs. Meta disables the "Only traffic from Meta" filter in GA4 when it detects too much variation in source values. A consistent UTM structure not only improves data clarity but also ensures more reliable attribution across campaigns.
Once you've addressed connection and UTM issues, it's time to validate your data accuracy.
Test and Monitor Data Accuracy
Set aside time each week to compare conversion metrics from Meta and GA4. Make sure both platforms align in terms of time zone, currency, and conversion definitions. Keep in mind that a 5% to 15% discrepancy is normal due to differences in attribution models - Meta typically uses a 7-day click/1-day view model, while GA4 relies on data-driven or last-click attribution.
Double-check that both platforms are set to the same time zone and currency. During the first week, monitor reports daily to catch any anomalies early. If you notice discrepancies, verify that conversion definitions match perfectly between Meta and GA4 and that UTM parameters remain consistent across all active campaigns.
Keep an eye on your tracking setup regularly to maintain accurate and actionable campaign insights.
Conclusion
Syncing Meta Ads with Google Analytics simplifies tracking and optimization. By consolidating performance data, you no longer need to switch between platforms. This integration offers attribution accuracy, showing exactly which ads generate revenue. For instance, instead of seeing "social media" as the source, you’ll know a specific carousel ad brought in $2,500 in sales. This unified perspective combines Meta's engagement metrics - like impressions, reach, and clicks - with GA4's on-site behavior data, such as pages visited, time spent, and conversions. Together, they create a clear, comprehensive view of your full-funnel Meta ads setup.
The real advantage lies in having cost data and ROAS (Return on Ad Spend) calculations in one place. By pulling Meta's spend and CPC data into GA4, you can calculate ROAS without juggling multiple tabs. This setup also provides deeper audience insights. For example, you can compare how users from Instagram Stories behave versus those from Facebook video ads. With this information, reallocating budgets from underperforming ads to high-performing ones becomes much easier.
To ensure accuracy, it’s crucial to regularly audit your Meta ad account setup parameters and address any tagging or currency mismatches.
For teams managing multiple campaigns, automation tools like AdAmigo.ai can take optimization a step further. These tools automate tasks like budget adjustments and creative scaling. AdAmigo’s AI Autopilot, for instance, pulls spend and performance data directly from Meta’s API into a unified dashboard. It can automatically optimize budgets, pause ads that aren’t performing well, and scale successful ones based on your KPIs. You can start in a review mode to manually approve suggestions before fully automating routine adjustments. This allows you to focus on strategy while the AI handles the execution.
Regular monitoring is key to keeping your integration running smoothly. Set up alerts for budget overspending or performance dips, and reconcile data weekly to catch any discrepancies early. With a well-synced system and consistent oversight, you’ll gain actionable insights to make smarter decisions and improve campaign performance over time.
FAQs
Which GA4 events should I map to Meta conversions?
To ensure your Meta Ads data aligns with GA4, it's important to map GA4 events that directly reflect your Meta conversion goals. Prioritize tracking essential events such as "purchase", "lead", "sign-up," or any custom events that align with your campaign's objectives. By consistently monitoring these events across both platforms, you can achieve more accurate attribution and streamlined reporting.
Why isn’t Meta cost data showing up in GA4 yet?
If you're not seeing Meta cost data in GA4 yet, it could be due to an incomplete integration setup. To address this, double-check the following:
Permissions: Ensure you have the necessary access rights to both platforms.
UTM Tagging: Verify that your campaign URLs are properly tagged with UTMs for accurate tracking.
API Connections: Make sure the API connections between Meta and GA4 are configured correctly.
Remember, even with the proper setup, it may take some time for the data to fully process and appear in GA4.
How do I fix UTMs that split my Meta traffic in GA4?
To fix UTM issues that lead to split Meta traffic in GA4, make sure all your destination URLs include properly formatted UTM parameters, particularly utm_source and utm_medium. These parameters are key for GA4 to correctly track traffic sources and campaign performance.
Stick to consistent UTM naming conventions across all campaigns. This prevents data fragmentation and ensures GA4 can group Meta traffic accurately, giving you reliable insights for reporting and analysis.