
Meta Ads Analytics: GA4 Integration Guide
Step-by-step guide to link Meta Ads with GA4, map and validate events, fix UTM tagging, and use GA4 data to improve ad performance.
Running Meta ads without connecting them to Google Analytics 4 (GA4) leaves you with incomplete data. While Meta Ads Manager provides insights into clicks and impressions, Tracking Meta Ads with Google Analytics shows what happens post-click - whether users convert, bounce, or engage with your site. Integrating these platforms bridges this gap, improving tracking, attribution accuracy, and campaign performance.
Key Benefits of Meta Ads and GA4 Integration:
Complete Customer Journey: Combine Meta’s click data with GA4’s post-click insights, like conversions and session behavior.
Better ROAS Accuracy: GA4 corrects inconsistencies caused by ad blockers and privacy settings.
Enhanced Campaign Optimization: GA4 data feeds Meta’s algorithm for smarter bidding and targeting.
Steps to Connect Meta Ads with GA4:
Set Up GA4 Events: Ensure key events (e.g.,
purchase,generate_lead) are properly configured and named.Link Platforms: Use Meta Events Manager to connect GA4 properties with Meta datasets.
Map Events: Match GA4 events to Meta’s standard conversion events.
Test and Validate: Check the connection quality and resolve any issues.
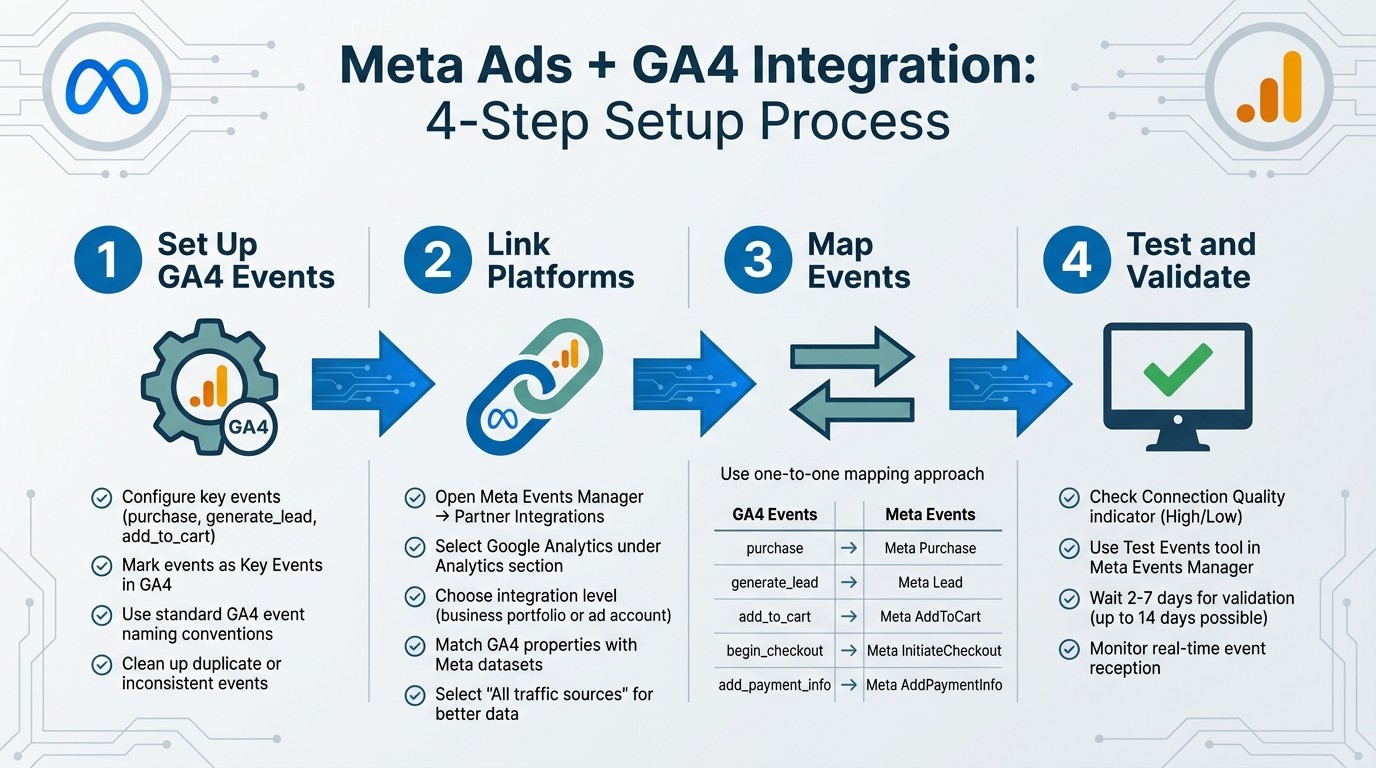
4-Step Process to Connect Meta Ads with Google Analytics 4
How to connect GA4 events to optimize Meta Ads targeting - Full Guide
Before You Start: Setup Requirements
If you're ready to link Meta Ads with GA4, it's crucial to ensure that everything is properly set up. Without meeting these requirements, the data syncing process can hit a wall.
Required Tools and Settings
First, confirm you have the right access on both platforms. For GA4, you’ll need Viewer access or higher at the account or property level. On the Meta side, you must have either Partial control or Business asset access at the business portfolio or ad account level. Keep in mind, this integration only works with fully configured GA4 properties - older Universal Analytics setups are not supported.
For Meta, active pixels (now called datasets) must be installed on your website and used for optimization in active ad sets within the last 56 days. Without this, mapping won't work.
"This integration doesn't replace the Meta Pixel or the Conversions API, it enhances them." - Dataslayer
To ensure smooth access over time, use a service account email like marketing@company.com instead of a personal email address.
Privacy compliance is also a key step. Implement a Consent Management Platform (CMP) to stay aligned with regulations like GDPR and CCPA when sharing data between platforms.
Platform | Required Access Level | Scope |
|---|---|---|
Google Analytics 4 | Viewer access or higher | Account/Property level |
Partial control | Business Portfolio level | |
Meta Business Suite | Business asset access | Ad Account level |
Meta Events Manager | Dataset Owner/Shared Access | Pixel/Dataset level |
Once permissions and access are squared away, you’re ready to configure your GA4 events.
Configuring Events in GA4
With access confirmed, the next step is setting up your GA4 events for accurate mapping. Make sure to mark key conversion events in GA4 as Key Events - this ensures they show up in Meta Events Manager. Events like "purchase", "generate_lead", or "add_to_cart" need to be designated as Key Events before they can be mapped.
Stick to GA4-standard event names. For instance, use generate_lead rather than a custom name like form_submit. Meta's system automatically recognizes standard event names, making mapping much easier. If your GA4 setup includes inconsistent naming or duplicate events, resolve these reporting differences before proceeding.
Meta advises a one-to-one mapping approach - each GA4 event should link to a single Meta event for better tracking accuracy. Keep in mind that landing page view events cannot be mapped through this integration, and only web-based events are supported. If you’re dealing with app events, a separate setup process is required.
During the setup process, you’ll choose between importing data from "All traffic sources" or "Only traffic coming from Meta." Generally, importing all traffic is the better choice. This broader dataset helps Meta’s algorithm with attribution, especially when ad blockers or browser privacy settings limit tracking. Note that if your ad URLs contain more than 50 unique utm_source parameters, Meta won’t allow the "Only traffic coming from Meta" option.
Once everything is configured, Meta will validate the setup and start syncing data. Validation typically takes 2 to 7 days, but in some cases, it may take up to 14 days. Afterward, check the "Connection quality indicator" in Meta Events Manager to confirm everything is running smoothly.
How to Connect Meta Ads with GA4
Once your GA4 events are set up, the next step is linking Meta Ads to GA4 through Meta's interface. This connection ensures your GA4 insights are directly integrated into Meta Ads, allowing for unified tracking and better campaign performance. The setup is quick, typically taking around 5 to 10 minutes.
Setting Up Meta Ads Manager
Start by opening Meta Events Manager and navigating to Partner Integrations. Under the Analytics section, select Google Analytics. You'll then choose whether to integrate at the business portfolio level or the ad account level. If you manage multiple ad accounts but only want specific ones connected to GA4, make sure to uncheck the "Apply connection to all Meta ad accounts" option. For agencies, the integration must be done at the ad account level since the business portfolio option isn't available.
Log in using your linked Google account, and then match each GA4 property with its corresponding Meta dataset (formerly known as the Meta Pixel). Be sure to select datasets that have been actively used for optimization in ad sets within the last 56 days.
When prompted, select All traffic sources. This choice provides Meta with more data, helping to address tracking gaps caused by ad blockers and Apple's Intelligent Tracking Prevention. If your account uses more than 50 utm_source parameters for Meta ad URLs, the "Only traffic coming from Meta" filter won't be available.
Linking Conversion Events
Next, map your GA4 key events to Meta conversion events. For instance, connect GA4's purchase event to Meta's Purchase event, or add_to_cart to Meta's AddToCart. Meta suggests a one-to-one mapping to ensure the best accuracy. Events marked as Key Events in GA4 will automatically appear in the dropdown menu. If an event is missing, double-check your GA4 configuration.
GA4 Event Name | Meta Standard Event |
|---|---|
| Purchase |
| Lead |
| AddToCart |
| InitiateCheckout |
| AddPaymentInfo |
Once you've completed the mapping, proceed to test the connection to confirm the data flow.
Testing the Connection
After finalizing the integration, Google Analytics will show up as a partner integration in Meta Events Manager. Check the Connection quality indicator on the Summary page, which will display either "High" or "Low". If the quality is low, hover over the indicator to identify and resolve issues like unmapped events or missing permissions.
"It typically takes 2-7 days to validate setup changes. Recheck your Connection quality status on your Google Analytics connection Summary page after that time." – Meta Business Help Centre
Validation may take up to 14 days. During this time, use the Test events tool in Meta Events Manager to ensure that web browser events are being received in real time. Once validation is complete and the connection quality status is "High", your integration is live. At this point, data will begin flowing between platforms, enhancing Meta's optimization processes with your post-click data.
Using Your Integration Effectively
Now that your integration is live, it’s time to focus on ensuring data accuracy and using insights effectively to refine your campaigns. Regularly monitor the quality of your connection to catch any issues early. Once changes are implemented, allow some time for validation. Don’t forget to review your data details, dashboard setup, and campaign insights to stay on track.
Checking Data Accuracy
Start by ensuring your UTM parameters are consistent across all Meta ads. A critical note: GA4 is case-sensitive. For example, utm_source=Facebook and utm_source=facebook will be treated as separate traffic sources in your reports. To avoid fragmented data, always use lowercase for utm_source and utm_medium. You can confirm your UTM parameters are firing correctly by checking GA4 Realtime reports.
Keep in mind that Meta and GA4 use different attribution models. Meta includes view-through conversions (users who see an ad but don’t click), while GA4 typically attributes conversions only to clicks. These differences mean slight variations in data are normal, so focus on trends rather than expecting exact matches.
Once your data is accurate, you can move on to building dashboards that combine insights from both platforms.
Building Combined Reporting Dashboards
Since GA4 doesn’t automatically pull Meta spend data, you’ll need to import cost information manually - either through CSV uploads or third-party connectors. This step is essential for calculating ROAS directly in your dashboards. Use dynamic parameters to automatically sync campaign names and placements, which will highlight top-performing placements like Instagram Stories and Facebook Feed.
To get a complete picture, combine Meta’s top-of-funnel metrics (like impressions, reach, and frequency) with GA4’s post-click data (such as engagement time and bounce rate). This reveals where users drop off after clicking your ads. For example, adding a frequency widget to your dashboard can help you identify issues: a frequency under 3 may indicate your ads aren’t being seen enough, while a frequency over 8 could point to audience fatigue.
Improving Campaigns with GA4 Metrics
The insights from GA4 can help you refine your campaigns for better results. For instance, GA4 shows what happens after users interact with your Meta ads - whether they engage with your site or leave quickly. By filtering the "Traffic Acquisition" report for utm_source=facebook, you can identify campaigns that bring in high traffic but low engagement. If you notice certain cities or countries with high clicks but no engagement, consider excluding them from your Meta Ad Set settings.
You can also use utm_content to track which specific ad creatives drive the longest engagement times. This allows you to scale winning concepts rather than focusing solely on clicks. Additionally, mapping GA4 events like generate_lead and purchase to Meta events in Events Manager helps send cleaner signals back to Meta’s machine learning. This makes it easier for Meta to find similar high-value users.
"If your GA4 setup is messy, Meta will optimize for noisy or incomplete signals. Fix your GA4 hygiene first".
Automating Meta Ads Management with AdAmigo.ai

Once you've refined your manual dashboards and reports, it's time to step up your game with automation. With your Meta Ads and GA4 integration ready, automation can transform insights into immediate actions. Manual optimization can eat up hours every week, but AdAmigo.ai works as an AI-powered media buyer, optimizing campaigns in real time using data from Meta and GA4. This not only saves you time but also boosts the impact of your GA4 insights.
AdAmigo.ai Features
AdAmigo.ai is packed with tools designed to simplify and supercharge your ad management:
AI Autopilot: This feature constantly audits your account, identifies opportunities, and makes improvements - either automatically or with your go-ahead. It handles everything from testing and budget reallocation to scaling winning campaigns and pausing underperformers, all without you needing to log into Ads Manager.
AI Chat Agent: Manage campaigns through simple conversations. Ask questions like, "Why did ROAS drop yesterday?" or give commands like, "Launch a new retargeting campaign." The AI not only analyzes your data but also executes changes directly from the chat.
Bulk Ad Launcher: streamline bulk ad testing by uploading your assets to Google Drive. The platform generates ad copy, structures campaigns, and publishes ads within minutes.
AdAmigo Protect: This feature keeps an eye on your account for issues like broken links, unusual spending patterns, or API problems, catching potential mistakes before they hurt performance.
How AdAmigo.ai Uses GA4 Data
AdAmigo.ai taps into GA4's standardized conversion data and the Meta Conversions API to optimize campaigns in real time. The platform uses this data to adjust bids, reallocate budgets, and refresh creatives based on which audiences and ads deliver the most value. To make the most of this, ensure that your GA4 and Meta events follow a unified schema with matching event names and IDs. This helps provide clean, deduplicated signals for the AI to work with. For example, follow a guide to map specific GA4 events like generate_lead directly to their corresponding Meta conversion types instead of grouping multiple actions into one category.
With AI Actions, you can review daily recommendations that highlight high-performing creatives or budget adjustments you might overlook manually. Additionally, set up anomaly alerts via Slack or email to catch issues like broken landing pages or API failures before they cost you money.
Real Results with AdAmigo.ai
AdAmigo.ai delivers performance improvements you can see. Agencies using the platform manage 3–5× more accounts, as the AI handles repetitive tasks, freeing up strategists to focus on growth. For eCommerce brands, it enables advanced Meta strategies without the need for large in-house teams. Essentially, the AI functions like a tireless media buyer, continuously refining performance.
The platform offers two pricing plans:
Full Access Plan: $349 per month per ad account. This includes unlimited ad spend, all features, and a dedicated account manager.
Signals Plan: $99 per month. This plan provides two daily AI optimization recommendations, one-click application, and access to the AI Chat Agent for performance insights.
Conclusion
Key Takeaways
Connecting Meta Ads with GA4 gives you a full view of your customer's journey. To get started, ensure admin access is set up, implement two-factor authentication, use consistent lowercase UTM tagging, and map each GA4 event to its corresponding Meta conversion. Keep in mind that validation can take anywhere from 2 to 7 days, so check the Connection Quality indicator during this time.
GA4 offers insights that Meta's pixel alone can't provide, such as bounce rates, time spent on your site, and complete customer journeys. Leverage these insights to refine Custom Audiences and Lookalike Audiences, calculate accurate ROAS, and pinpoint which creatives lead to high-value actions. This data creates a strong foundation for fine-tuning your campaigns.
To maintain clean data, standardize your UTM parameters and use service accounts like marketing@company.com for authentication. This prevents access issues if team members leave. Regularly review your dashboards - check the "Building Combined Reporting Dashboards" section for tips on frequency and performance benchmarks.
Once your integration is up and running, consider automating optimizations with tools like AdAmigo.ai. These tools can use your GA4 and Meta data to adjust bids, redistribute budgets, and refresh creatives automatically, allowing you to focus on strategy while automation handles the execution.
FAQs
Do I still need the Meta Pixel and Conversions API after linking GA4?
Yes, you still need the Meta Pixel and Conversions API, even after linking GA4. These tools directly track user interactions on your website, offering more precise attribution and better campaign optimization than relying solely on the GA4 integration.
Why don’t Meta and GA4 conversion numbers match exactly?
Meta and GA4 often show different conversion numbers due to the way they track and attribute data. Meta prioritizes in-platform actions, such as clicks or purchases made directly through its ads, while GA4 focuses on website events and user behavior, capturing activity across your site. These contrasting methods naturally result in discrepancies between their reports.
What should I do if Meta shows a low connection quality with GA4?
If Meta shows low connection quality with GA4, start by reviewing your integration in Events Manager under Partner Integrations. Check that all permissions are correctly assigned and that datasets are mapped appropriately. If the problem continues, refer to Meta's official setup guides for troubleshooting steps. Ensuring the configuration is set up correctly is crucial for keeping the connection stable.