
Meta Ad Account Setup Checklist for Compliance
Step-by-step checklist to verify business assets, enable 2FA, verify domain, set up Pixel + Conversions API, and avoid Meta ad rejections.
Setting up a Meta ad account isn’t just about launching campaigns - it’s about avoiding costly mistakes that can lead to ad rejections, account restrictions, or even permanent bans. In 2025, Meta removed over 159 million scam ads, and by early 2026, ad rejection rates surged 34% due to stricter policies. Here’s what you need to know to stay compliant:
Business Verification: Use matching legal documents (e.g., EIN, licenses) to verify your account. Even small errors, like abbreviations, can cause delays.
Two-Factor Authentication (2FA): Mandatory for all users to secure your account.
Domain Verification: Essential for tracking and intellectual property protection.
Tracking Setup: Use Meta Pixel and Conversions API together for accurate data and event deduplication.
Policy Compliance: Label AI-generated content, avoid misleading claims, and meet regional compliance standards for EU audiences.
User Roles: Assign roles carefully. Regularly audit access to avoid unauthorized changes.
Special Ad Categories: Follow stricter rules for political, housing, employment, or credit ads.
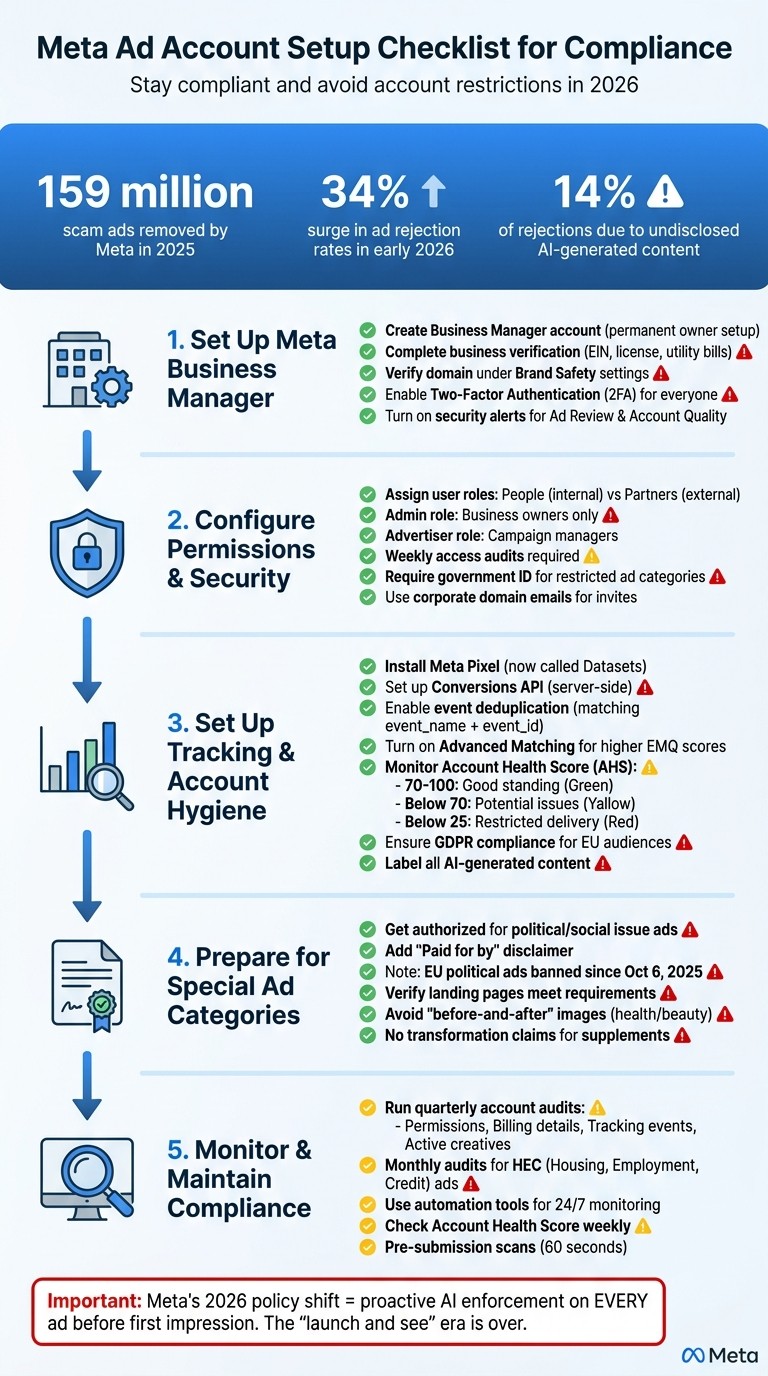
Meta Ad Account Setup Compliance Checklist: 5-Step Process
Step 1: Set Up Meta Business Manager
Create and Verify Your Business Manager Account
When setting up a Meta Business Manager account, keep in mind that the account creator becomes its permanent owner. To avoid future complications, it’s best to have a business owner or a long-term stakeholder handle this setup, rather than a temporary employee or contractor. This ensures smooth control over the account even if personnel changes occur.
After creating the account, go to Business Settings to connect your Facebook Pages, Instagram accounts, and WhatsApp numbers as business-owned assets. Avoid linking them through personal profiles. Why? It minimizes risks - if a personal account gets restricted, your ad operations won’t come to a halt.
Next, complete the business verification process in the Security Center. This involves submitting legal documents like your EIN letter, business license, or utility bills. Be meticulous: the business name and address on these documents must match the details in your Business Settings exactly. Even small discrepancies - like writing "Street" instead of "St." - can cause verification failures. Double-check everything before submitting to avoid delays and setup issues.
Once your assets are verified, focus on strengthening your account’s security settings.
Turn On Two-Factor Authentication
After verifying your business assets, the next critical step is enabling two-factor authentication (2FA). Meta requires 2FA for all users accessing business assets. To set this up, go to Business Settings, find Security Center, and set the 2FA requirement to "Everyone." This ensures that employees and third-party partners comply with Meta’s security standards.
For added security, invite team members using corporate domain emails. This builds trust with Meta and shows professionalism. Additionally, enable security alerts by navigating to Business Settings > Notifications. Turn on real-time notifications for "Ad Review" and "Account Quality" to catch unauthorized changes or security issues early - before they disrupt your campaigns. Enforcing 2FA not only protects your account but also strengthens your compliance standing.
Verify Your Domain
Domain verification is a must if you want to set up Datasets (formerly Pixels) and track web events accurately. This often involves a Meta Conversions setup with GA4 for comprehensive data tracking. Without it, your conversion tracking won’t work properly, and your campaigns won’t optimize as they should. You can find the domain verification option under Brand Safety and Suitability in Business Settings. Completing this step before launching campaigns will save you from unnecessary delays.
Domain verification also safeguards your intellectual property by preventing unauthorized use in ad campaigns. For smooth tracking and compliance with Meta’s policies, ensure your landing page URLs avoid redirects or URL shorteners. Even after verification, these can trigger security filters and cause issues. A verified domain is key to running effective, secure campaigns.
Step 2: Configure Account Permissions and Security
Set Up User Roles and Permissions
After verifying your domain, the next step is setting up user access to ensure your account stays secure and compliant. Meta separates users into two categories: "People" (your internal team) and "Partners" (external agencies or third-party providers). To minimize security risks, assign your in-house team as People and external collaborators as Partners. This distinction helps maintain clear boundaries and reduces potential vulnerabilities.
When assigning roles, be strategic. Reserve the Admin role for individuals who require full control, like business owners or senior managers. For daily campaign management, the Advertiser role is more appropriate, as it limits access while maintaining accountability. Understanding the differences between permissions and admin roles is key to maintaining security. Avoid giving account access to just one person - whether it’s a founder or a media buyer. If that individual leaves or gets locked out, it could create unnecessary complications.
Make it a habit to audit access permissions across your Page, ad account, and Business Manager on a weekly basis. This ensures only current, authorized team members or agencies have access. Immediately revoke access for employees or partners who are no longer involved. As Cedric Yarish from AdManage.ai highlights:
"A surprising number of 'performance' problems are actually access problems in disguise".
Verify User Identities
Identity verification is now a must for compliance. Anyone managing restricted ad categories must submit a government-issued ID.
Additionally, require all users to enable two-factor authentication (2FA) on their personal Facebook accounts. Meta mandates 2FA for accessing Business Manager assets, and enforcing this at the Business Manager level adds another layer of security. When inviting team members, use corporate domain emails instead of personal ones. This not only boosts your account's trust score with Meta but also reduces the chances of phishing-related issues.
Step 3: Set Up Tracking and Account Hygiene
Install Meta Pixel and Conversions API
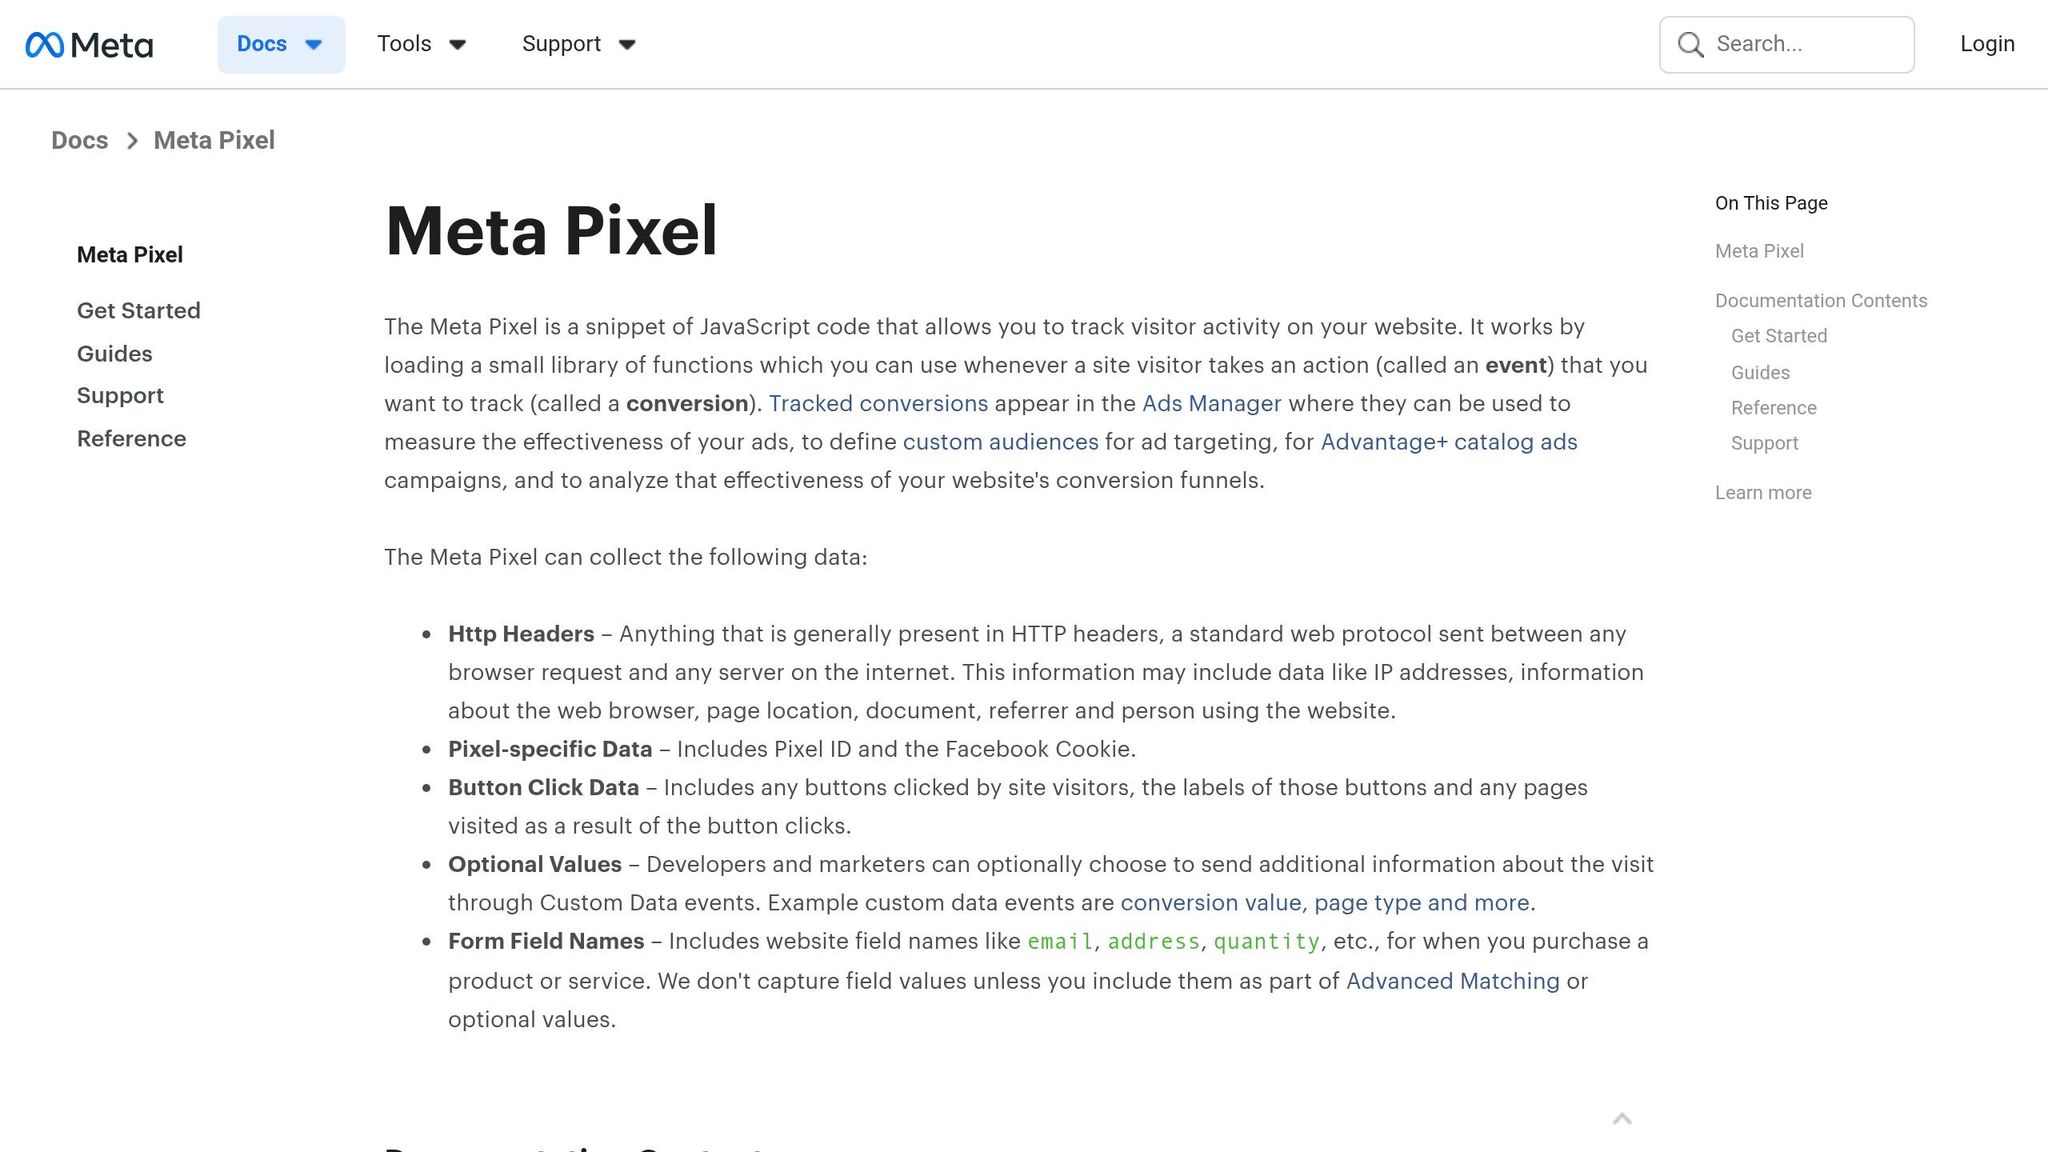
If you’ve already verified your domain in Step 1, you’re ready to enable advanced tracking tools. Meta now calls its Pixel "Datasets". To get the most accurate results, Meta suggests using both the browser-side Pixel and the server-side Conversions API together. This dual setup helps safeguard your data when ad blockers disrupt browser tracking or when users leave a page before events are fully logged.
To avoid double counting, you’ll need to deduplicate events. Make sure both browser and server versions of the same action share the same event_name and event_id. If they don’t match, you might end up with inflated numbers for purchases or leads, which can throw off your reporting and optimization efforts. You can use the Meta Pixel Helper Chrome extension to ensure browser events are firing properly and are being deduplicated.
During configuration, turn on Advanced Matching. This feature sends hashed customer details like email addresses, phone numbers, and names to Meta, helping to link events to user accounts more effectively. A higher Event Match Quality (EMQ) score means Meta’s auction system has better data to work with, improving real-time bid optimization.
Stick to standard events like Purchase, Lead, or AddToCart whenever possible. Meta’s system is already optimized for these actions, which helps you move out of the learning phase faster and stabilize your ad performance.
Setup Method | Technical Requirement | Best For |
|---|---|---|
Partner Integration | Small businesses and standard CMS users | |
Manual Setup | Basic coding/Web developer required | Custom websites and complex tracking needs |
Conversions API | Server-side integration/CRM connection | Bypassing ad blockers and tracking offline events |
Once your tracking is in place, the next step is to keep an eye on your account’s overall health.
Check Account Quality and Restrictions
After setting up tracking, make sure your account stays in good standing by regularly checking Meta’s Account Quality Dashboard. You can access this through Meta Business Suite or Ads Manager. In 2026, Meta introduced the Account Health Score (AHS), which ranges from 0 to 100. A score below 70 signals potential issues, while anything under 25 can lead to Restricted Delivery, drastically reducing your ad reach.
To stay ahead of problems, enable real-time alerts in Business Settings under "Ad Review", "Account Quality", and "Policy Updates." These alerts will notify you of any issues immediately. It’s also a good idea to maintain an audit log that tracks ad IDs, rejection reasons, and resolution dates. This can help you identify recurring issues with your messaging or creative elements.
If your ads get rejected, Meta has a three-tier appeal process to recover disabled Meta ad accounts. Start with an automated re-review, then escalate to a manual review if needed. For more complex cases, you can submit them to the Policy Advisory Board. Completing Business Verification in Meta Business Settings can also give you higher spending limits and faster resolution times during appeals.
Meet GDPR and Data Privacy Requirements
Accurate tracking must go hand in hand with privacy compliance, especially for campaigns targeting EU audiences. Make sure your practices align with the EU Digital Services Act (DSA), which requires you to include beneficiary and payor details in specific fields. Additionally, the Digital Markets Act (DMA) mandates giving EU users the choice between fully personalized ads and a less personalized experience with limited data sharing.
Update your privacy policy and terms to clearly explain how you collect and use data. Publish these details on your landing page for transparency. When building custom or lookalike audiences, document your data sources to ensure you have proper consent, and regularly audit these audiences to confirm the data is recent and compliant.
If you use AI-generated or modified ad content, label it as such by checking the "AI-generated" box in Ads Manager. Finally, avoid misleading elements on your landing pages. For instance, if your ad promises "Free Shipping", make sure that’s reflected during checkout, and steer clear of deceptive practices that could frustrate users or violate guidelines.
Step 4: Prepare for Special Ad Categories
Get Authorized for Political Ads
If you plan to run ads related to social issues, politics, or elections, you’ll need to complete Meta’s authorization process. During the campaign setup, select the "Social issues, elections, or politics" category. This step ensures your ads comply with the specific targeting and transparency rules required for these topics.
To get authorized, verify your identity through the "Business Support Home" or "Account Quality" dashboard. Once completed, include a mandatory "Paid for by" disclaimer on every ad, listing your legal details. After authorization, all political and social issue ads you run will be stored in Meta's public Ad Library for seven years, allowing anyone to search and view them.
It’s worth noting that as of October 6, 2025, ads related to politics, elections, or social issues can no longer be delivered in the European Union. This change stems from the Transparency and Targeting of Political Advertising regulation. If your campaigns target EU audiences, you’ll need to adapt to Meta policy changes and rethink your approach. Also, ensure your landing pages align with Meta’s compliance requirements.
Make Sure Landing Pages Meet Requirements
Even if your ad creative is approved, your landing page must also meet Meta's guidelines. For instance, the destination page cannot promote or link to prohibited products. Ads in the health and beauty space face additional scrutiny: "before-and-after" images are generally not allowed unless they relate to fitness services.
If you're advertising supplements or topical products, avoid making transformation claims. Instead, focus on neutral explanations or demonstrations to steer clear of triggering flags for promoting "negative self-perception". By carefully crafting both your ads and landing pages, you can ensure compliance and avoid disruptions. You can also use third-party compliance tools to automate creative checks and reduce the risk of rejections.
Step 5: Monitor and Maintain Compliance
Run Regular Account Audits
Once your account is set up securely and tracking is in place, the next step is regular audits to ensure compliance. Meta’s advertising policies are constantly enforced, with AI classifiers reviewing every ad before it’s served - not just after user complaints. This means even ads that were previously approved can face rejection if policies are updated or violated.
To stay ahead, conduct quarterly audits of key account components like permissions, billing details, tracking events (Pixel and Conversions API configuration), and active creatives. Look for misleading claims, prohibited language like "Are you struggling with…", and missing AI labels. By 2026, undisclosed AI-generated content became the third-largest reason for ad rejections, making up 14% of all cases. Every creative modified or generated by AI must include the required "AI-generated" label to avoid automatic disapprovals.
Sync your audit schedule with your earlier account quality checks. Use Meta's Account Quality dashboard to monitor your Account Health Score, which ranges from 0 to 100. Scores below 50 can limit ad delivery, while scores under 25 may stop impressions entirely. If your campaigns involve housing, employment, or credit (HEC) ads, perform monthly audits to ensure they’re correctly categorized under Special Ad Categories. Meta’s updated visual classifiers now aggressively flag attempts to bypass these classifications, so proactive compliance is critical to avoid policy violations.
Don’t forget to audit landing pages as well. Ensure they load quickly, align with your ad copy, and function properly. A pre-submission audit can prevent up to 70% of potential ad rejections.
Once you’ve established a regular audit process, automation can take over some of the heavy lifting, offering continuous protection for your campaigns.
Use Automation Tools for Account Monitoring
While audits are essential for periodic checks, automation plays a key role in keeping your account compliant 24/7. Automated tools can monitor your account in real time, spotting potential issues before they escalate into costly mistakes or policy violations.
For example, AdAmigo.ai offers AdAmigo Protect, a feature designed to continuously track account health. It flags unusual activity, delivery problems, and performance anomalies, helping you avoid unnecessary disruptions. These tools can also perform pre-submission scans in under 60 seconds, identifying potential violations before your ads even enter Meta’s review queue. This is especially useful given Meta’s multimodal enforcement system, which evaluates all ad elements simultaneously.
For agencies managing multiple accounts or brands running high-volume campaigns, automation ensures consistent application of rules across all ads. This reduces human error and helps maintain compliance standards across the board.
Never Get Your Facebook Ads Rejected Again! (Use This Free Tool)
Conclusion
This checklist lays out a clear path to keeping your Meta ad operations compliant and running smoothly. From securing your Business Manager with two-factor authentication to implementing proper tracking with Meta Pixel and Conversions API, each step is designed to minimize disruptions to your campaigns. The stakes are especially high in 2026, as a major policy update in March led to a 34% jump in rejection rates within the health, wellness, and beauty sectors. Additionally, undisclosed AI-generated content now makes up 14% of all ad rejections, emphasizing the importance of accurate labeling and choosing the right categories. As AuditSocials explains:
"Meta's 2026 policy cycle marks the transition from reactive enforcement (reviewing ads after complaints) to proactive enforcement (scanning every ad through AI classifiers before the first impression is served). The era of 'launch and see what happens' is over."
To support compliance, ongoing monitoring is a must. Relying solely on manual checks can lead to errors, especially when managing multiple accounts or high ad volumes. Automation tools like AdAmigo.ai can simplify this process. With features like AdAmigo Protect, these tools provide round-the-clock monitoring, flagging policy violations, broken landing pages, and spending anomalies in under a minute - often catching issues before Meta’s review process begins. For agencies juggling multiple clients or brands, this kind of proactive oversight helps save ad spend and ensures compliance across campaigns.
Finally, regular reviews are key to maintaining compliance over the long term. Keep an eye on your Account Health Score weekly - accounts scoring above 70 are in good standing, while those below 25 risk restricted impressions. By combining the steps in this checklist with frequent audits and automated monitoring, you can safeguard your ad account, avoid unexpected policy issues, and ensure consistent results.
FAQs
What causes Meta ad account bans most often?
Meta ad account bans often happen when policies are broken. Common triggers include misleading claims, promoting prohibited content (like illegal products), using discriminatory targeting, or failing to follow rules for special ad categories. Topics such as housing, employment, and credit need careful handling to meet Meta's strict guidelines.
Do I need both Pixel and Conversions API?
Yes, using both the Pixel and the Conversions API is a smart move for precise conversion tracking. This is becoming increasingly important as Meta continues to prioritize privacy and data accuracy in 2025 and beyond. By combining these tools, you can achieve more reliable measurement while staying aligned with evolving privacy regulations.
How can I raise my Account Health Score fast?
To boost your Account Health Score quickly, focus on resolving policy violations and adhering to Meta's advertising standards. Use Meta Ads Manager to regularly monitor your account and address any issues as they arise. Tools like AdAmigo.ai can streamline this process by auditing your account, identifying violations, and offering real-time suggestions for corrections. The combination of staying compliant, resolving problems promptly, and proactive monitoring will help you improve your score effectively.