
Using URLs for Meta Custom Conversions
Set up URL-based custom conversions in Meta Events Manager: define URL rules, test events, and use Conversions API for more accurate tracking.
Setting up URL-based custom conversions in Meta Events Manager is a quick way to track key actions on your website without needing extra code. By defining rules for specific pages - like "thank-you" or "order-confirmation" URLs - you can monitor conversions that matter most to your business. This helps Meta's algorithm improve ad targeting and reporting accuracy. Here’s a simple breakdown of how it works:
What You Need: A verified Meta Pixel, domain verification, and a list of URLs representing key actions (e.g., checkout pages).
How It Works: Define URL rules using "contains", "equals", or even regex for advanced patterns.
Setup in Events Manager: Create rules, assign categories like "Purchase" or "Lead" by mapping events to conversion goals, and test to ensure tracking works.
Best Practices: Use descriptive names, avoid overly broad rules, and combine with the Conversions API for better data accuracy.
This method is limited to 100 custom conversions per ad account, so choose your rules wisely. Avoid tracking sensitive data (e.g., health or financial terms), as Meta enforces restrictions on such content. Once set up, these custom conversions can optimize your ad campaigns by focusing on high-value user actions.
How To Create Facebook Custom Conversions
Before you begin, it is helpful to compare Meta Ads event triggers to ensure custom conversion rules are the right choice for your tracking needs.
What You Need Before You Start
To set up URL-based custom conversions, there are a few critical steps you need to take first. These steps ensure your tracking is accurate and your reporting is effective. Once these are in place, you’ll be ready to configure your conversion rules without a hitch.
Meta Business Manager and Pixel Setup
First, you’ll need an active Meta Business Manager account and a verified Meta Pixel installed on your site. The Pixel collects raw data - like page views - which is then filtered by your URL rules to define conversions. Without a functioning Pixel, your custom conversion rules won’t work.
Another important step is domain verification within Meta Business Manager. This process confirms ownership of your data and ensures tracking accuracy, especially as privacy restrictions on browsers continue to grow. To further improve tracking, consider using the Conversions API (CAPI) alongside the Pixel. CAPI allows data to be sent directly from your server to Meta, bypassing browser limitations like ad blockers. It also enhances your Event Match Quality (EMQ) score, which measures how well your events align with Meta’s data.
Once your account and Pixel are verified, the next step is identifying the exact URLs that signify valuable conversions on your site.
Access to Key Website URLs
You’ll need to gather the specific URLs or URL patterns that correspond to your key conversions. These are often pages like "thank-you" screens, order confirmations, or checkout success pages.
Before diving into Events Manager, make a list of these URLs. Decide whether you’ll use a full URL match or a substring and note any unique parameters that distinguish different types of conversions. For instance, if you’re tracking newsletter sign-ups separately from demo requests, each should have a distinct URL pattern. Be mindful, though - Meta prohibits using URLs with health or financial terms for conversions starting September 2, 2025.
How to Set Up URL-Based Custom Conversions
Once your Pixel is installed and you've identified the URLs you want to track, you can create custom conversions in Meta Events Manager in just a few steps.
Opening Events Manager
Start by logging into Meta Business Manager. Click the menu icon (≡) in the top-left corner of Ads Manager and select Events Manager from the dropdown. Choose the Pixel that's active on your website. In the left-hand menu, click Custom Conversions and then hit Create Custom Conversion to begin. This is the first step toward capturing the specific user actions that are critical for your campaign's success.
Creating URL Rules for Custom Conversions
Begin by selecting All URL traffic as your conversion event. This setting tells Meta to track visits to specific pages rather than relying on standard vs custom conversions that use code-based events. Next, define your URL rule by choosing one of three options: URL contains, URL equals, or URL doesn't contain.
Use URL contains to track pages with keywords like "thank-you" or "complete."
Choose URL equals if you need an exact match, such as
https://yoursite.com/checkout-success.For more detailed tracking, filter by URL parameters like
product_id=123to match specific query strings.
You can also combine rules for greater accuracy, such as "URL contains 'trial' AND URL doesn't contain 'login'." Once your URL rule is set, assign it an event category and, if needed, a monetary value.
Setting Categories and Values
After defining the URL rule, select a standard event category from the dropdown. Options like Purchase, Lead, Complete Registration, or Start Trial help Meta's algorithm optimize ad delivery for the desired user actions. Choose the category that best aligns with your goal. You can also assign an optional monetary value, which is especially helpful for calculating Return on Ad Spend (ROAS) directly in Ads Manager.
Saving Your Custom Conversion
Double-check that your URL rule, category, and value are accurate, then click Create to save your custom conversion. To ensure it's working, visit the target URL to trigger the event. Then, return to the Custom Conversions tab in Events Manager to confirm the status has changed to Active. Keep in mind that while you can edit the name, description, and value of a custom conversion after it's created, the URL rules cannot be changed - you'll need to create a new custom conversion if adjustments are required.
URL Rule Types and When to Use Each One
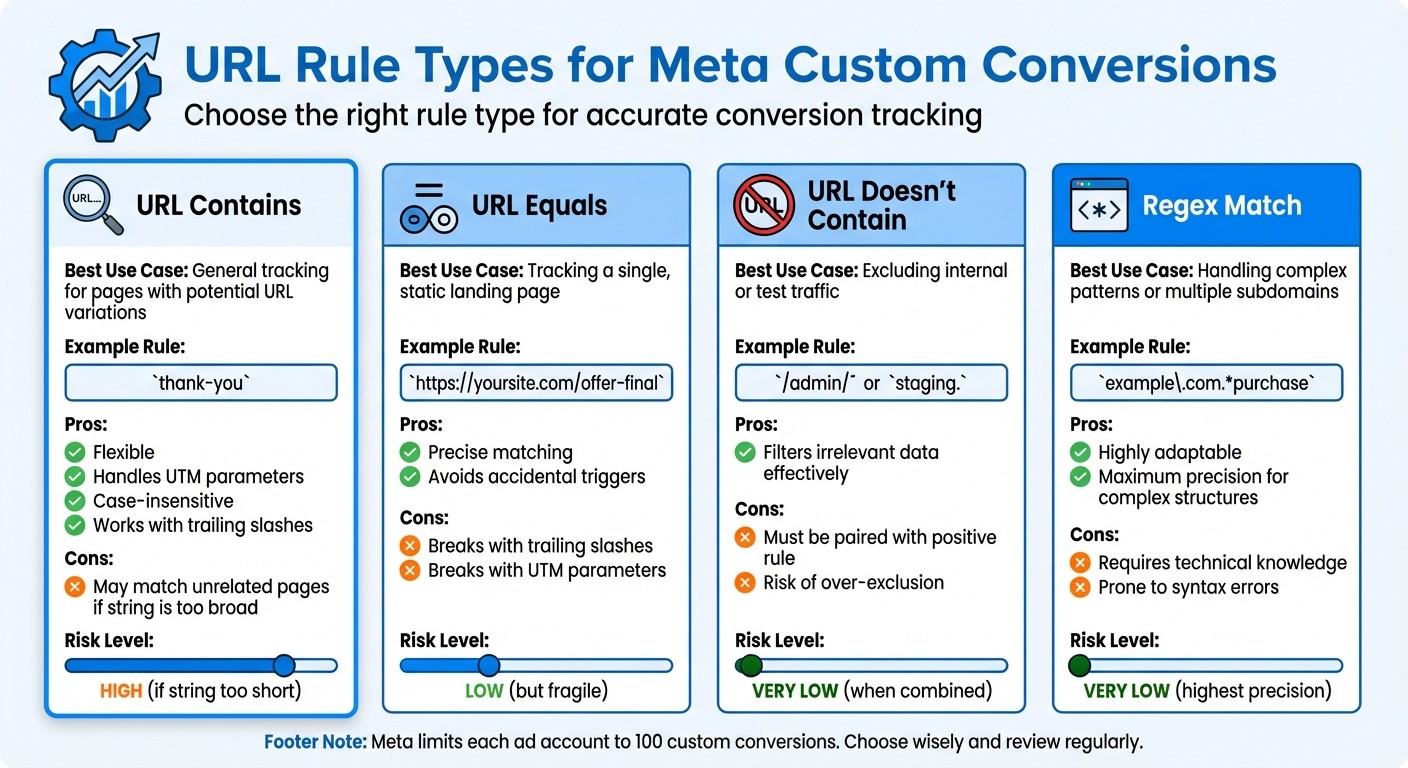
Meta Custom Conversions URL Rule Types Comparison Guide
Choosing the right URL rule type depends on how you want to maintain URL consistency and meet your tracking needs.
URL contains is the go-to option for most tracking scenarios. It matches any URL that includes the text string you specify, regardless of capitalization. This makes it a great fit for pages with dynamic elements. For example, a rule set to thank-you will capture URLs like https://yoursite.com/thank-you, https://yoursite.com/Thank-You.html, and even https://yoursite.com/thank-you?utm_source=facebook. You can also track Meta Ads in Google Analytics to see how these conversions appear alongside other traffic sources. Its adaptability makes it a reliable choice.
URL equals is more rigid, requiring an exact match of the entire URL. This option works best for static pages that don’t include variable components. For instance, if you set the rule to https://yoursite.com/success, it won’t trigger if there’s any variation, such as added UTM parameters or trailing slashes. Because of this, "URL contains" is often a better choice when dealing with URLs that might have dynamic elements.
URL doesn't contain is designed for filtering out specific traffic from your data. It’s especially helpful for excluding internal visits, staging environments, or test pages. For example, setting a rule to exclude URLs containing /admin/ or staging. ensures these actions don’t skew your conversion data. To maximize its effectiveness, pair this rule with a positive one like "URL contains."
Regex match is the most advanced option, allowing for complex pattern matching using full PCRE syntax. This rule type is ideal for tracking intricate URL structures, such as multiple subdomains or specific URL patterns. However, it comes with a learning curve - regex errors are easy to make and can be tricky to troubleshoot. Use this only when simpler rules won’t suffice.
URL Rule Types Comparison Table
Rule Type | Best Use Case | Example URL Rule | Pros | Cons |
|---|---|---|---|---|
URL contains | General tracking for pages with potential URL variations |
| Flexible; handles UTM parameters, case variations, and slashes | May unintentionally match unrelated pages if the string is too broad |
URL equals | Tracking a single, static landing page |
| Precise; avoids accidental triggers | Breaks if there’s a variation like trailing slashes or parameters |
URL doesn't contain | Excluding internal or test traffic |
| Filters out irrelevant data effectively | Needs to be paired with a positive rule; risks over-exclusion |
Regex match | Handling complex patterns or multiple subdomains |
| Highly adaptable for intricate matching | Requires technical knowledge; prone to syntax errors |
Following best practices for custom conversion reporting is essential for accurate tracking and avoiding duplicate counts in your conversion setup. Remember, Meta limits each ad account to 100 custom conversions, so it’s smart to review and delete unused conversions regularly to stay within the limit.
Testing and Verifying Your Custom Conversions
Testing URL-Based Conversions
To make sure your custom conversion is working, use the Test Events tool in Meta Events Manager. Start by opening the tool, then visit the specific URL tied to your rule - such as a thank-you page - in a separate browser tab. The Test Events tab will provide real-time feedback, showing the event firing along with details like Facebook browser cookies (fbp and fbc) and user agent data.
If the event doesn’t show up right away, give it 15–20 minutes and then check the Overview section in Events Manager. While you’re there, review the Event Match Quality (EMQ) score. A higher score indicates Meta can better match your website visitors to Facebook profiles, which boosts tracking accuracy.
In the custom conversion settings, the first_fired_time and last_fired_time timestamps confirm when the rule last triggered successfully. If your conversion appears as unavailable or blocked, it could mean Meta flagged it for including restricted information, such as details about health conditions or financial status. This policy has been enforced proactively since September 2, 2025. To resolve this, create a new conversion without those terms or request a review through Events Manager.
Once you’ve confirmed the conversion is firing correctly, keep monitoring it to ensure everything runs smoothly.
Monitoring Performance After Setup
After successfully testing your events, shift your focus to long-term performance monitoring. For the first 7–14 days, watch the conversion data to ensure it stays stable and accurate. During the initial 24–48 hours, check the "Last Received" status in Events Manager to confirm the conversion is firing consistently beyond the test phase.
When reviewing performance, exclude data from the most recent 7 days to account for delayed attribution. Meta's conversion tracking may take some time to fully register all events. Keep an eye on essential metrics like cost per conversion and ROAS during this period. If you notice duplicate events, revisit your URL rule logic to fix any issues.
Best Practices for URL-Based Custom Conversions
Once you've set up your URL-based custom conversions, following these best practices can help improve tracking accuracy and campaign performance.
Using Clear Conversion Names
Choose descriptive and meaningful names for your conversions. For example, instead of generic labels like "Conversion 1", use something specific, such as "Checkout Complete – High Value." This makes it easier to identify the action being tracked when managing campaigns or analyzing reports.
Starting September 2, 2025, Meta will block custom conversions that include prohibited terms. Avoid using words tied to sensitive topics like health conditions (e.g., "diabetes" or "cancer treatment") or financial status (e.g., "credit score" or "bankruptcy"). Conversions flagged for such terms will display is_unavailable set to true and will no longer work in new campaigns.
For improved tracking reliability, consider pairing your setup with the Conversions API.
Combining with Conversions API for Better Data
Relying solely on Meta Pixel tracking can lead to missed conversions due to ad blockers or cookie deletions. The Conversions API (CAPI) addresses these issues by sending data directly from your server to Meta, bypassing browser-related limitations.
To ensure accurate attribution and optimization, integrate the Conversions API with Meta Pixel. This setup requires at least 50 weekly conversion events for effective optimization and to avoid duplicate data. Additionally, CAPI allows you to send hashed customer information, like email addresses, which enhances your Event Match Quality (EMQ) score. Higher-quality data often results in better attribution, lower costs per action, and improved return on ad spend (ROAS).
To further refine your tracking, make sure your URL rules are specific and avoid unnecessary overlaps.
Avoiding Broad or Overlapping URL Rules
Using overly broad URL rules, such as "/shop", can result in tracking multiple unintended pages. Instead, opt for more specific rules like "/shop/thank-you." Additionally, the "contains" operator is often better than "equals" because it accommodates variations in URLs, such as UTM parameters, trailing slashes, or protocol differences (HTTP vs. HTTPS).
For more precise tracking, combine URL conditions with event parameters using "AND" logic. For instance, to track high-value purchases, you can set a rule where the URL contains "thank-you" AND the "value" parameter is greater than $100. To exclude certain pages or subdomains, use negative constraints like i_not_contains or neq. Before finalizing your rule, test it in Events Manager by visiting the target URL under the Test Events tab to confirm that the conversion fires as expected without capturing unintended pages.
Operator | Use Case | Risk of Overlap |
|---|---|---|
| General tracking (case-insensitive) | High if the string is too short (e.g., "/shop") |
| Static, unchanging URLs | Low, but may break with UTM parameters |
| Complex URL structures | Low, offering the highest precision |
| Filtering by value or specific product | Very low, as it adds multiple layers of verification |
Using Custom Conversions in Your Meta Ad Campaigns
Once you've verified and tested your URL-based custom conversions, it's time to put them to work in your campaigns. These conversions help Meta's algorithm focus on the actions that matter most to your business, giving you the chance to maximize the impact of your ad spend.
Selecting Custom Conversions for Campaign Objectives
Incorporating custom conversions into your campaigns can significantly improve targeting and outcomes. To get started, head to Ads Manager and select a custom conversion as your optimization event. Under the Optimization & Delivery section, use the Conversion Event dropdown to choose your custom conversion. This step signals Meta to prioritize showing your ads to users most likely to complete that specific action - whether that's high-value purchases (e.g., over $50) or sign-ups for premium services.
Keep in mind: Once your campaign is published, the conversion event cannot be changed. If you need to optimize for a different event, duplicate the campaign and select the new conversion before publishing.
Focus on events that align closely with your business objectives. For campaigns aimed at iOS users or domains impacted by privacy restrictions, ensure your domain is verified in Events Manager. Then, rank your custom conversions in order of importance under Aggregated Event Measurement (AEM). Remember, each verified domain is limited to 8 pixel/event pairs, so make your choices wisely.
After setting your campaign's objective, keep an eye on its performance by using custom metrics.
Analyzing Performance with Custom Metrics
When your campaigns are live, tracking their performance is essential. Use Ads Manager to monitor custom conversion data by using AI tools for account analysis and adding custom columns. Click Columns: Performance in the top-right corner, then choose Customize Columns. Search for your custom conversion by name and include metrics like cost per conversion, conversion value, and total conversions. This setup allows you to evaluate how different ad sets or creatives are performing in relation to your business goals.
For more advanced analysis, you can leverage the Ads Insights API to pull custom conversion data programmatically. However, note that this tool doesn’t support product ID breakdowns or unique action counts. Before scaling up any campaign, double-check in Events Manager to ensure your custom conversion is listed as "Active" - this confirms it's functioning properly before you increase your budget.
Summary
Setting up URL-based custom conversions is a simple and effective way to track and optimize key actions without needing additional code. By using specific URL rules - like targeting thank-you pages or high-value checkout pages - you can guide Meta's algorithm to focus on actions such as purchases over $200 or capturing quality sign-ups.
Here’s how it works: Open Events Manager, define your URL rules with operators like "contains" or "equals", assign a category and value, then save and test your setup. This ensures real-time conversion tracking is functioning correctly across your funnel. Use the Test Events tab to confirm everything is working properly and review quality scores before launching your campaigns. Keep in mind the limit of 100 custom conversions per ad account, so choose your rules carefully and avoid overlap or overly broad definitions.
Once verified, activate your custom conversions by selecting them as optimization events in the Conversion Event dropdown when setting up campaigns. Allow at least seven days to monitor performance and account for attribution delays and reporting best practices.
Be sure to follow Meta’s guidelines for sensitive information. If a conversion is flagged, the is_unavailable field in the API will return true, and it cannot be used for new campaigns. Use clear and descriptive naming conventions, such as "High-Value Purchase ($200+)", to keep everyone on your team aligned and reduce the risk of issues. This setup not only streamlines your custom conversion tracking but also ensures compliance with Meta's evolving policies.
FAQs
Should I use URL contains or URL equals?
When setting up URL-based conditions for custom conversions in Meta Ads, using URL contains provides greater flexibility. This option matches URLs that include specific parameters or paths, making it ideal for tracking a broader range of user interactions. On the other hand, URL equals demands an exact match, which can be overly restrictive in most tracking scenarios. For most cases, URL contains is the preferred choice to capture more diverse behaviors effectively.
How do I avoid duplicate or inflated conversions?
To avoid duplicate or inflated conversions in Meta Ads, it's important to set clear URL rules that ensure each conversion is tracked correctly. Use specific filters to prevent multiple counts of the same event, and take the time to test your tracking setup thoroughly. Regular monitoring and adjustments are essential to keep your conversion data accurate and trustworthy. By focusing on precise event filtering and validation, you can maintain dependable conversion metrics.
Why is my custom conversion blocked or unavailable?
Starting September 2, 2025, restrictions under Facebook's terms might block or limit your custom conversion. This could happen if specific types of data are restricted, your URL conditions aren’t set up correctly, or there’s a policy violation. To fix this, review your setup and make sure it aligns with Meta’s policies.