
How To Safely Share Ad Account Access
Secure your ad account with business manager tools, role-based permissions, 2FA, partner access, and regular permission audits.
When granting access to a Meta ad account, security and control are key. Instead of sharing personal login details, always use Meta Business Suite or Business Manager. These tools let you invite users via email and assign specific Meta ad permissions vs. admin roles tailored to their responsibilities. This approach ensures accountability and minimizes risk.
Key Steps to Securely Share Access:
Use People for team members and Partners for agencies.
Assign the least access necessary based on roles:
Admin: Full control (reserved for trusted individuals).
Advertiser: Campaign management.
Analyst: View-only access.
Complete Business Verification and enable two-factor authentication (2FA) for all users.
Regularly audit Meta ad account permissions and remove inactive users.
For agencies, use their Business ID to assign Partner access, allowing them to manage their own teams without exposing sensitive data like billing. Tools like AdAmigo.ai can further enhance security by monitoring account activity, pausing campaigns during unusual spending, and simplifying permission management.
HOW TO: Partner Access in Meta 2026 (ads, Instagram, pixels, Facebook, etc)
Meta Ad Account Access Levels
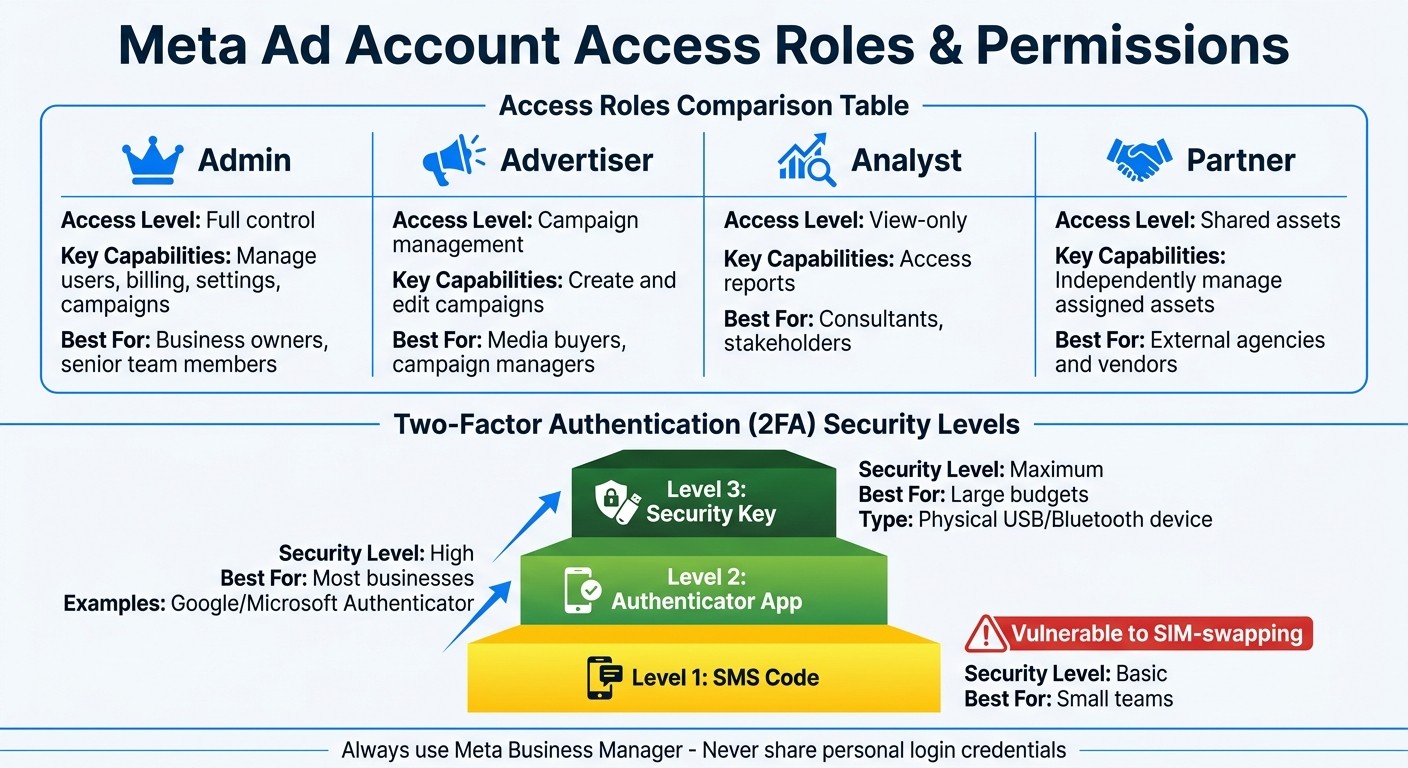
Meta Ad Account Access Roles and Permissions Comparison Guide
Meta Business Manager provides three main ways to manage access: People, Partners, and role-based permissions. Following Business Manager setup best practices ensures your assets remain organized and secure. Each option allows you to control and monitor access effectively, which is a key part of securing your Meta ad account.
Access Roles and Their Permissions
There are three key roles to assign: Admin, Advertiser, and Analyst. Here's how they differ:
Admins: Handle everything from managing users and billing to adjusting settings.
Advertisers: Focus on creating and managing ad campaigns.
Analysts: Have view-only permissions, giving them access to reports without the ability to make changes.
Meta also distinguishes between Basic Access and Partner Access. Basic Access is for your internal team and involves inviting individuals via email. Partner Access, on the other hand, is tailored for agencies, allowing them to manage their own teams through their Business Manager accounts.
By understanding these roles, you can choose the setup that aligns best with your business needs.
Selecting the Right Access Model
When deciding on an access model, consider whether you're adding an individual or working with an agency. For individuals, use the People option to send email invitations and assign roles. If you're collaborating with an agency, use the Assign Partners feature, which requires the agency's Business ID.
Partner Access is especially useful for maintaining control while outsourcing tasks. For instance, agencies can manage their team members independently. If an agency staff member leaves, they can update their team without requiring you to revoke access manually. This setup also ensures that sensitive information, like billing details, remains off-limits to the agency.
Role | Access Level | Key Capabilities | Best For |
|---|---|---|---|
Admin | Full control | Manage users, billing, settings, campaigns | Business owners, senior team members |
Advertiser | Campaign management | Create and edit campaigns | Media buyers, campaign managers using AI media buying platforms |
Analyst | View-only | Access reports | Consultants, stakeholders |
Partner | Shared assets | Independently manage assigned assets | External agencies and vendors |
Prerequisites Before Sharing Access
Before you give anyone access to your Meta ad account, it's crucial to ensure your Business Manager is set up correctly. Skipping these steps can leave your account exposed and make it unclear who has control over key settings.
Verify Your Business Manager Setup
First, make sure you’re an admin of the Meta Business Account that owns the ad account. Only admins can grant access, so this step is essential. To check, go to Business Settings and look under the "People" tab to confirm your role and permissions.
Next, complete Meta's Business Verification process through the Security Center. This process not only unlocks advanced features but also builds trust with Meta. You’ll need to provide official business documents, and Meta usually reviews these within a few business days.
Activate two-factor authentication (2FA) for all users. In the Security Center, enforce a policy requiring 2FA across your team. Use authenticator apps like Google Authenticator or Microsoft Authenticator instead of SMS codes, which can be compromised by SIM-swapping attacks. For accounts managing high budgets, consider using physical security keys for the highest level of protection.
2FA Method | Security Level | Best For |
|---|---|---|
SMS Code | Basic | Small teams (but vulnerable to SIM-swapping) |
Authenticator App | High | Most businesses (Google/Microsoft Authenticator) |
Security Key | Maximum | Large budgets (Physical USB/Bluetooth device) |
Admins and users with elevated access should also complete Meta’s identity confirmation process. This extra verification step reduces the risk of unauthorized access.
Once your account is verified and secure, the next step is to define clear permission boundaries.
Define Permission Boundaries
Always grant the least amount of access necessary for someone to do their job. For example, an analyst who only needs to view performance reports doesn’t require advertiser permissions to create campaigns. Similarly, a media buyer doesn’t need admin rights to manage billing.
Keep admin access limited to one or two trusted individuals, such as business owners or senior managers. Admins hold control over everything, including user management and billing settings, so this role should be assigned with caution.
For agencies, use the "Assign Partners" feature to allow them to manage their own team members without needing direct access to your account.
When connecting third-party tools or automation platforms, create dedicated system users instead of using personal admin accounts. This ensures a clear audit trail and avoids disruptions when team members leave. For example, if you’re integrating a tool like AdAmigo.ai, set up a specific system user for it.
Consider setting up IP whitelisting to limit account access to trusted networks or locations. This adds an extra layer of security, especially for teams working from consistent office environments. Additionally, configure session timeouts - 15 minutes for shared workstations and 30 minutes for personal devices.
Finally, schedule quarterly access audits. Set a recurring calendar reminder to review who has access to your account. During these audits, remove access for former employees or inactive contractors, and adjust roles as team responsibilities shift. Regular reviews help prevent unauthorized access and maintain account security.
How to Share Ad Account Access
When you're ready to grant access to your ad account, it's important to do so carefully to maintain security. Once your Business Manager is verified, which often requires completing advertiser identity verification, you can proceed based on whether you're adding individual team members or working with an external agency.
Adding Users in Business Manager
To add someone to your ad account, visit business.facebook.com and click the Settings icon (the cogwheel). Under Users, select People and then click Add people. Make sure to use their work email address - this keeps business and personal access separate and ensures accountability.
After entering the email, assign a Business Role. For most users, choose Basic access instead of Admin access. Admins have full control, including billing and user management, so limit this role to trusted individuals like business owners or senior managers.
Next, assign the appropriate ad account permissions. Click Ad accounts in the left-hand menu, select the account, and choose a role:
Analyst: For those who only need to view reports.
Advertiser: Ideal for team members managing campaigns.
Admin: Reserved for those overseeing everything.
Once you've selected the role, click Send request. The person will appear as "Pending" until they accept the invitation.
Ad Account Role | Access Level | Best For |
|---|---|---|
Admin | Full Control | Business owners and senior managers |
Advertiser | Campaign Management | Media buyers and creative teams |
Analyst | View-only | Stakeholders and data consultants |
This structured approach ensures that each user gets the right level of access. It also helps in maintaining cleaner ad account structures for better performance.
Sharing Access with Agencies or Partners
When working with an external agency, grant them access as a Partner. This allows the agency to manage their team members without requiring you to add individuals manually. Here’s how:
Open Business Settings and navigate to Accounts > Ad Accounts.
Select the ad account you want to share and click Assign partners.
Choose the Business ID option. The agency will need to provide their unique 15-digit Business ID, which they can find in their Business Info settings.
After entering the Business ID, assign the Manage campaigns role. This role lets the agency handle campaigns without giving them access to sensitive details like billing. Click Next to send the request. The agency will need to accept the invitation, after which they can add their own team members through their Business Manager.
Always use top tools for multi-account Meta ad management for controlled access - never share personal login credentials.
You can also use AI agents to monitor your ad accounts for unauthorized changes. Stay tuned for tips on monitoring and updating permissions in the following section.
Managing and Monitoring Permissions
Taking steps to secure your account is only the beginning. To maintain the integrity of your ad account, it’s essential to regularly review permissions and keep an eye on user activity. Neglecting this can leave your account vulnerable, especially if inactive users or outdated permissions linger.
Review and Update Permissions Regularly
Think of regular audits as a follow-up to your initial security setup. Make it a habit to check user permissions every three months. Simply go to Business Settings, head to Users > People, and examine each user's role. Ask yourself: Do they still need access? Is their current role appropriate?
Remove access for anyone who has left your company or agency.
Adjust permissions for team members with role changes. For instance, if someone moves from Analyst to Campaign Manager, update their role to Advertiser. If they’ve switched departments entirely, revoke their access.
Don’t forget third-party integrations and API connections. Rotate API keys every 90–180 days to reduce the risk of misuse or accidental exposure.
Once you’ve updated permissions, the next step is to keep a close watch on how they’re being used.
Monitor Account Activity
Meta provides a built-in activity log that tracks all changes to your ad account - like role updates, campaign edits, and budget adjustments. You can access this log under Business Settings > Activity history, where records are stored for 90 days. Make it a point to review this data weekly to catch anything unusual.
Keep an eye out for red flags, such as:
Changes made during odd hours.
Bulk edits by users who don’t typically handle those tasks.
Unapproved updates to budgets or targeting.
If you notice anything suspicious, act immediately. Revoke access, reset passwords, and use the Security Center to enforce two-factor authentication (2FA). You can also monitor active sessions and remotely end any logins from unfamiliar locations.
For extra security, set up automated budget guardrails. These can alert you or even pause campaigns if spending suddenly spikes, protecting your account from unauthorized changes or accidental overspending.
Using AdAmigo.ai for Ad Account Security
Managing ad account permissions manually is a good start, but it’s not enough to ensure complete security. When multiple team members or partners have access to your ad accounts, constant monitoring becomes essential. That’s where AdAmigo.ai steps in. As a Meta Business Technology Partner, it connects directly to your ad account via Meta's official API, providing automated, round-the-clock security that works alongside your existing permission settings.
How AdAmigo Protect Monitors Your Account
AdAmigo Protect serves as a safeguard for your Meta ad account by continuously tracking performance and activity. Its automated AI system is designed to identify and respond to potential threats - whether it’s an unexpected budget surge, delivery problems, or suspicious login behavior that could signal unauthorized access.
When issues arise, quick action is critical. AdAmigo Protect minimizes disruptions and helps maintain campaign performance. For example, its Automated Budget Protection feature can pause campaigns within just 15 minutes if it detects unusual spending patterns, cutting down on wasted ad spend. If a campaign is compromised, the Backup Campaign Deployment system steps in, preserving about 82% of your original ROAS and recovering in roughly one hour.
Additionally, you can set custom performance goals and budget limits. If these are exceeded - whether due to user error or unauthorized changes - the AI steps in to pause campaigns, preventing further losses. This feature is especially helpful when onboarding new team members or working with external partners unfamiliar with your account setup. By combining automation with your manual processes, AdAmigo adds an extra layer of protection.
Simplifying Permissions and Workflow with AdAmigo
AdAmigo doesn’t just secure your accounts - it also simplifies how you manage them. Instead of logging into Meta Business Manager for every task, the platform’s AI Chat Agent lets you use conversational commands like "Who adjusted the budget yesterday?" or "Pause campaigns spending over $500/day." This reduces the need for multiple users to have direct access, lowering the risk of errors or security breaches.
The platform also strengthens security with secure OAuth API connections, so you don’t need to share sensitive login credentials. You can assign specific API permissions - like ads_management for optimization or ads_read for performance tracking - and the AI operates within those limits. Prefer more control? Enable semi-autonomous mode to review and approve AI recommendations before they’re implemented.
For agencies managing several clients, AdAmigo’s centralized dashboard is a game-changer. It lets you enforce consistent security protocols and review permissions across all Meta ad accounts at once as part of a regular security audit, streamlining account management while keeping everything secure.
Wrapping Things Up
Managing Meta ad account access securely boils down to following a few smart steps. Use official Meta tools to avoid sharing personal logins, assign roles based on specific responsibilities, and add agencies as Partners using their Business ID instead of inviting individual employees. These measures help keep your workflow organized and your account secure.
But remember, security isn’t something you set and forget - it’s an ongoing process. Make it a habit to review user permissions every quarter to ensure they align with current roles. Check API integrations monthly, and if someone’s role changes or a partnership ends, promptly revoke their access to prevent permission errors. Keeping a detailed log of permission changes can also help maintain accountability.
For an extra layer of security, consider automating parts of this process. While manual checks are important, tools like AdAmigo.ai can add another level of protection. It monitors your account for unusual spending or activity and provides a centralized dashboard for agencies to easily manage permissions across multiple client accounts. Plus, its AI Chat Agent helps streamline task management, reducing the need for direct access and minimizing risks.
FAQs
Which access role should I assign someone?
The type of access role assigned should align with a person's specific responsibilities:
Admin: Grants complete control, covering user management, billing, and settings. This role suits senior team members who oversee the broader operations.
Advertiser: Allows the creation and management of campaigns but excludes access to billing details and user permissions. This is a good fit for campaign managers.
Analyst: Provides view-only access to monitor reports and performance metrics without the ability to edit campaigns or handle sensitive data.
Choose roles carefully to maintain security and ensure individuals have access only to what they need.
How do I give an agency access without sharing billing?
To safely provide an agency access to your Meta ad account without exposing billing information, you can use Meta Business Suite to manage permissions effectively.
Navigate to Business Settings and select "People."
Click "Add" to invite agency team members, then assign roles such as "Advertiser" or "Employee." These roles enable them to manage campaigns while restricting access to billing details.
Make sure not to assign Admin roles to ensure you keep control over sensitive billing information.
What should I do if I see suspicious changes or spend spikes?
If you spot unusual changes or unexpected spending increases in your ad account, it’s crucial to act fast. Start by checking your activity logs for any unauthorized actions. To protect your account, enable Two-Factor Authentication (2FA) and keep an eye on user access and login activity. For added security, conduct a thorough review of your account settings, make necessary updates, and reach out to Meta Support for assistance if needed. Tools like AdAmigo.ai can also be useful for keeping tabs on your account’s health and avoiding similar issues down the line.