
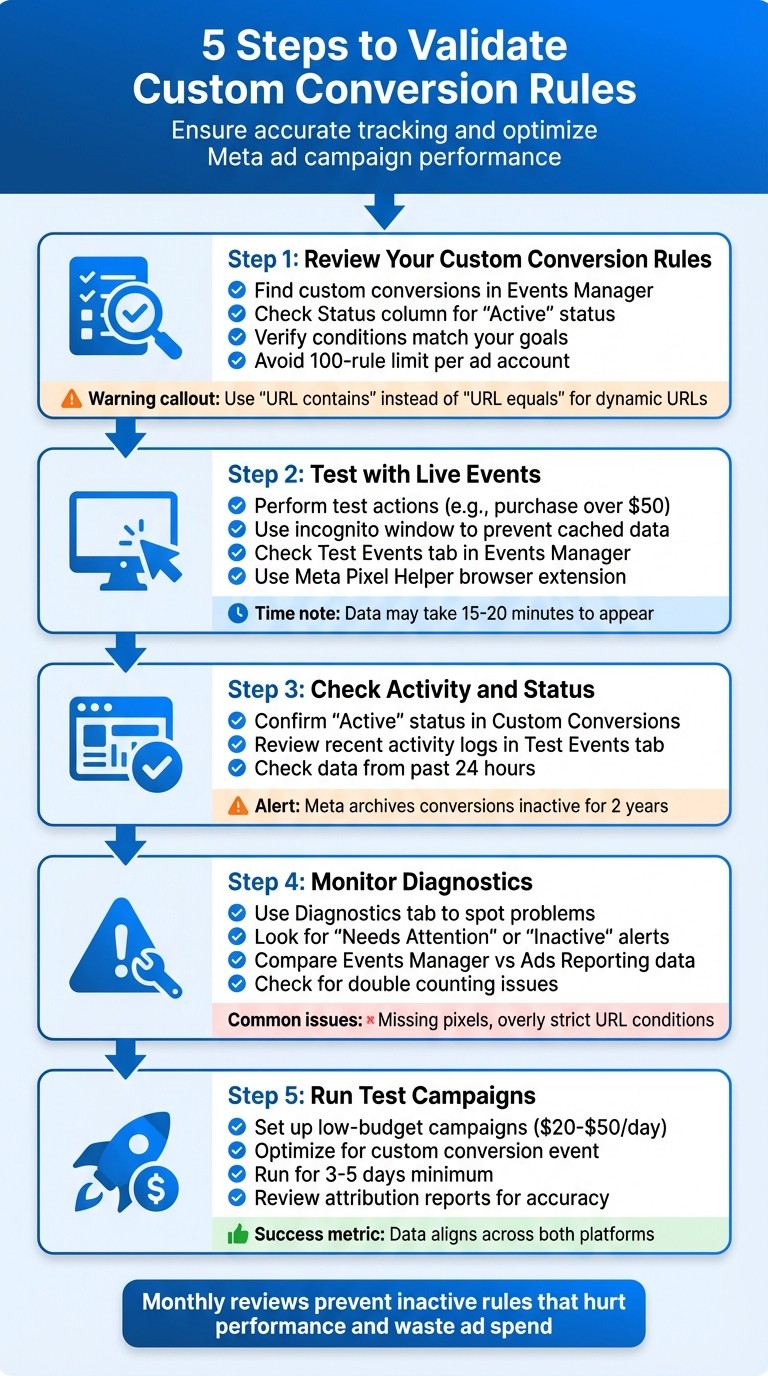
5 Steps to Validate Custom Conversion Rules
Five practical steps to test and fix Meta custom conversion rules, verify Pixel and CAPI events, and stop duplicate or inactive tracking.
Validating custom conversion rules ensures your Meta ad campaigns track the right actions, like purchases over $50 or sign-ups. Without proper validation, ad spend may be wasted, and metrics like ROAS and CPA can become unreliable. Here's a quick breakdown of the steps:
Review Your Rules: Ensure custom conversion conditions match your goals in Meta's Events Manager.
Test with Live Actions: Simulate user actions to confirm events fire correctly and troubleshoot potential tracking errors.
Check Activity: Confirm rules are active and receiving data in Events Manager.
Fix Issues: Use diagnostics tools to spot and resolve tracking discrepancies.
A/B Test Conversion Rules: Launch small-budget campaigns to verify performance.
5-Step Process to Validate Meta Custom Conversion Rules
How to Check Meta Pixel & Conversion API Event Health (🔥Fast & Easy🔥)
Step 1: Review Your Custom Conversion Rules
Start by making sure your custom conversions are set up to track the actions you care about. This ensures the rules are working as intended.
Find Custom Conversions in Events Manager
To locate your custom conversions, head to Meta Ads Manager, click the menu (≡), and choose Events Manager under "Measure & Report." Once there, go to the Custom Conversions tab on the left-hand sidebar. This is where all your custom conversion rules are stored.
You'll see a list of your custom conversions, each showing details like the rule name, status, and last active date. Pay close attention to the Status column. If it says "Active", it means data is being received. However, If you see "Inactive" or "No Recent Activity", that's a problem that requires you to debug your conversion tracking. It could mean the rule isn’t triggering properly or has been archived due to inactivity.
Once you've confirmed the rules are active, double-check that their conditions are aligned with your tracking goals.
Check That Rule Conditions Match Your Goals
Click on each custom conversion to review its details. You'll find the event it tracks (like Purchase or Lead) and the conditions tied to it, such as URL rules or parameters. For example, a Purchase event might filter for transactions over $50, while a sign-up rule might use "URL contains" for pages like "/thank-you."
"Custom conversions allow you to track specific actions users take on your website - like purchases, sign-ups, or page views - so you can measure what's really driving value for your brand or client." - Kyra Richards, Motion Help Center
Make sure your URL filters are precise. One common misstep is using "URL equals" instead of "URL contains", which can be problematic if your URLs include dynamic elements like UTM tags or session IDs. Also, check that you haven’t hit the 100-rule limit for custom conversions per ad account. If you're nearing the cap, consider archiving older, unused rules to free up space for new ones. For a broader look at your setup, follow this Meta ads conversion checklist.
Step 2: Test Custom Conversion Rules with Live Events
Once you've reviewed your custom conversion setup, it's time to trigger real user actions to test if the rules are firing properly. This hands-on approach ensures that your pixel or Conversions API is accurately capturing the events you need. Think of this as moving from theory to practice - validating your setup in actual conditions.
Perform Test Actions to Generate Data
Start by navigating to the page or completing the action tied to your conversion rule. For instance, this could mean simulating a test purchase above $50 or visiting a specific page like /confirmation to mimic the user journey.
Use an incognito window to prevent cached data from interfering with your results. After completing the action, head over to the Test Events tab in Events Manager to check if the event appears along with its parameters for real-time conversion tracking. These details are vital for improving your Event Match Quality (EMQ) score, which helps Meta accurately connect conversions to users. If you don’t see the event right away, don’t panic - data might take 15–20 minutes to show up in the Overview tab, even if tracking is working.
Double-check that the event triggers only on the confirmation page. If it fires elsewhere, it could inflate your conversion counts, throwing off your ROAS calculations.
Troubleshoot with Meta Pixel Helper
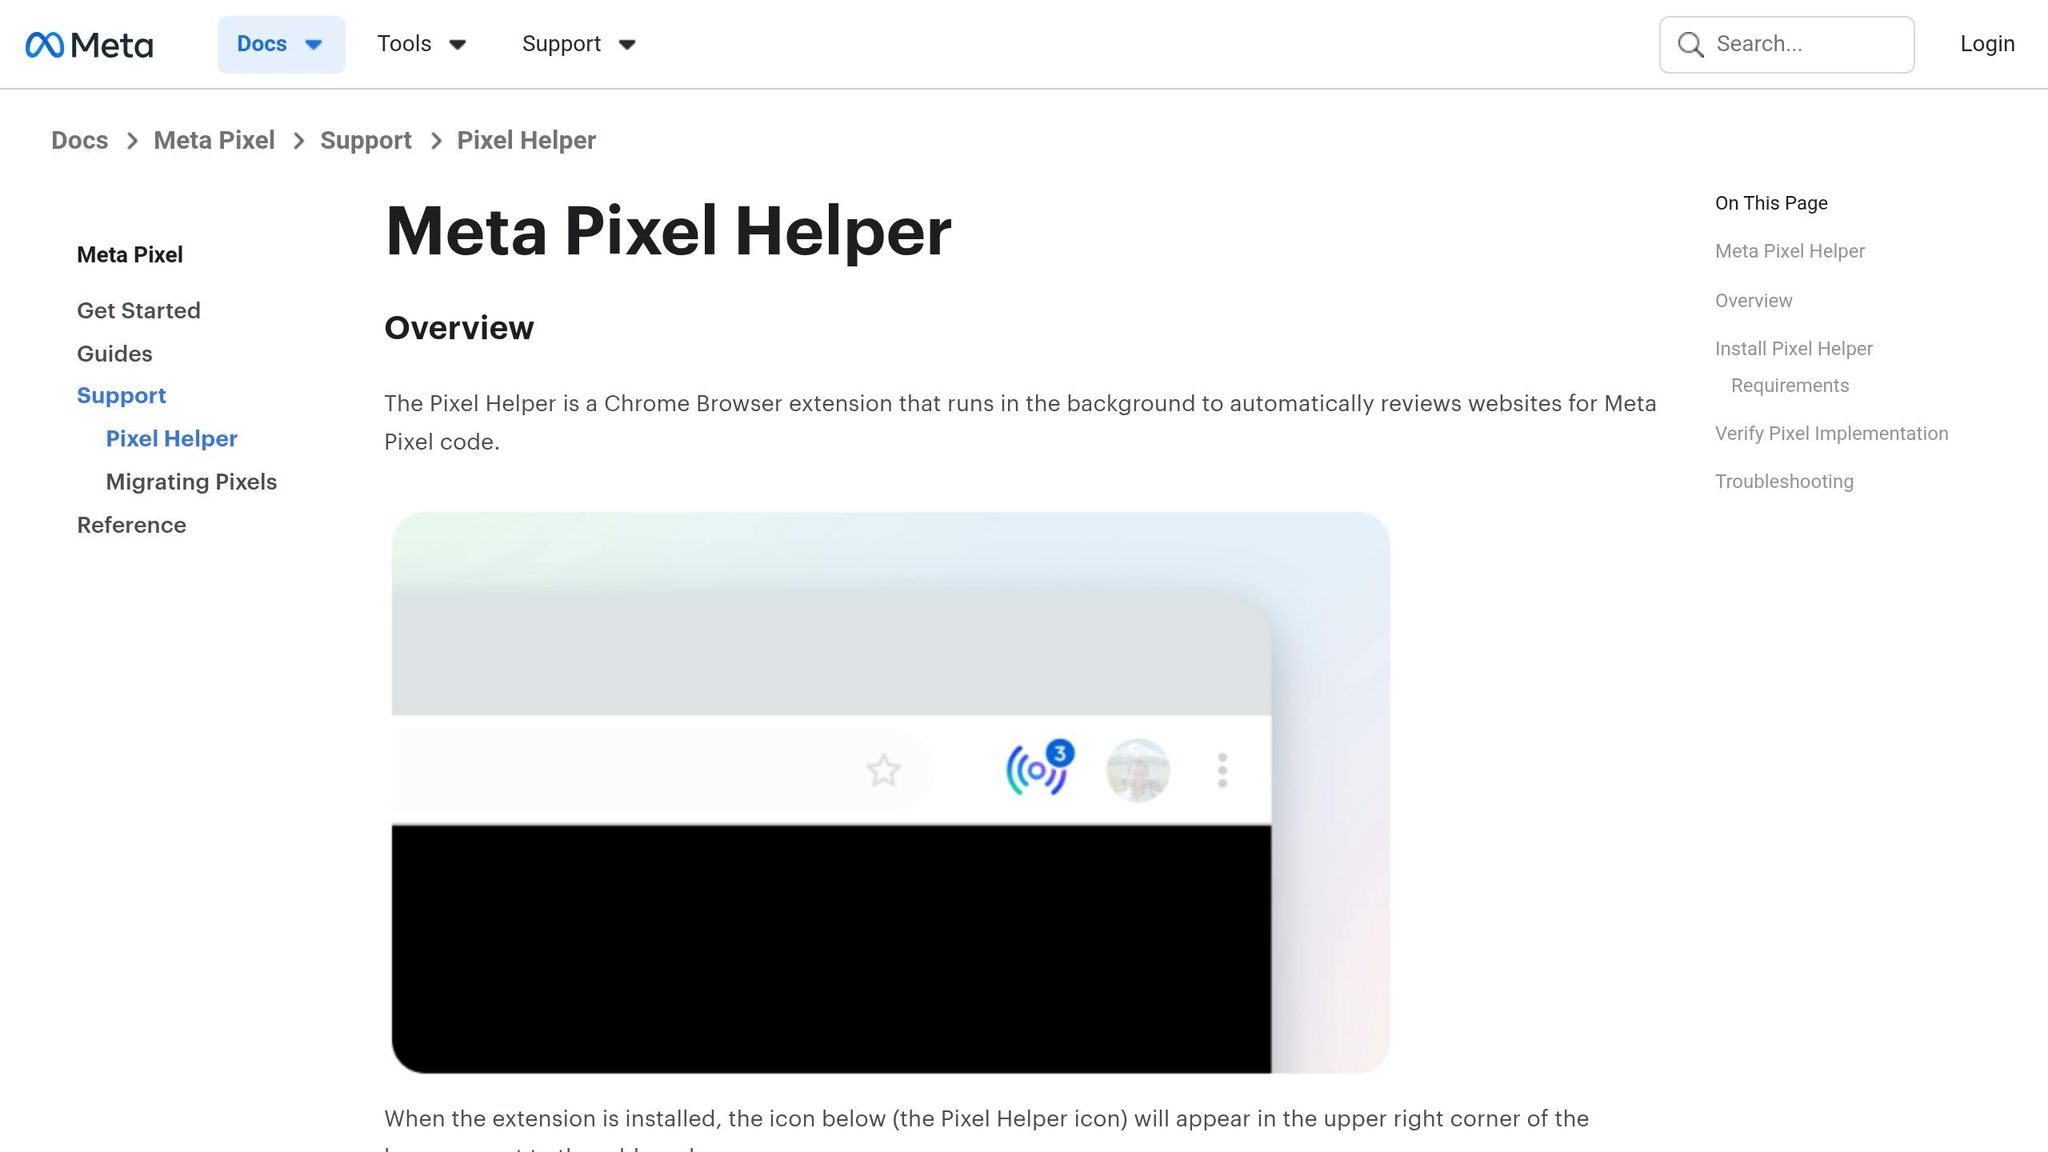
The Meta Pixel Helper browser extension is your go-to tool for spotting issues like Meta Ads anomalies. It shows fired events, sent parameters, and errors. Pay attention to warnings like "No Pixel Found" or "Duplicate Event", as these flag setup problems.
When using the Conversions API alongside the pixel, the Test Events tool will also display server-side events. This is especially useful for bypassing browser restrictions. Confirm that parameters like purchase value and currency are formatted correctly - Meta expects values like $100.00 for US dollars and dates in the MM/DD/YYYY format to ensure ROAS is calculated properly.
If a custom conversion appears as "Inactive" after testing, check that your URL rule matches the page you visited. A common mistake is using "URL equals" when the actual URL includes UTM tags or session IDs, which prevent a match. To fix this, switch to "URL contains" and only use the static part of the URL path.
Step 3: Check Activity and Status in Events Manager
After completing your live test actions in Step 2, it's time to confirm that your custom conversion rule is receiving data in Events Manager. To do this, go to the left sidebar and select Custom Conversions. This will show you if Meta is registering matches in real time.
Confirm 'Active' Status
In the Status column next to your custom conversion rule, look for the word Active. This means the rule has successfully fired at least once, and Meta is capturing matches. If it still says "Inactive", the rule hasn’t been triggered yet, even if you’ve already performed the test action. Try refreshing the page - sometimes the status takes a moment to update.
If the Custom Conversions page appears entirely blank, it’s possible that your tracking was set up as a custom event instead of a custom conversion. In that case, you’ll need to review how to map events to conversion goals. Additionally, check the recent activity logs for more confirmation.
Review Recent Activity Logs
Navigate to the Test Events tab under your pixel in the Data Sources section to see real-time activity from the past 24 hours. When you trigger a test conversion, you should see the event appear here, along with details like purchase value or the page URL. If you need to track more complex scenarios, you can also combine multiple tracking rules to increase accuracy.
If no events show up, make sure to disable any ad blockers and try opening the Test Events tab in a separate browser window. Keep in mind that Meta automatically archives custom conversions that remain inactive or fail to receive data for two years, so it’s a good idea to monitor this regularly.
Step 4: Monitor Diagnostics and Fix Discrepancies
Once your custom conversion is live and collecting data, it's important to ensure that everything is functioning as expected. Even with correctly configured rules, issues like mismatched totals or warning messages can pop up. Catching these problems early is crucial to avoid wasting ad spend on campaigns that rely on inaccurate data. This step ties back to your initial testing to confirm that events are firing properly.
Use the Diagnostics Tab to Spot Problems
In Events Manager, the Diagnostics tab is your go-to for identifying potential tracking issues. Look for status alerts such as Needs Attention or Inactive - these often signal problems like missing pixels or overly strict URL conditions by following Meta API integration best practices. For example:
A Needs Attention alert might point to errors like a missing pixel or a rule that's too restrictive.
If you see No recent conversions, it means the rule hasn’t triggered in the past seven days. This could suggest that your conversion page isn’t being visited or that there’s an issue with the rule’s logic.
Keep in mind that test data in the Event Testing tab is only available for 24 hours. Make sure to review it shortly after completing your tests.
Once you've reviewed diagnostics, cross-check your findings with other reporting tools to confirm accuracy. This is especially important when you integrate Meta Ads with analytics tools like GA4 to ensure data consistency.
Compare Data Between Events Manager and Ads Reporting
To ensure consistency, compare conversion data from Events Manager with the numbers in Ads Manager for the same time frame. If the figures don’t align, you might be dealing with double counting caused by multiple tracking methods. To resolve this, verify that only one tracking method has the Include in Conversions toggle activated for each specific action.
Also, check your Conversions list for alerts like Unverified or No recent conversions:
Unverified suggests the tag hasn’t fired recently or might be set up incorrectly.
No recent conversions means the tag is installed but isn’t triggering when users complete the desired action.
Finally, keep in mind that discrepancies can also arise from using different attribution models, such as Last Click versus Data-Driven. Make sure you're comparing performance using the same attribution model in both tools.
Step 5: Run Test Campaigns to Validate Performance
To ensure everything works as intended, it's time to test your setup in live campaigns. This step confirms that data flows smoothly from Events Manager to Ads Manager and that your custom conversion rules are ready for effective optimization.
Set Up Low-Budget Test Campaigns
Start by creating a new campaign in Ads Manager and optimizing it for your custom conversion. Allocate a daily budget of $20–$50 - enough to gather initial insights without taking on too much risk. When setting up the ad set, make sure to choose your custom conversion as the optimization event. This helps Meta's algorithm focus on users most likely to take the desired action.
Let the campaign run for at least three to five days to gather enough data for meaningful insights. If you're targeting a high-value or less common action, you might need to extend the test duration or slightly increase the budget to collect sufficient data. Keep an eye on the Results column in Ads Manager, which will show the number of conversions tracked.
Review Attribution Reports for Accuracy
Once your test campaign has run its course, it's time to dive into the attribution reports. Compare the conversion data in Ads Manager and Events Manager to ensure everything matches up. Use the Customize Columns feature in Ads Manager to display your custom conversion data and verify consistency between platforms.
If you notice discrepancies, check for potential issues. For instance, importing the same conversion from multiple sources - like GA4 and the Meta Pixel - while having Include in Conversions enabled for both can inflate your return on ad spend (ROAS). Also, confirm that both platforms are using the same attribution model. Differences between models like Last Click and Data-Driven attribution can lead to mismatches that might seem like errors but are simply reporting variations.
Once the data aligns across both platforms and shows consistent results, you’ll know your custom conversion is ready. At this point, you can confidently scale your budget and use the same setup for larger campaigns.
Conclusion
Following these five steps lays the groundwork for consistently improving your Meta ad campaigns. Validating your custom conversion rules isn’t something you do just once - it’s an ongoing process that ensures your ads perform at their best. This practice helps Meta’s algorithm focus on the right audience, keeps your tracking accurate, and ensures your budget is spent on actions that truly grow your business.
Monthly reviews are crucial to avoid inactive rules that can hurt your performance. If your ad sets rely on inactive custom conversions, they’re likely to perform poorly because of mismatched data. Regularly checking the status of your conversions in Events Manager can save you from expensive mistakes. For advanced optimization, consider AI-powered retargeting to re-engage users who have already interacted with your brand.
When your validation process is solid, Meta’s algorithm gets the precise data it needs to find high-value users. For example, instead of optimizing for just any purchase, you could target purchases over $50. This approach not only lowers your cost per acquisition but also boosts your return on ad spend.
FAQs
Why is my custom conversion still inactive after testing it?
If your custom conversion isn’t working, it’s likely due to misconfiguration or a triggering issue. Double-check that your conversion rules align perfectly - this includes specifics like URL or event conditions - and ensure the pixel is firing as intended. Once you’ve tested everything, head to the Events Manager to confirm the status changes to "Active." Problems often stem from mismatched URL rules, a pixel that isn’t firing, or the conversion not being triggered during testing.
Should I use URL equals or URL contains for my rule?
When creating custom conversion rules, opt for URL contains rather than URL equals. The URL contains option is more adaptable, as it matches URLs based on specific keywords or paths, even if they include dynamic parameters or slight variations. On the other hand, URL equals is much more rigid, only triggering when the URL perfectly matches the specified string, which can restrict how well your rule works.
How do I stop double-counting conversions in Meta?
To avoid double-counting conversions in Meta, it's crucial to set up custom conversion rules with precision. Focus on capturing unique actions by using specific URL rules or event filters. This ensures that each conversion is recorded only once.
Make sure your rules don’t overlap, as overlapping can lead to the same action being counted multiple times. For more detailed testing, tools like AdAmigo.ai suggest systematically testing your conversion rules to spot and fix any double-counting problems.